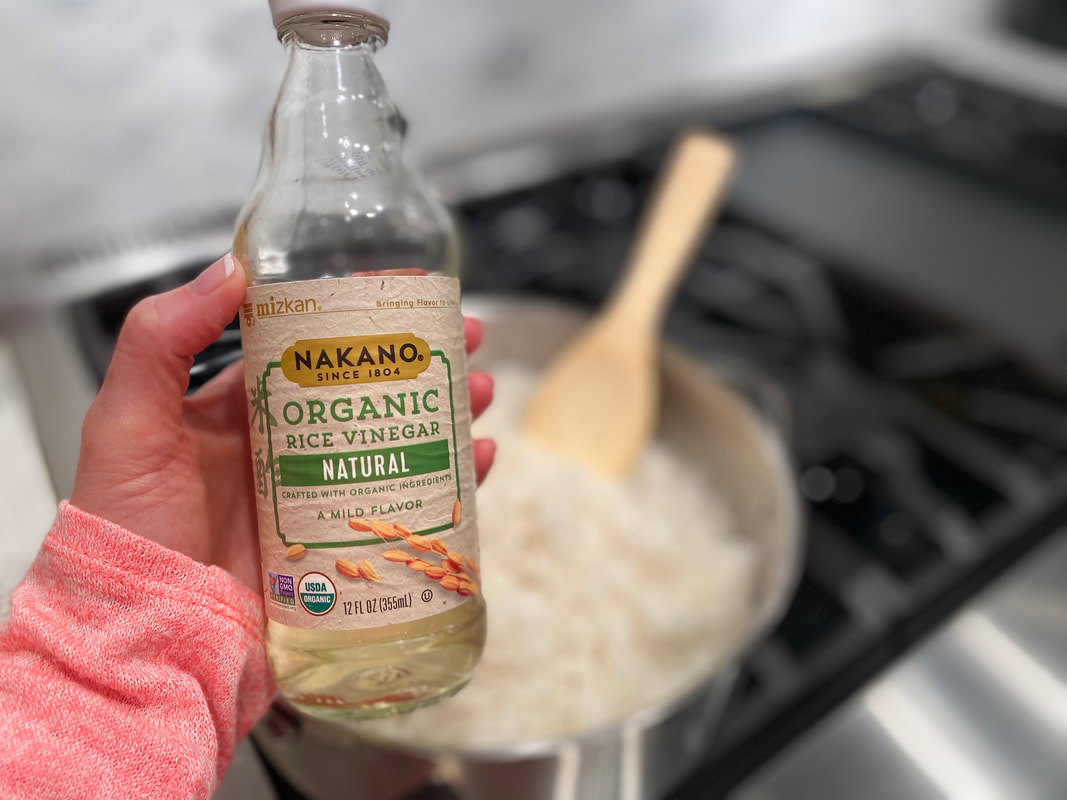
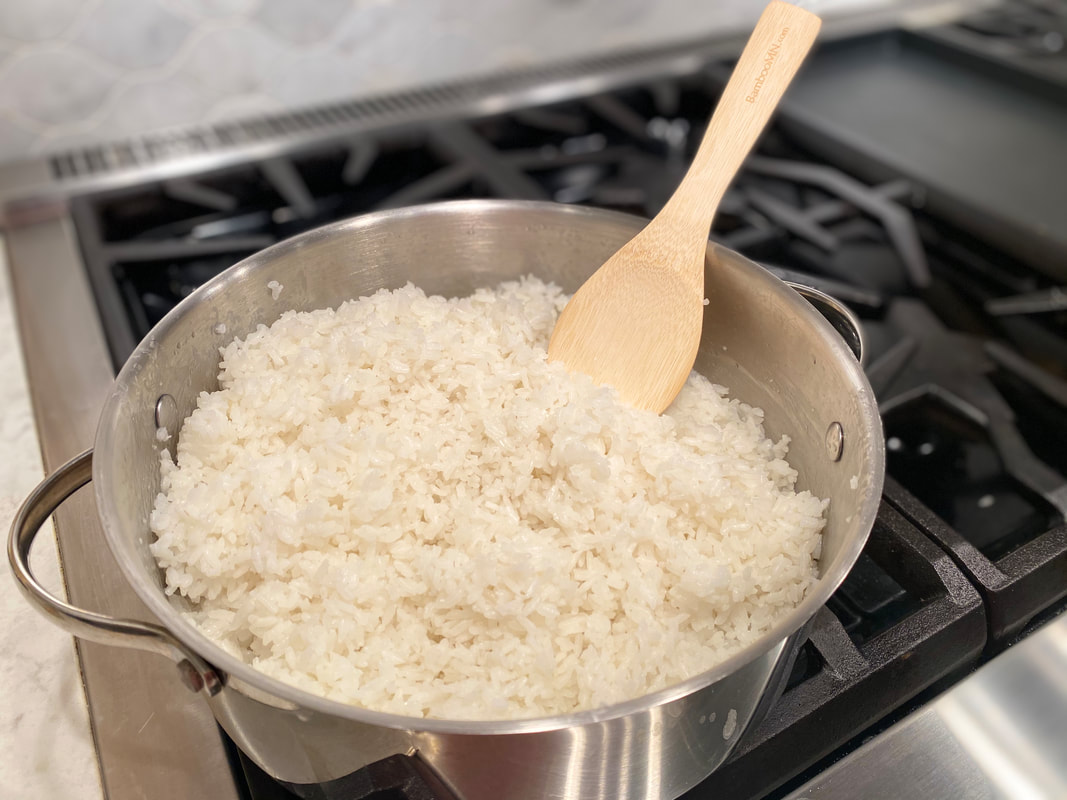
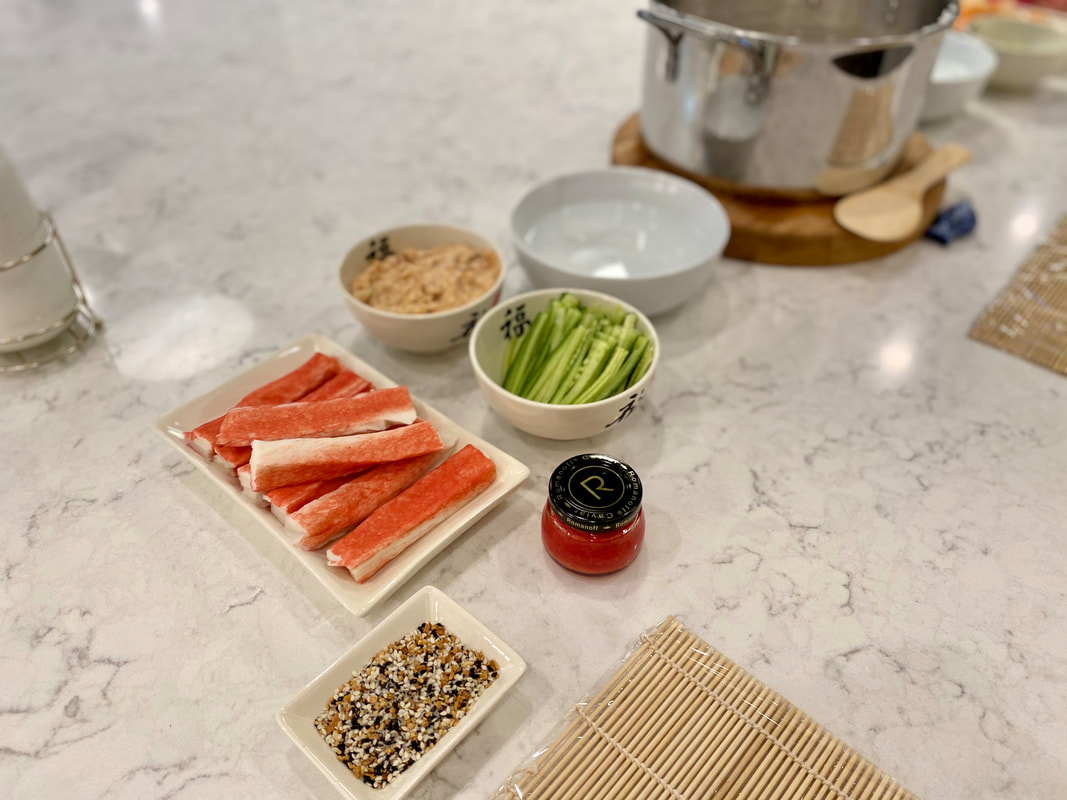
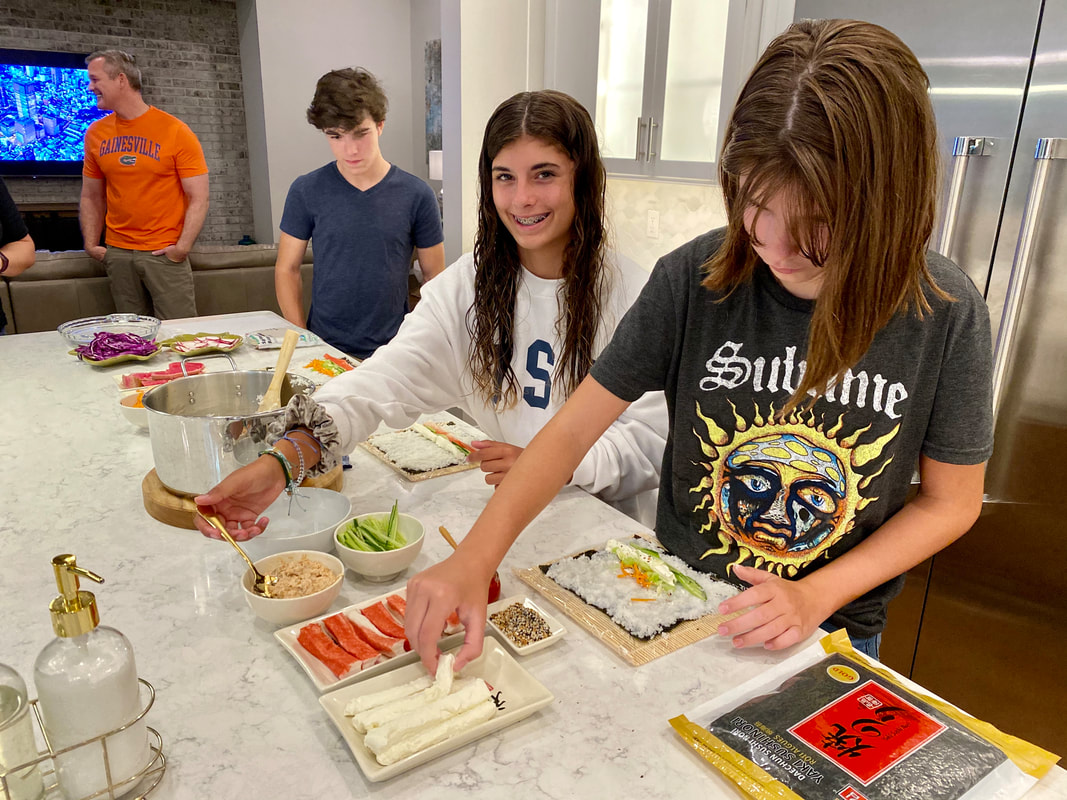
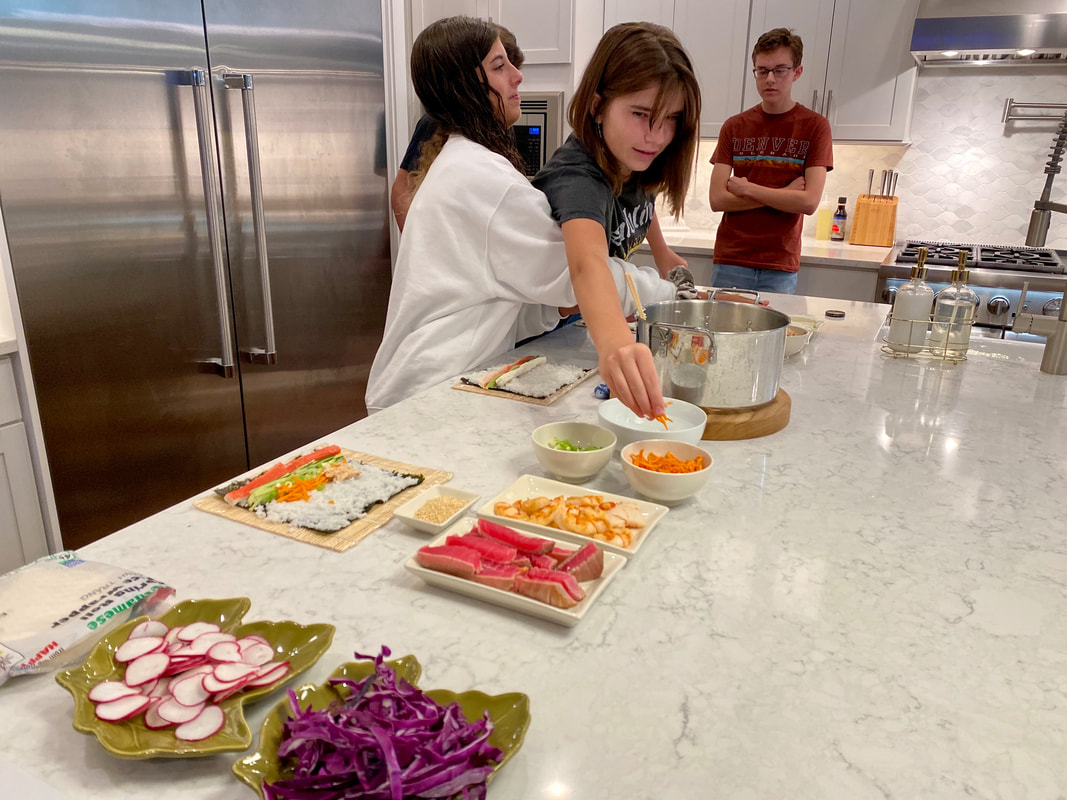
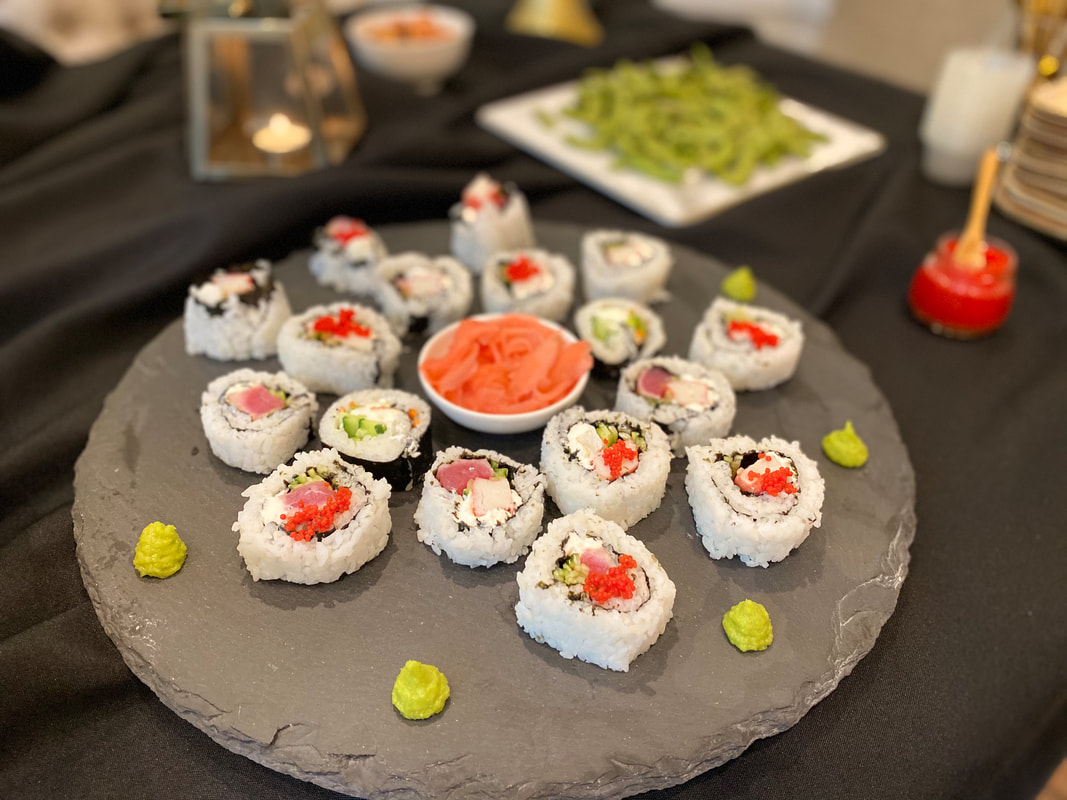
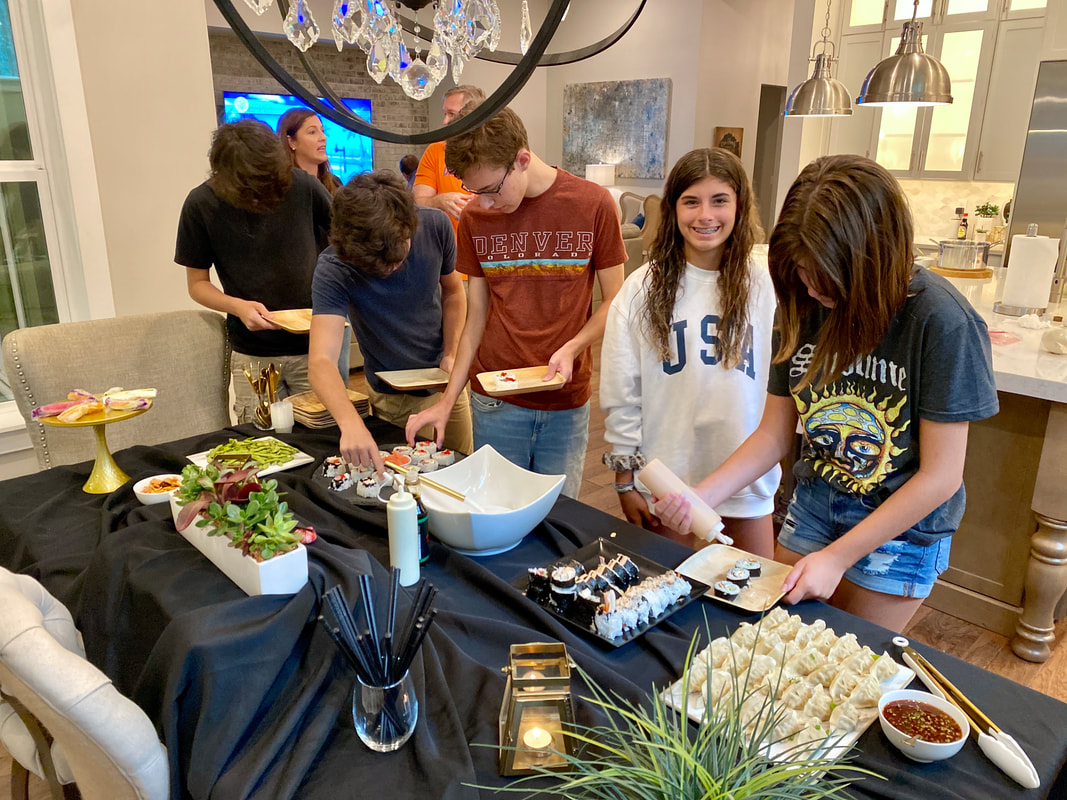
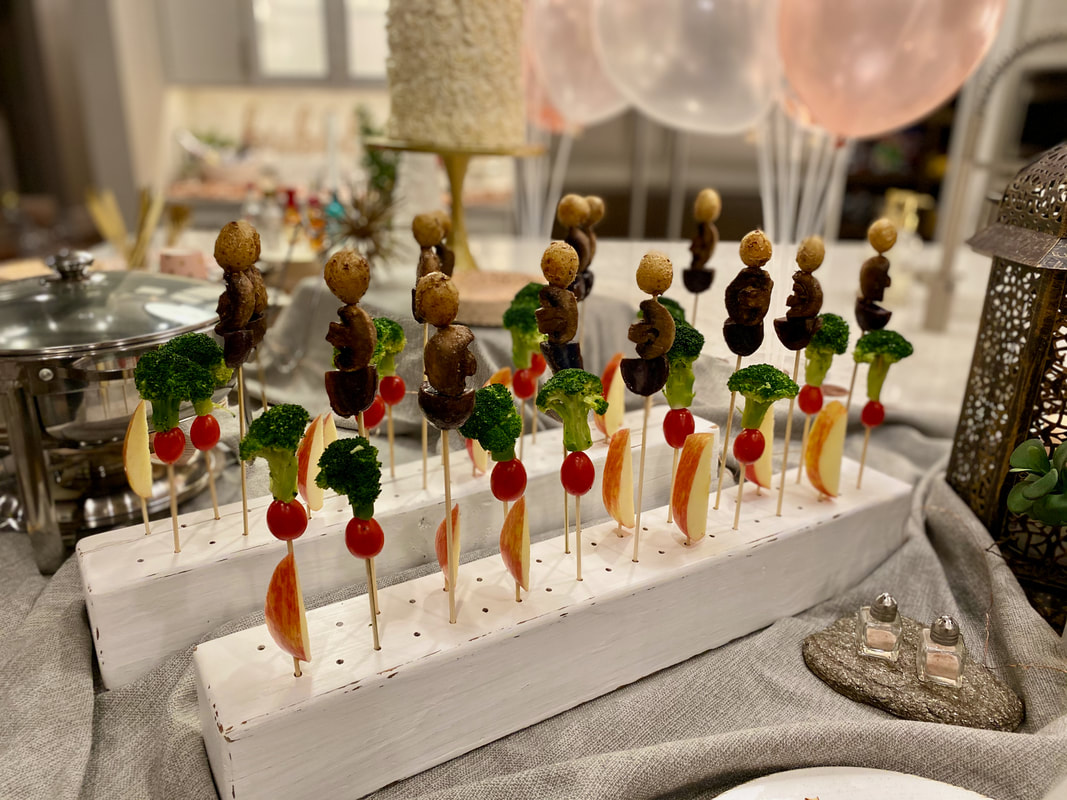
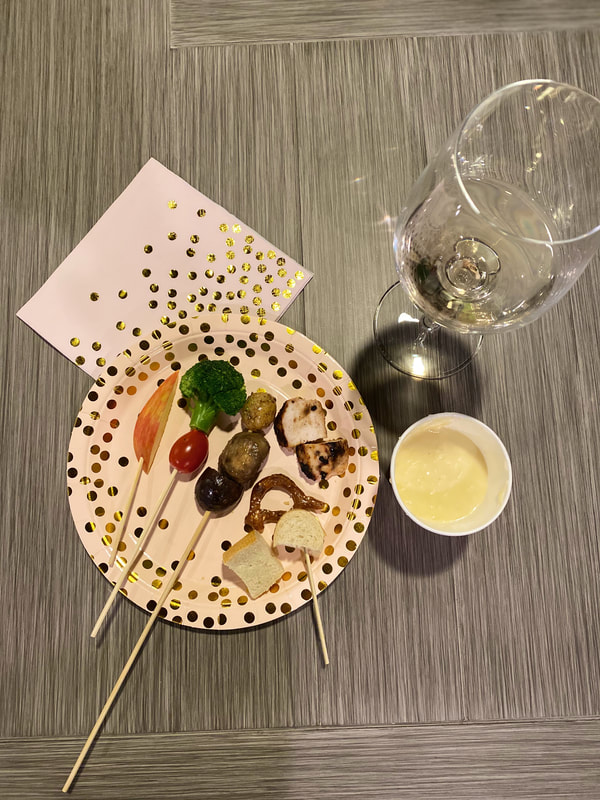
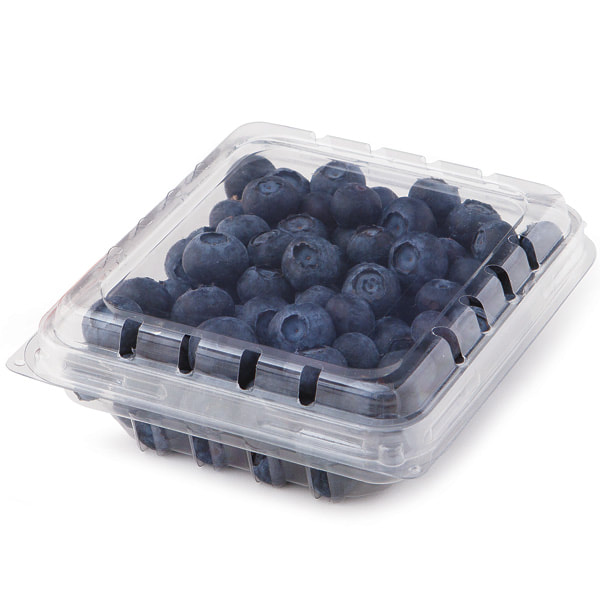
 Have you ever made sushi at home? It's a lot of fun, the entire family can get involved, and it's easier than you think! Here's what you need: Sushi Rice Rice Wine Vinegar Nori Seaweed Sheets Bamboo Sushi Mat Plastic Wrap Bowl of Water Sharp Knife Filling Ideas Crab Sticks Tuna Shrimp Cucumber, julienne Carrots, jullienne (or pre-cut matchsticks) Avocado, thinly sliced Cream Cheese Asparagus Topping Ideas Soy Sauce Shrimp Sauce *Make the shrimp sauce. You'll love my recipe and it's way better than anything you can buy in the store. Fish Roe Sesame Seeds Pickled Ginger Wasabi Paste 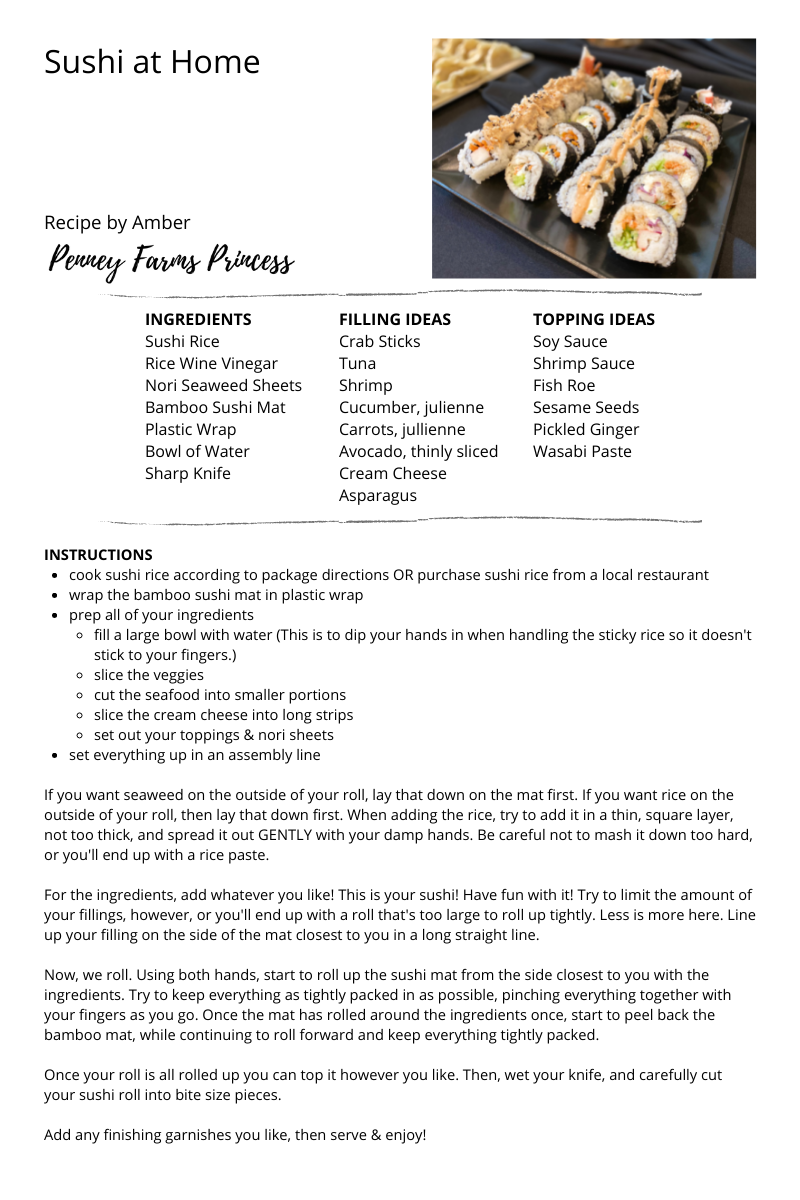
0 Comments

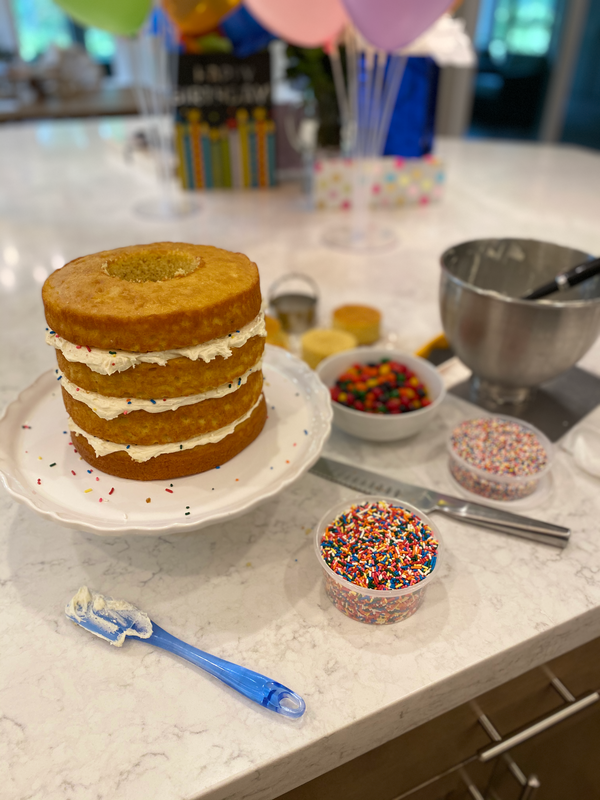
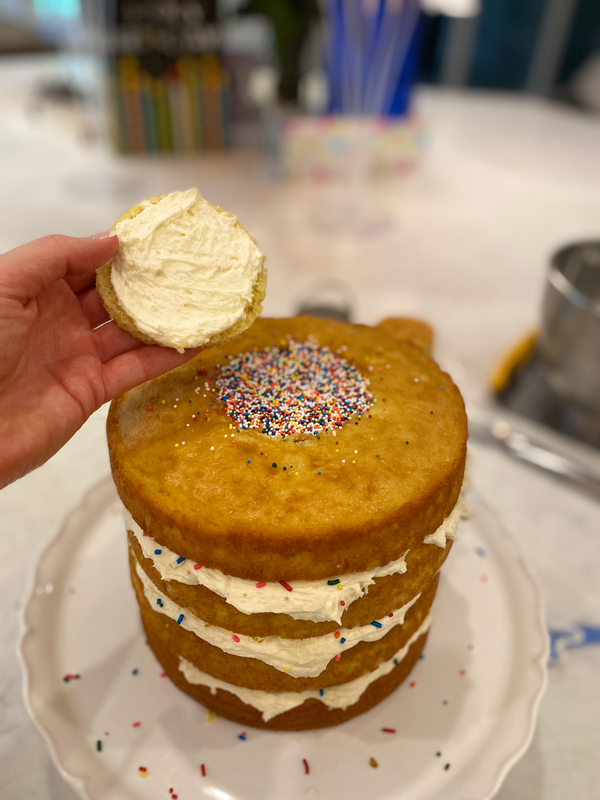
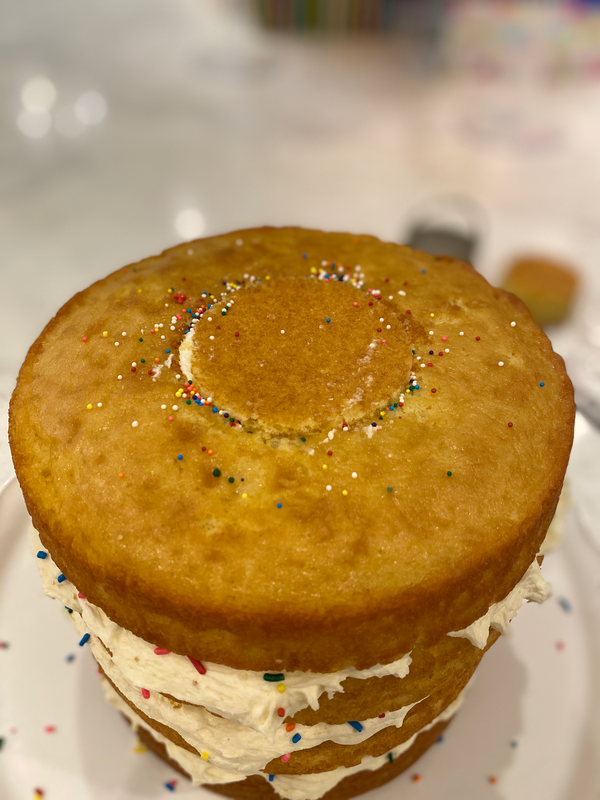
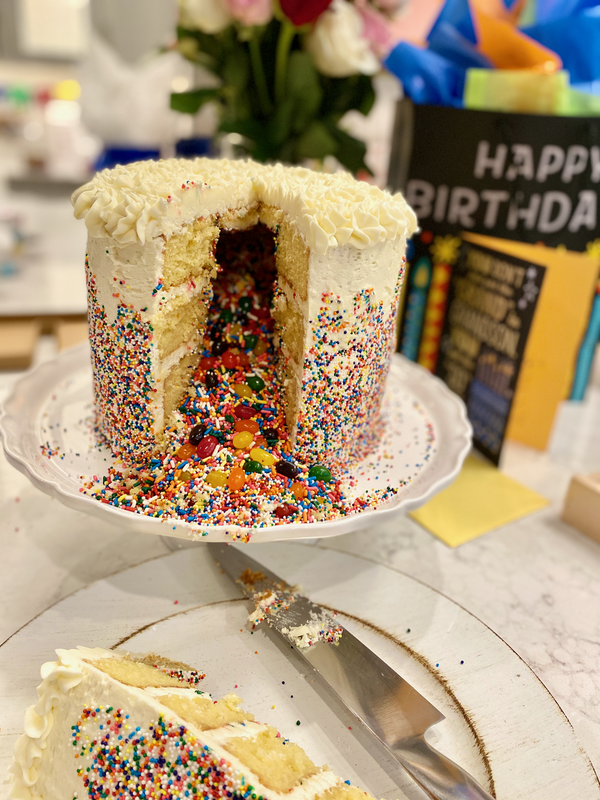
 For my son's 17th birthday, I decided to make him a confetti cake. Honestly, it's a lot easier than it looks y'all.
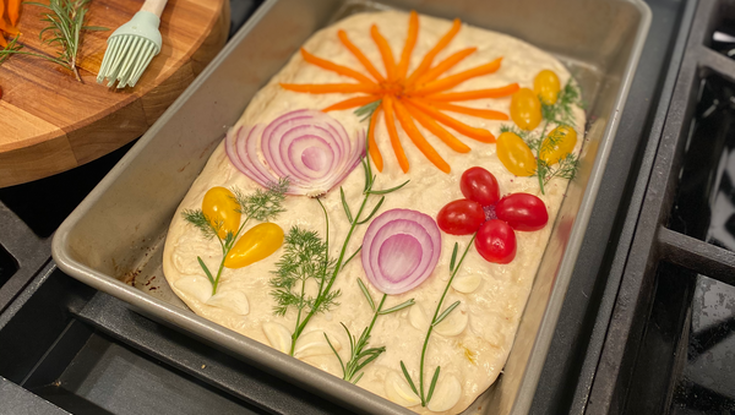 Try this one with your kiddos! Prepared pizza dough makes this quick, easy, and so much fun to create. This was a fun idea from my sister-in-law to keep my mind occupied away from the heaviness of Mother’s Day. It was a delicious snack with a glass of vino too! 😉 To create my easy focaccia garden I used:
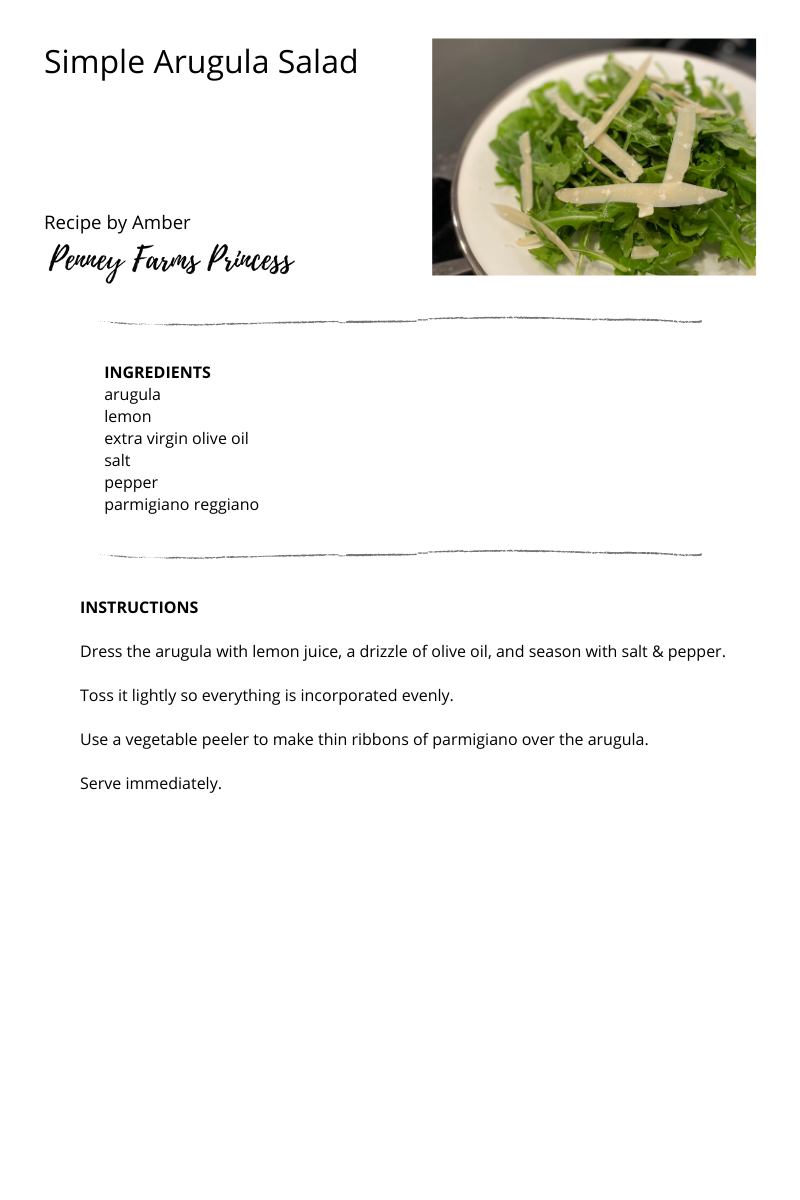
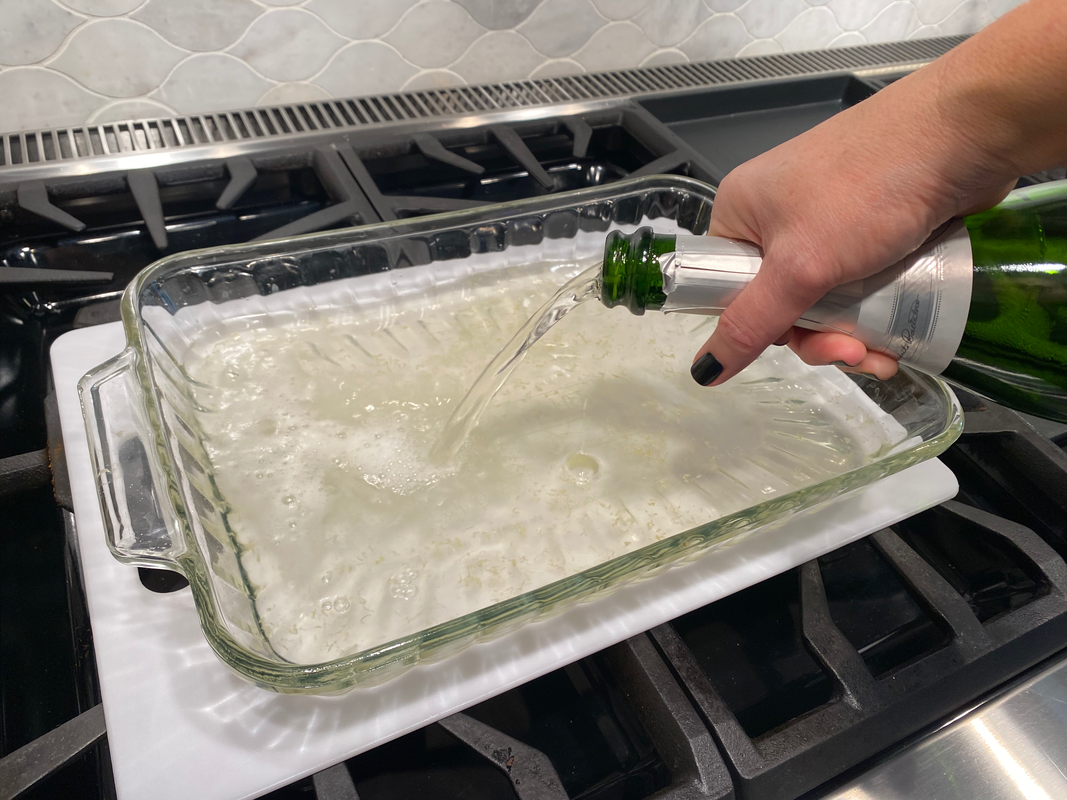
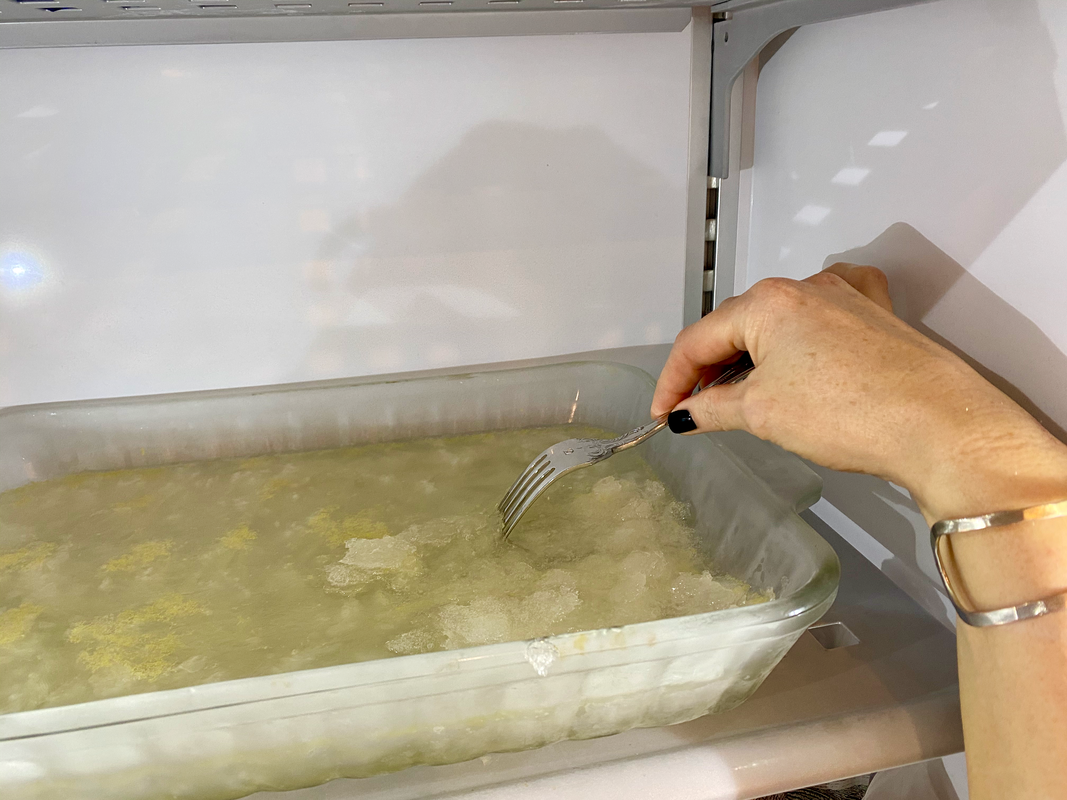
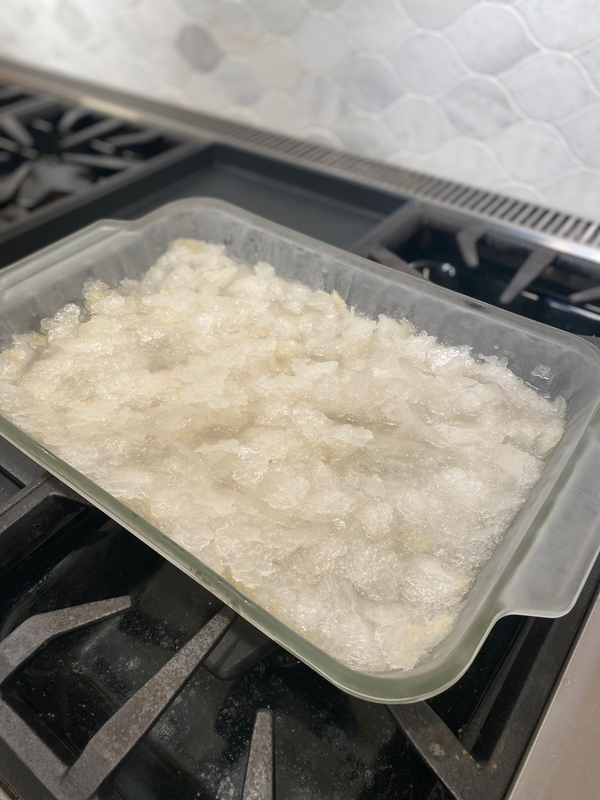
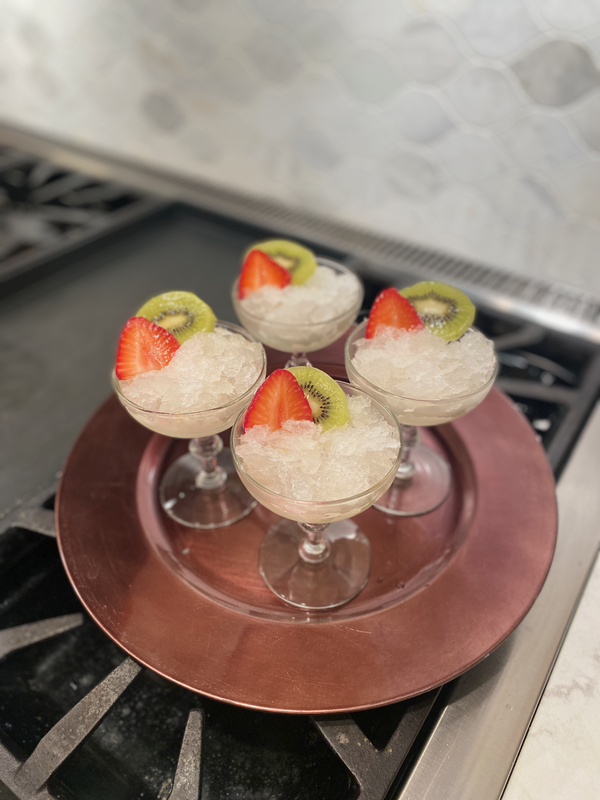
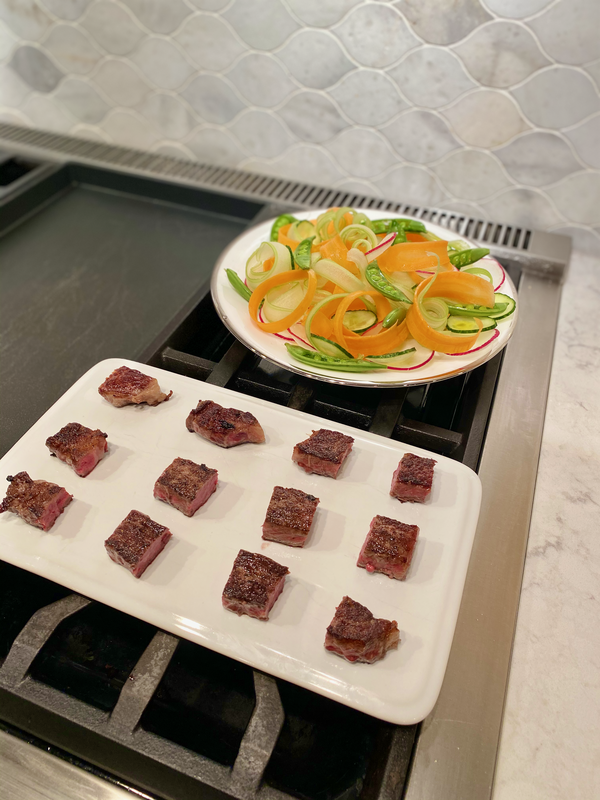
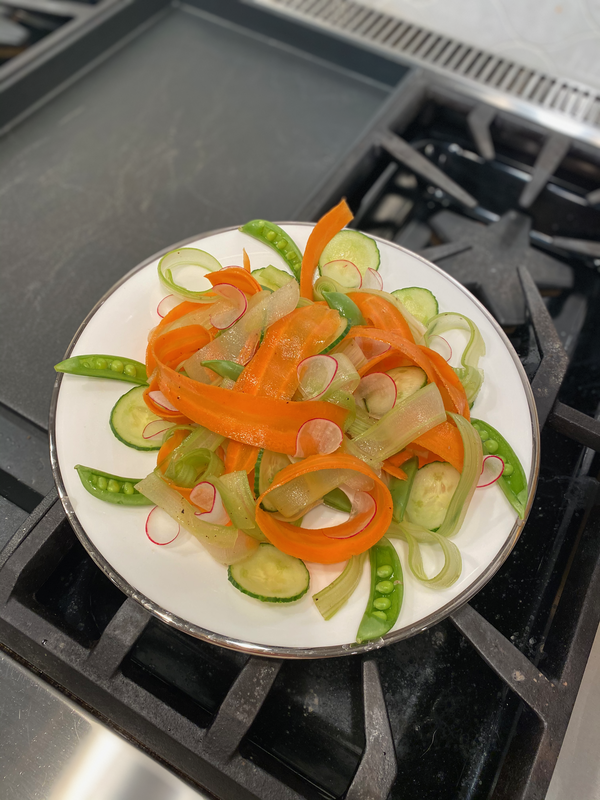
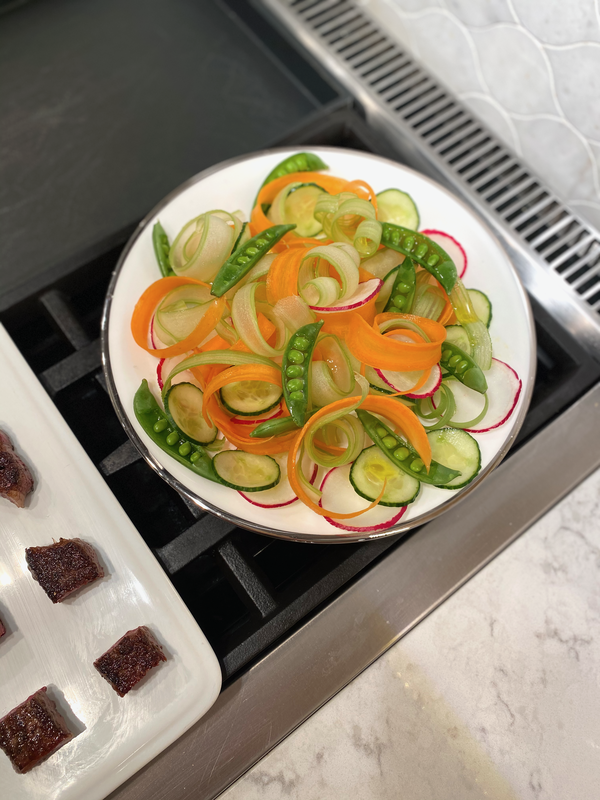
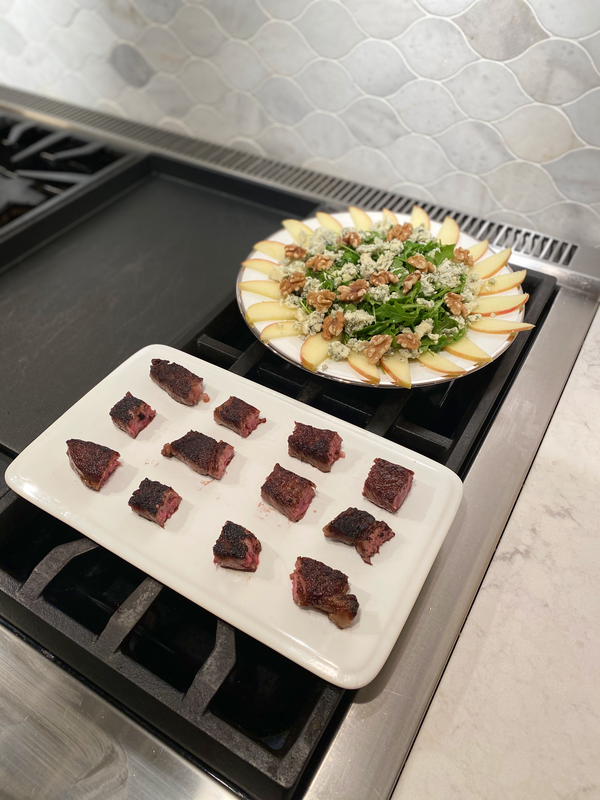
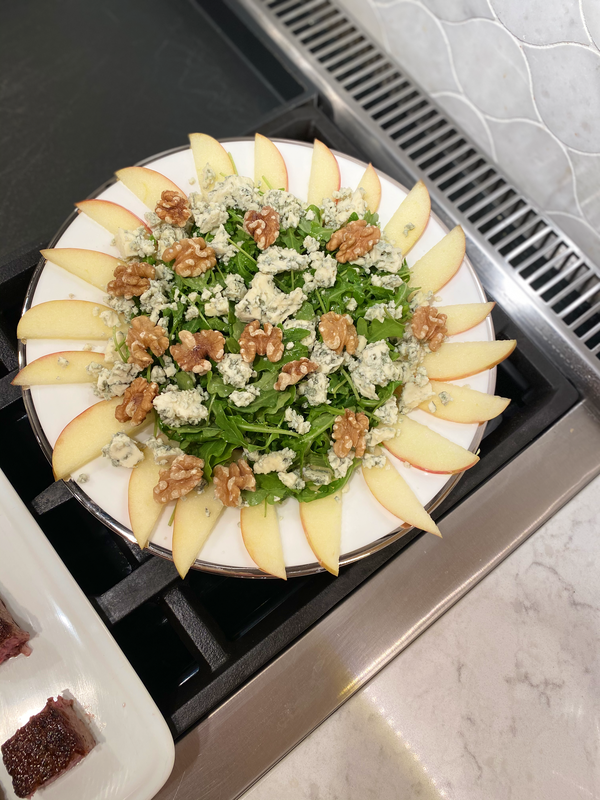
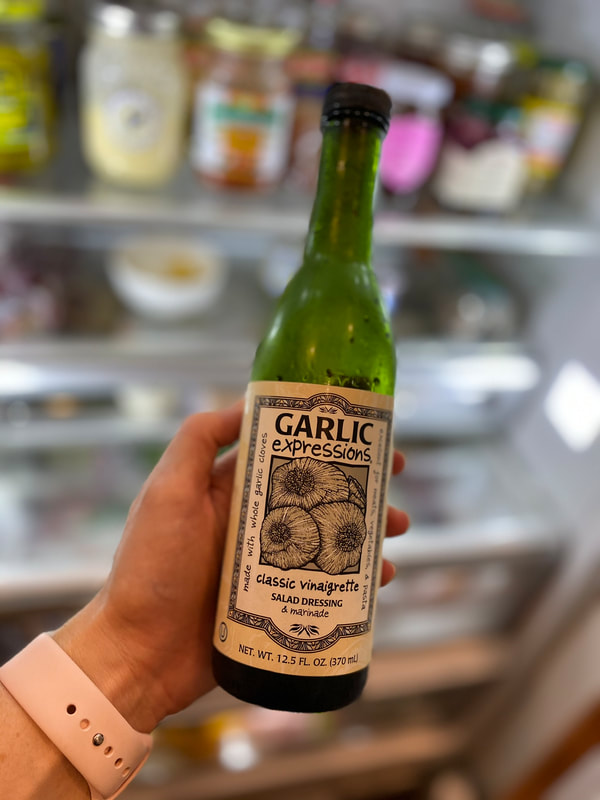
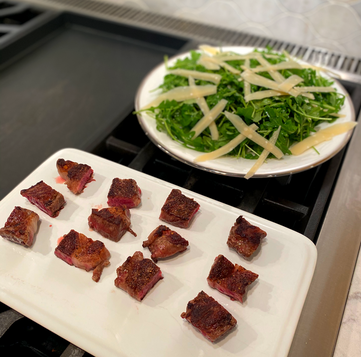
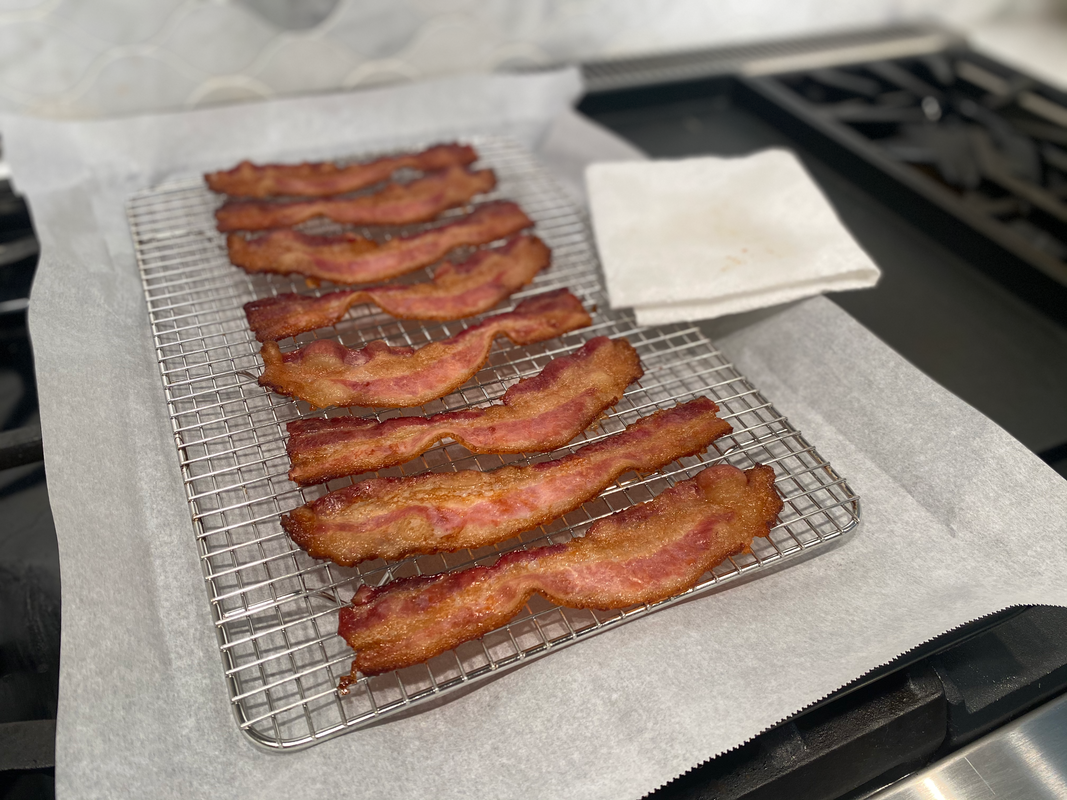
  Champagne Granita... one of my favorite ways to end a meal. It's the perfect dessert at the end of a nice meal. It's sweet, but not too sweet. It's light, and not heavy on your tummy. And it's beautiful. I've also made this with strawberries and grapefruit instead of lemon, but they're all delicious. Peach would also be really refreshing, like a bellini slushy!  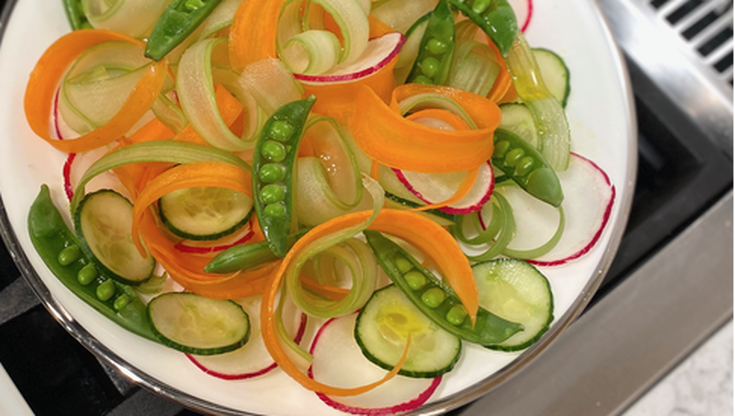 I watched the one and only Chef Thomas Keller make his famous Avocado Louis on Instagram, and let me tell you. When I say it looks like a piece of art, I mean, this thing looks like it belongs in the Louvre. It's gorgeous y'all! Chef Keller is simply masterful, and so inspiring to watch. Watching him create his Avocado Louis, with such care and precision inspired me to create this ribbon salad. While my salad doesn't belong in an art gallery, it's sure to be a showstopper when you serve it to guests. My weapon of choice to create the "ribbons" is a traditional vegetable peeler. It works best for me to get the perfect thin ribbon curl on the carrots and celery. For the cucumber and radishes, though, I prefer using the mandolin. I like them to be paper thin for this salad. TIP Place all of the veggies in an ice water bath before assembling the salad. This seems to help everything crisp up and assists in curling the "ribbons." 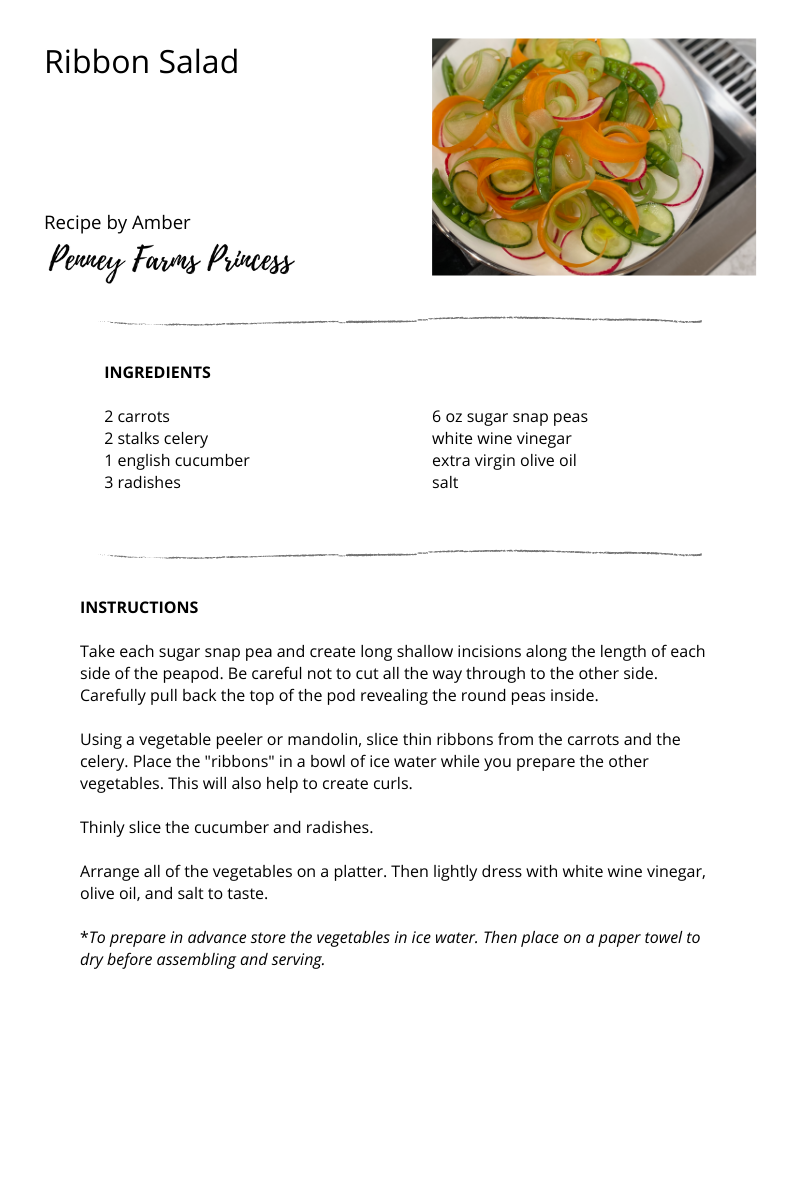 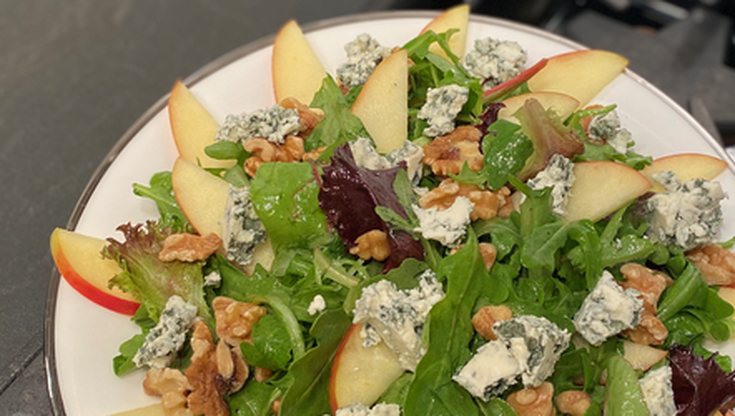 This salad is so good it deserves to be an entree. Or it's lovely with a nice steak or grilled chicken. I love it, and it couldn't be easier to prepare! The Vinaigrette This is one of the only salads where I don't make my own dressing. Instead, I use Garlic Expressions. You can find it at Publix or online. It's delicious, and it's not full of thickeners, preservatives, or toxic chemicals found in most prepared salad dressings. It's American made, non-GMO, vegan, allergen free, gluten free. Say Cheese! I prefer to buy a wedge of blue cheese, and crumble it myself. It ALWAYS tastes better. When you buy pre-crumbled blue cheese it typically contains anti-caking agents... sounds delicious, huh? No thank you. I'll spend the extra 15 seconds and crumble my own cheese. An Apple A Day We almost always have Honeycrisp apples on hand. They're Big Strong Handsome's favorite, so that's what I buy. I think almost any sweet apple would be delicious in this salad, though. Fuji, Golden Delicious, Gala, they'd all be good. Let's Get Nutty Whole walnuts can be a little pricey, so you can always substitute whole walnuts with walnut pieces, or pecans. Whatever you prefer. 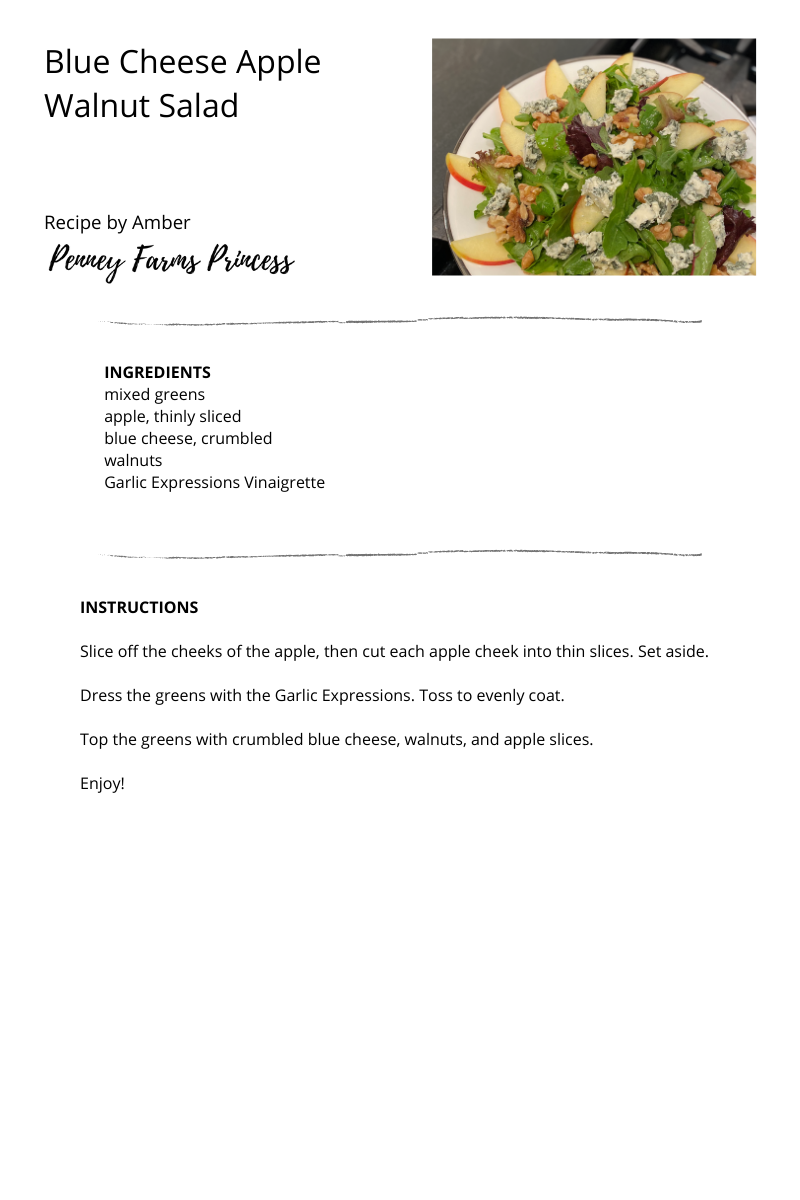 
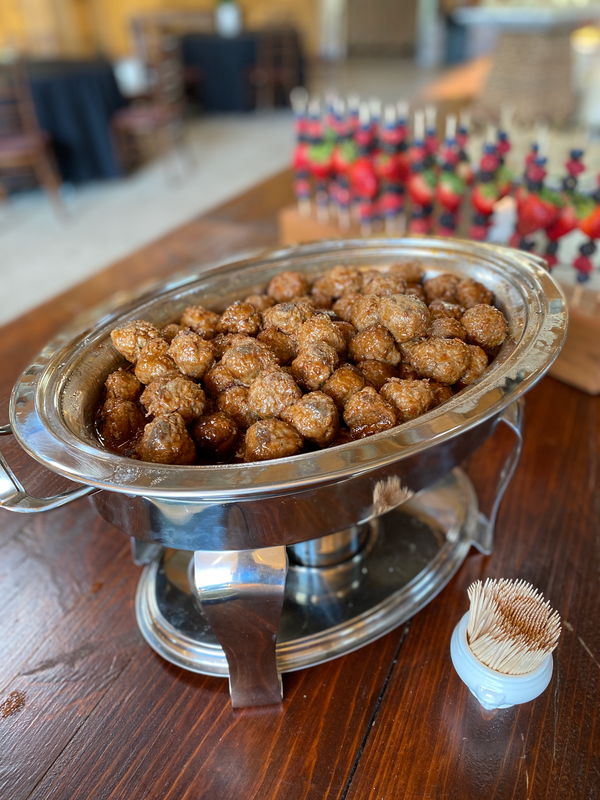
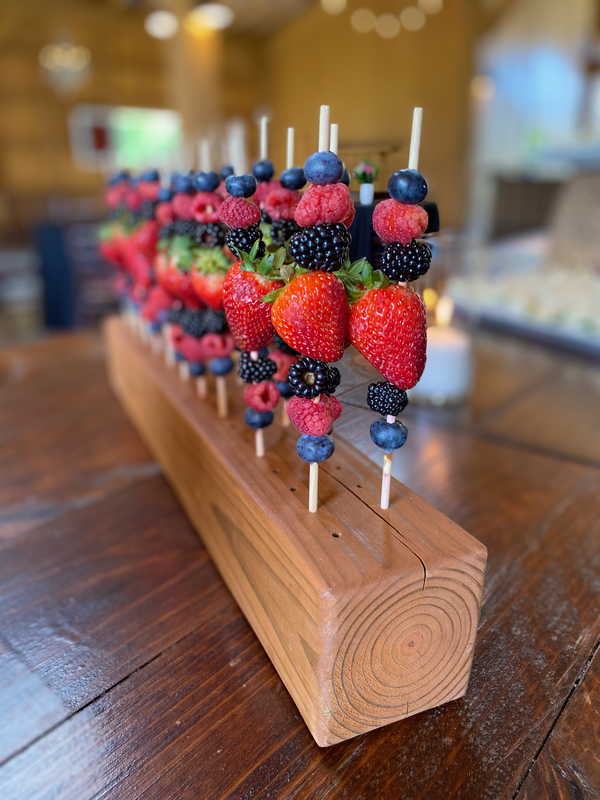
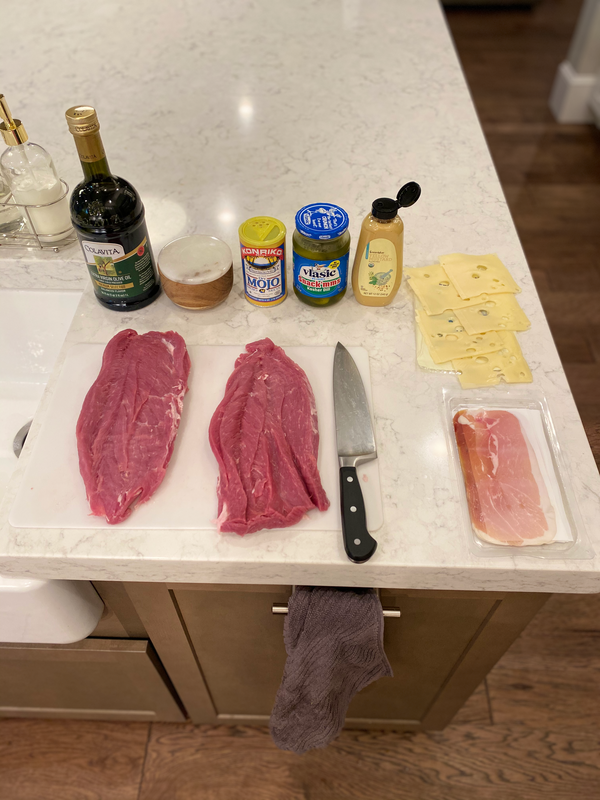
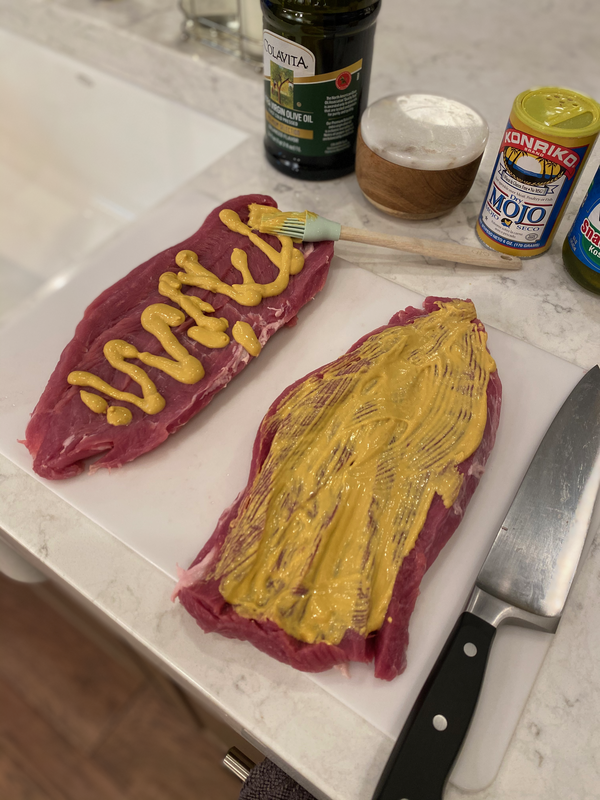
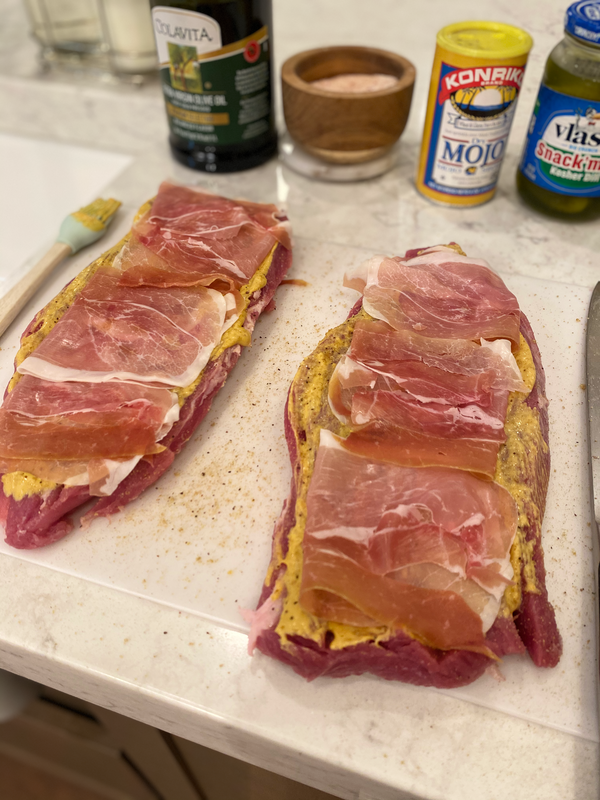
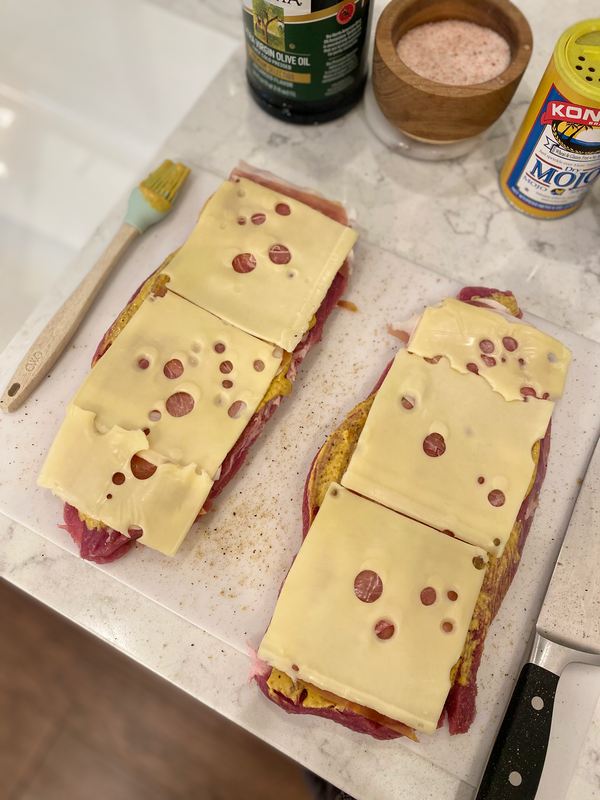
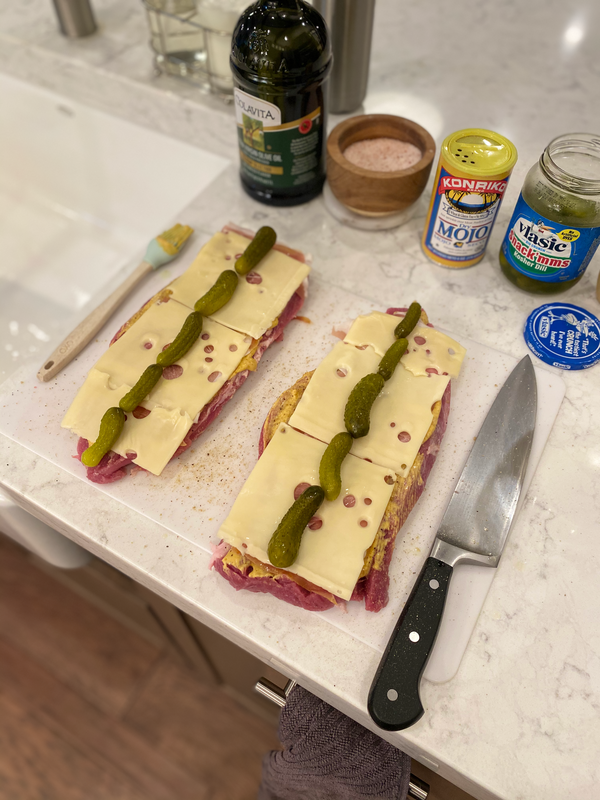
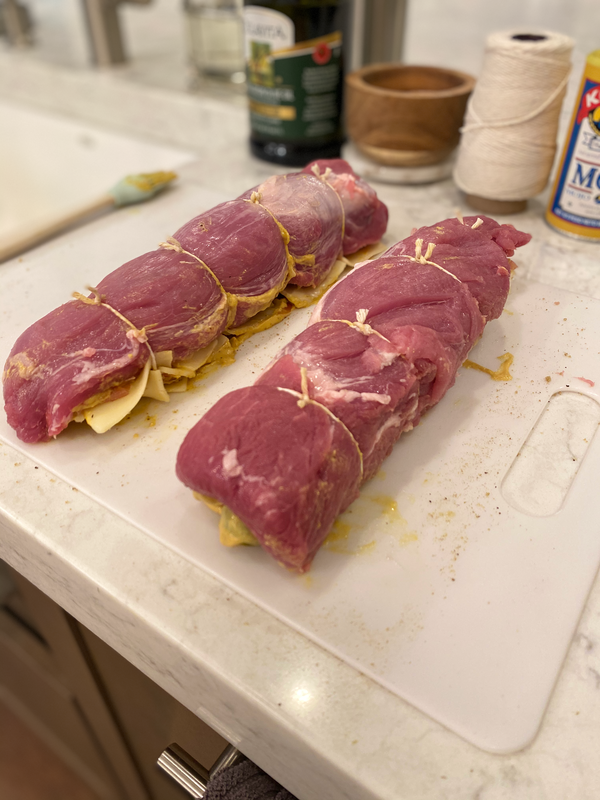
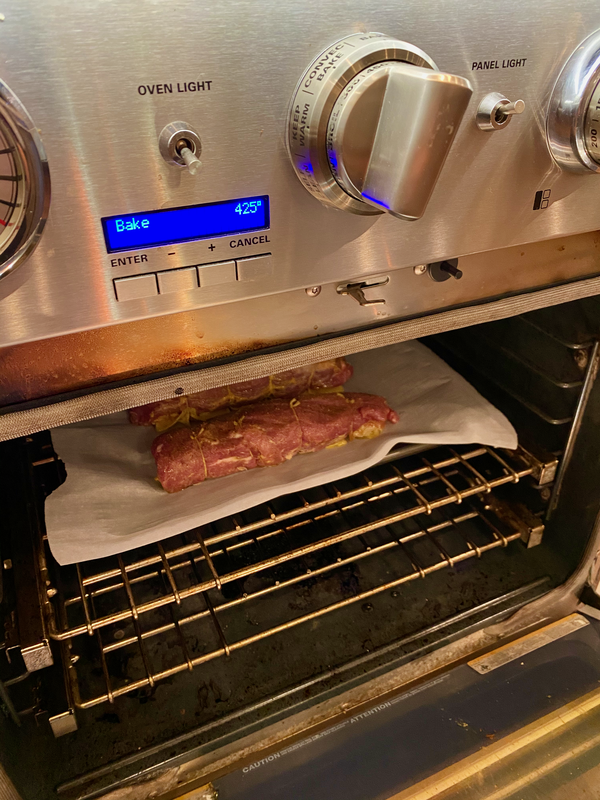
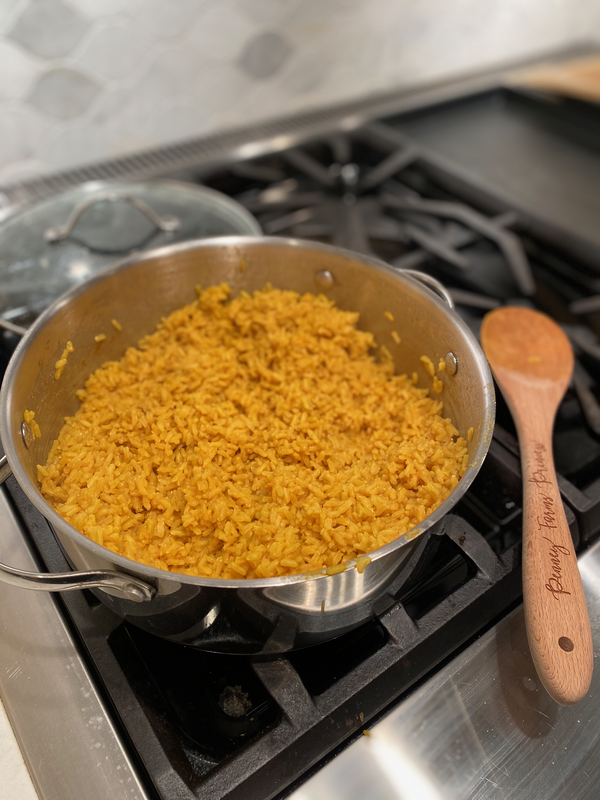
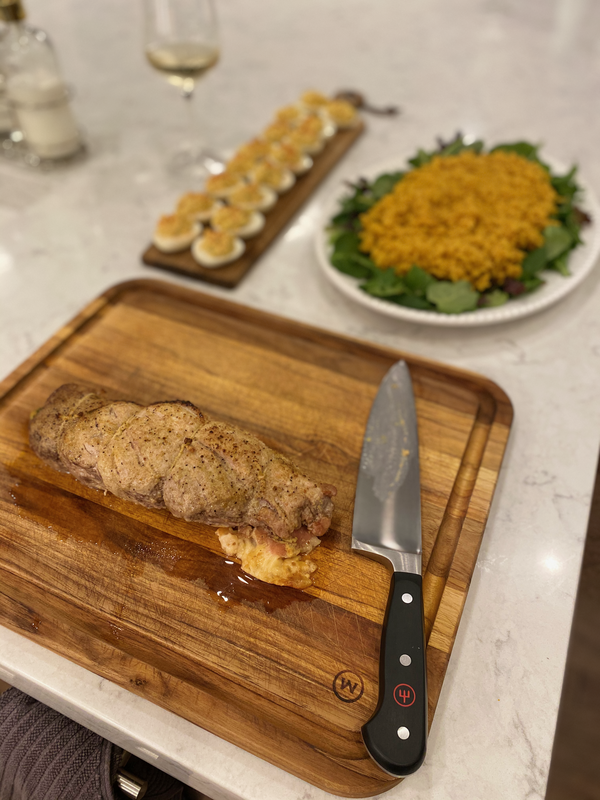
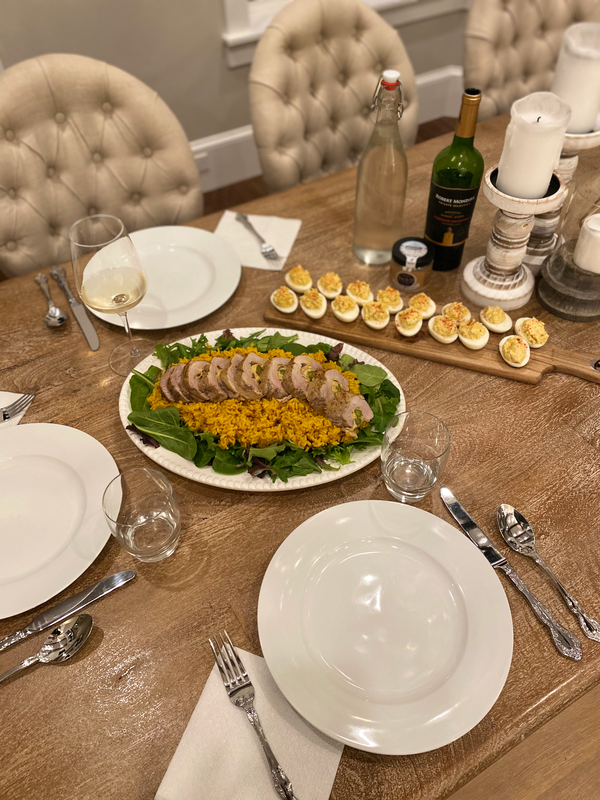
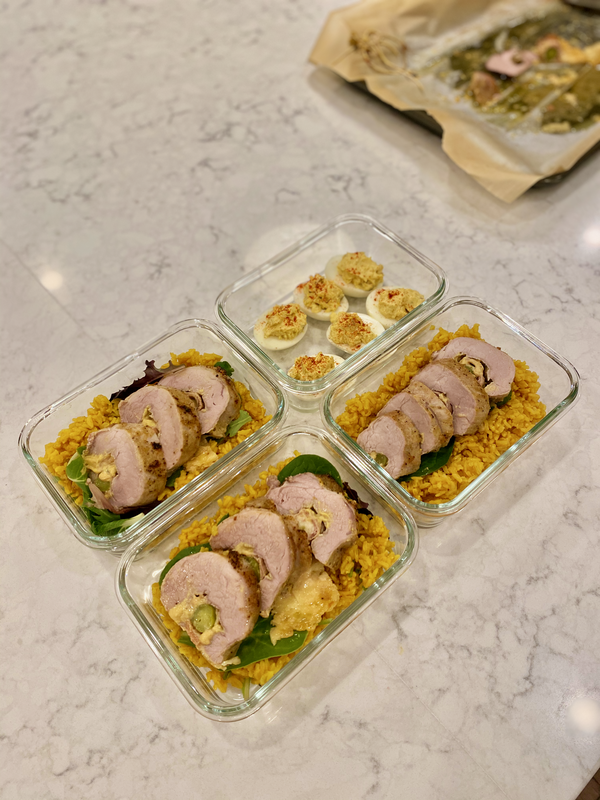
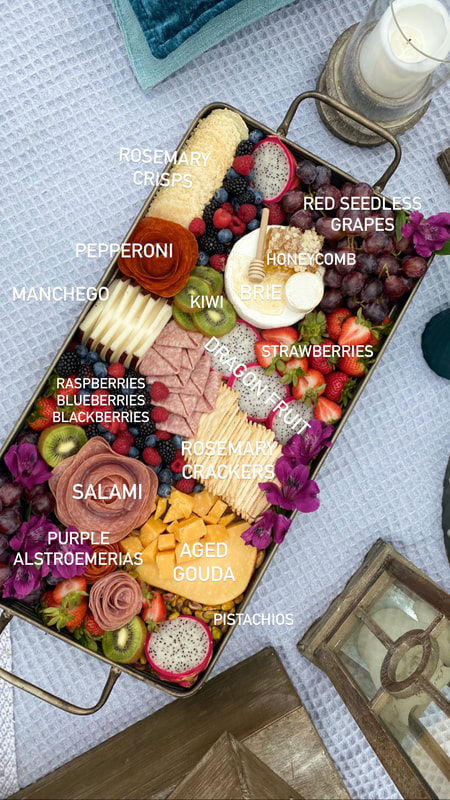
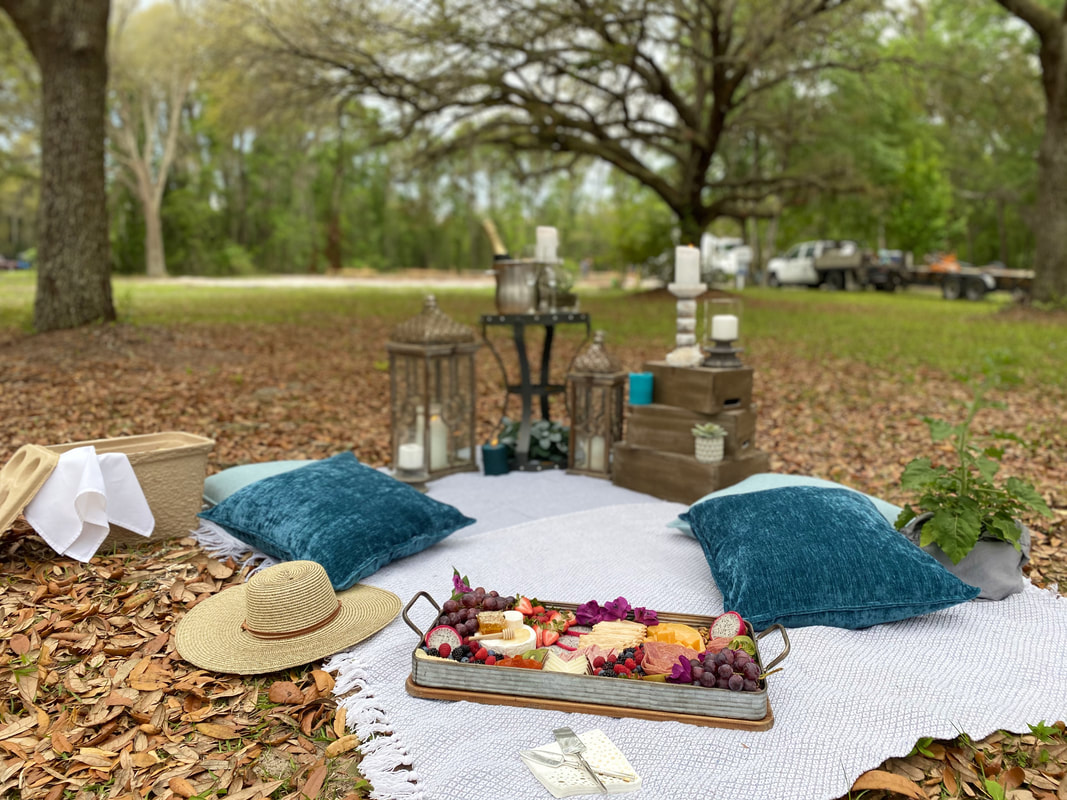
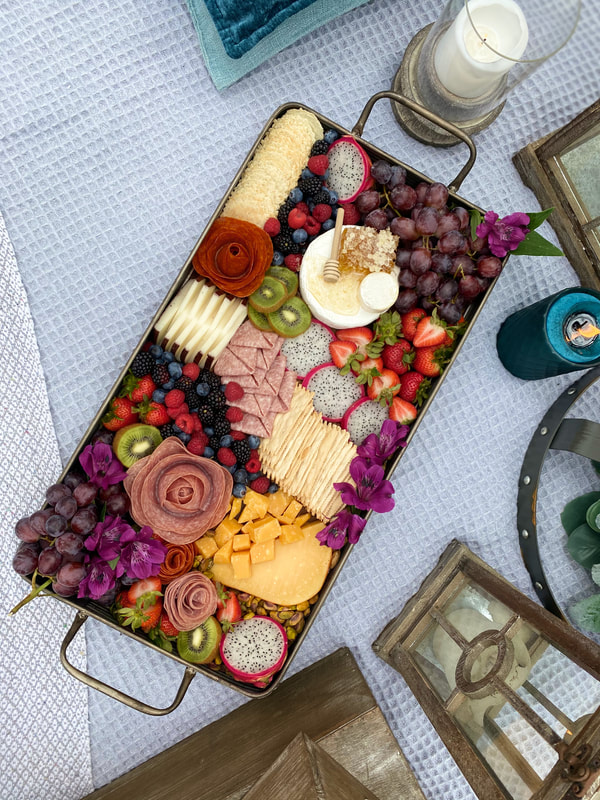
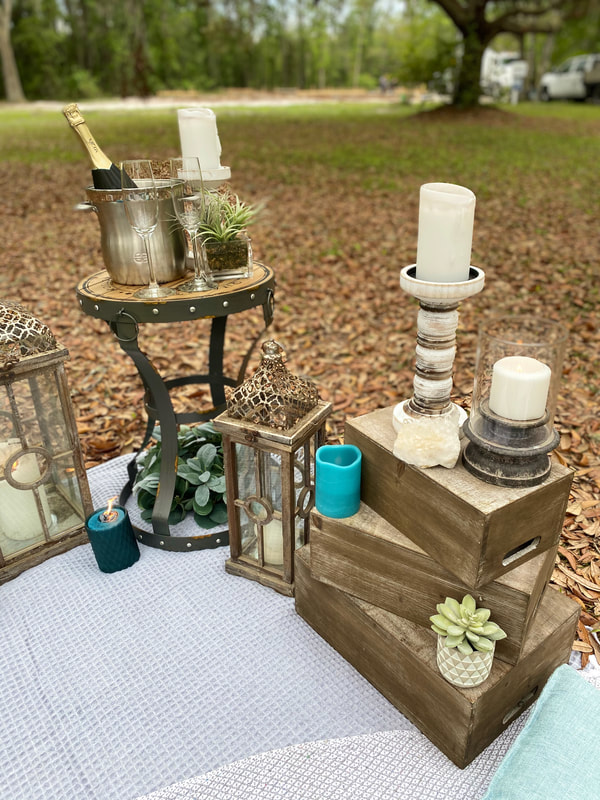
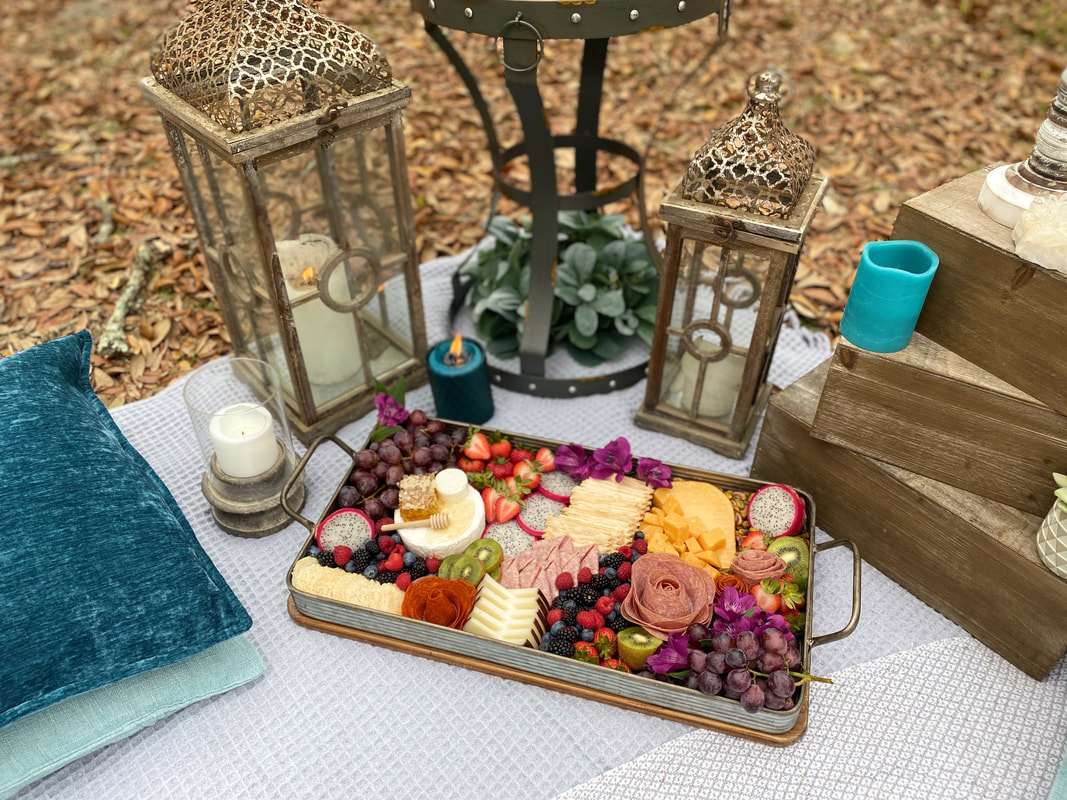
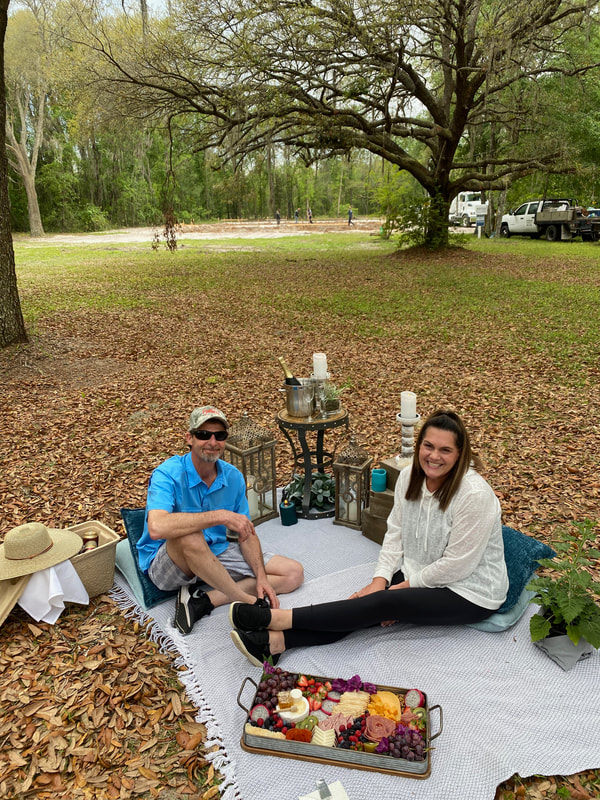
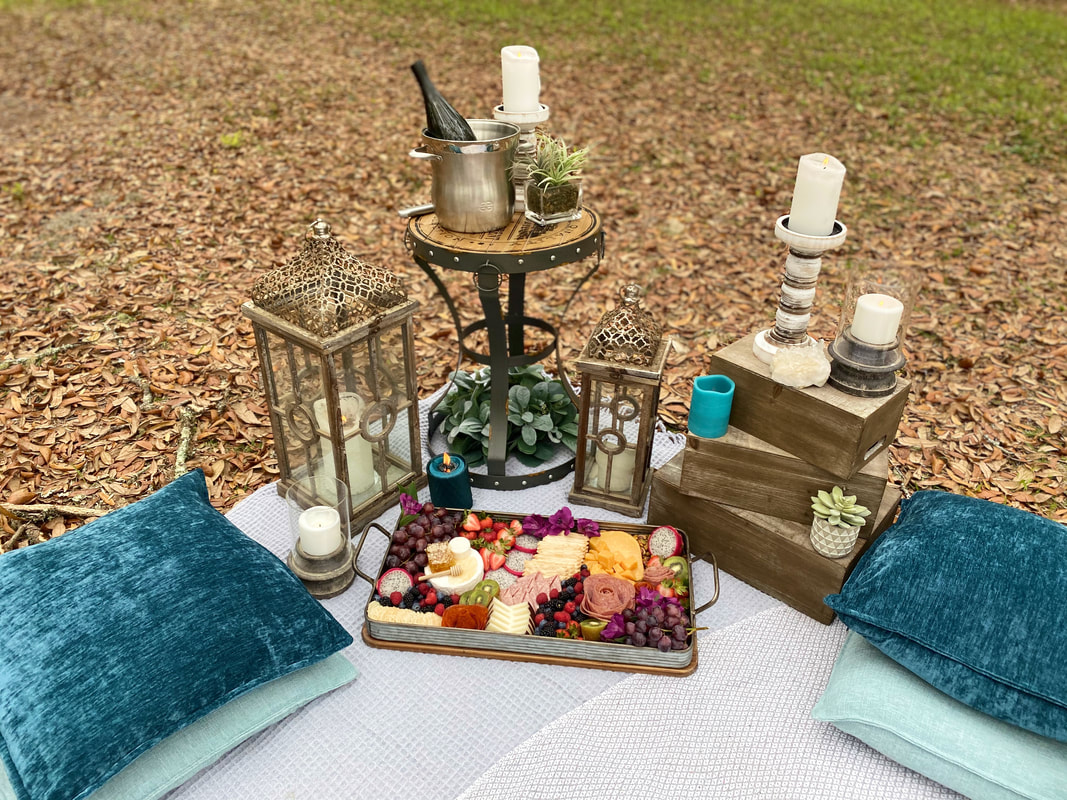
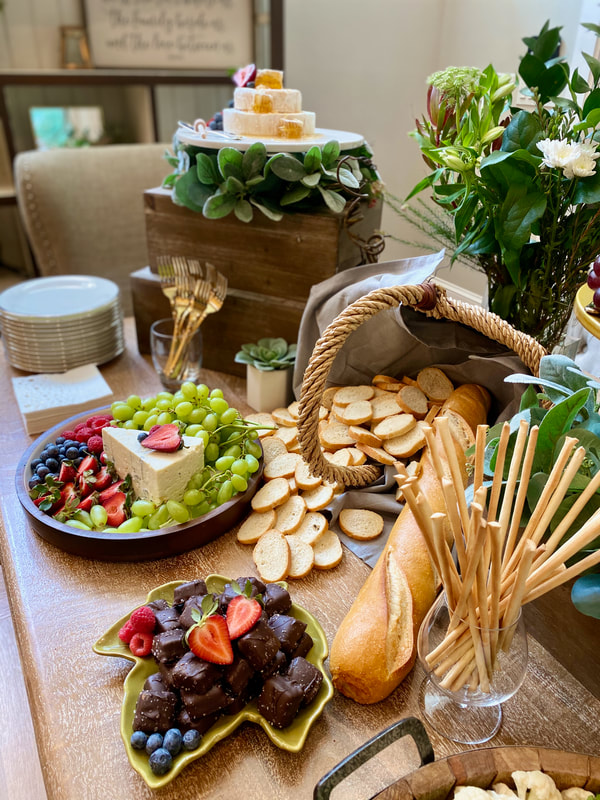
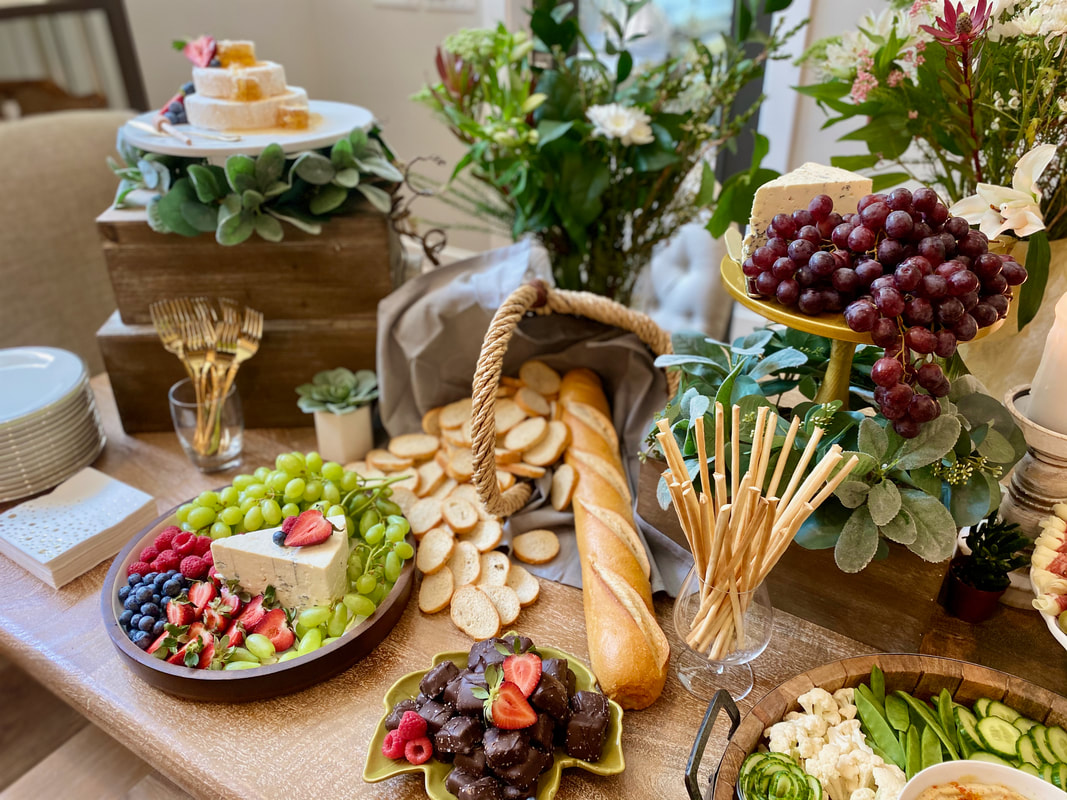
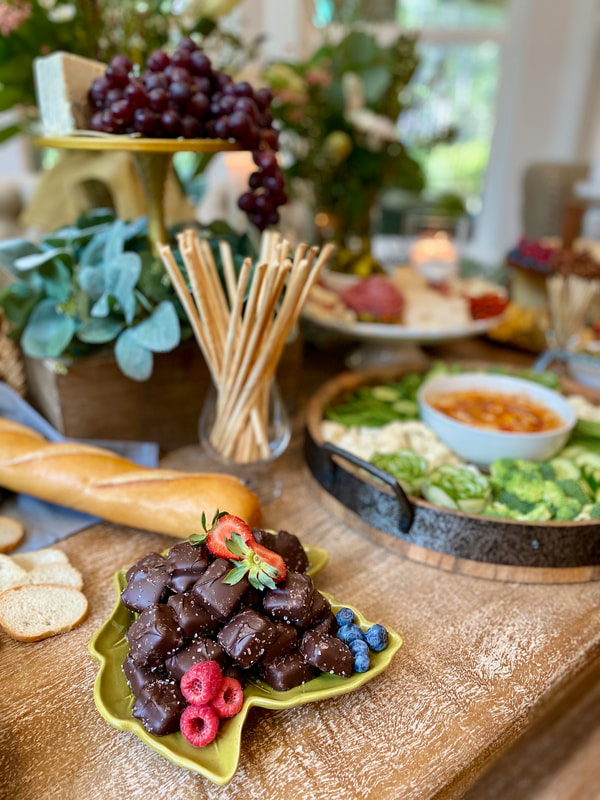
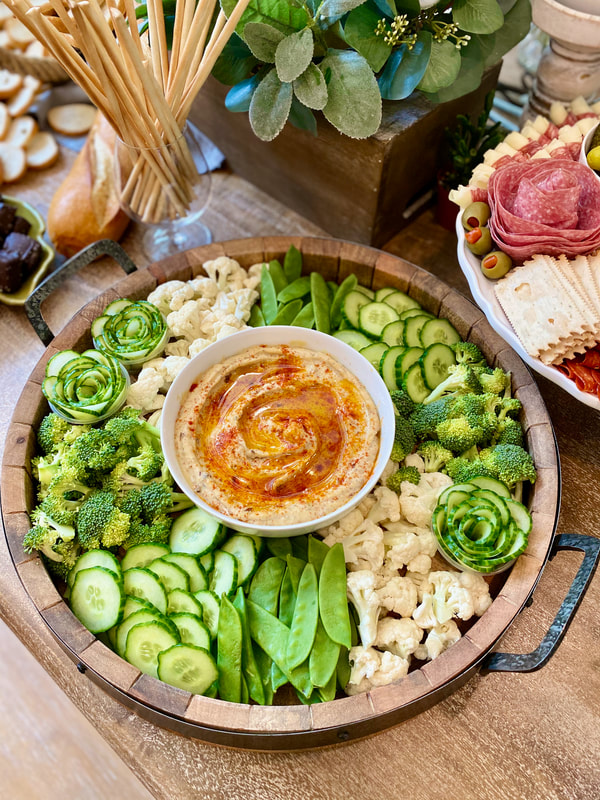
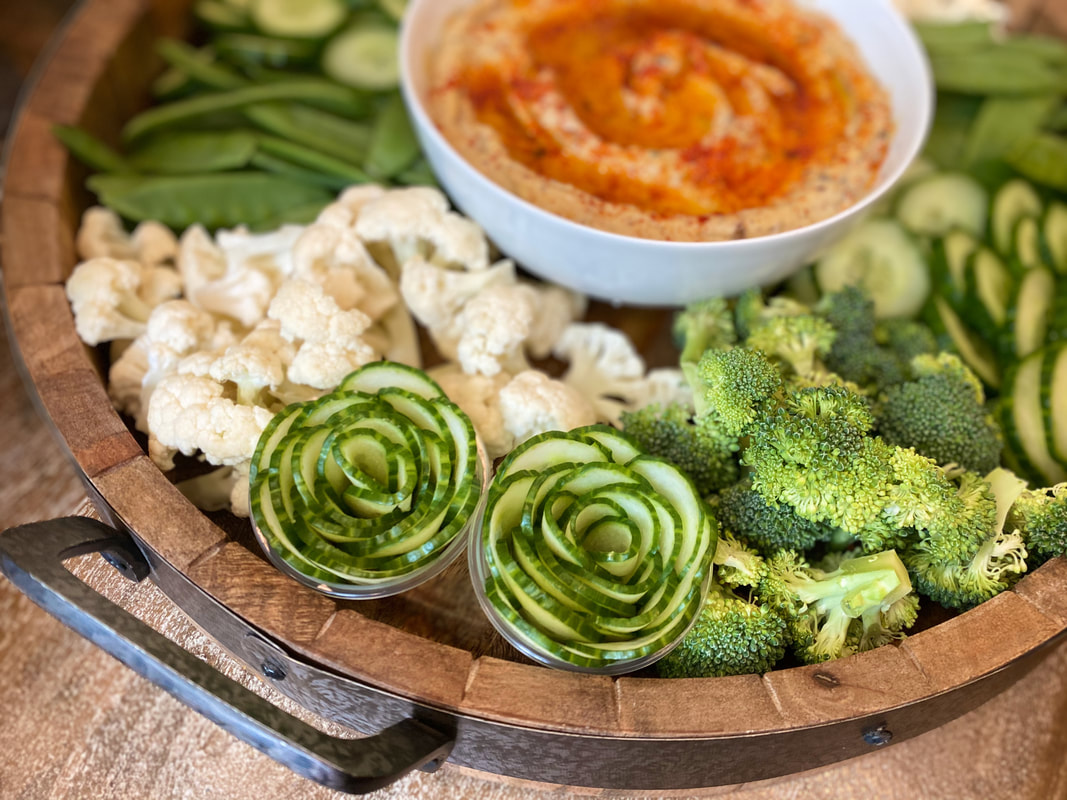
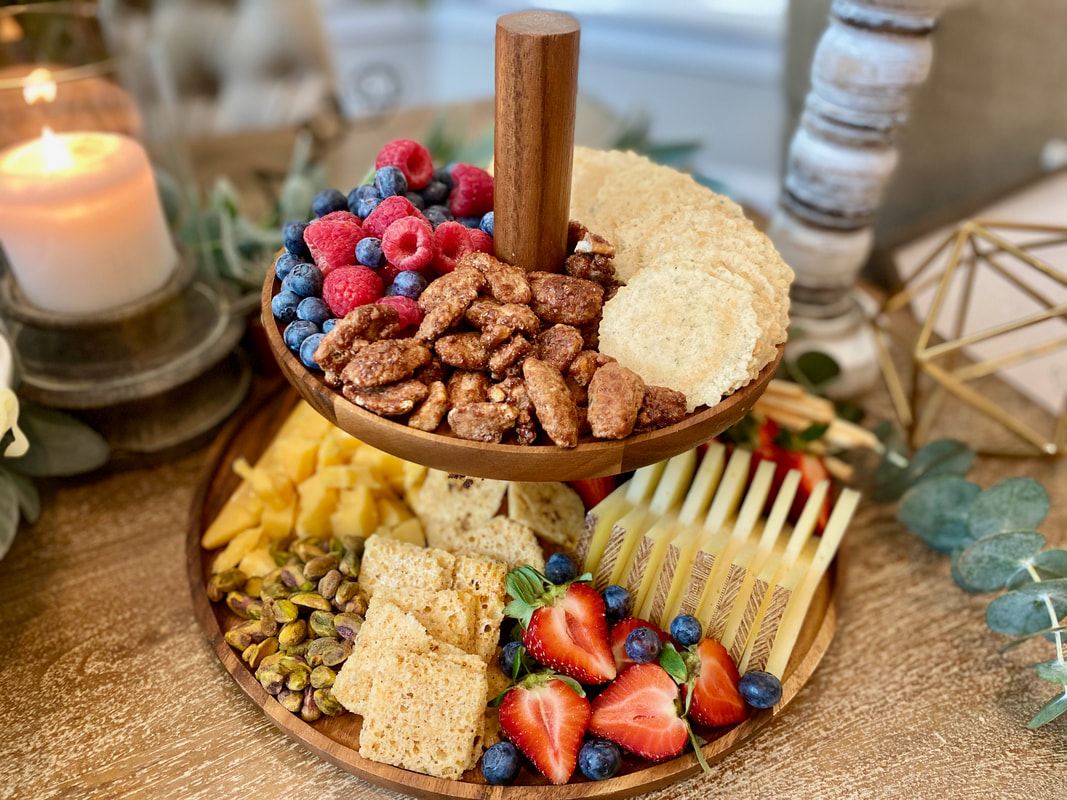
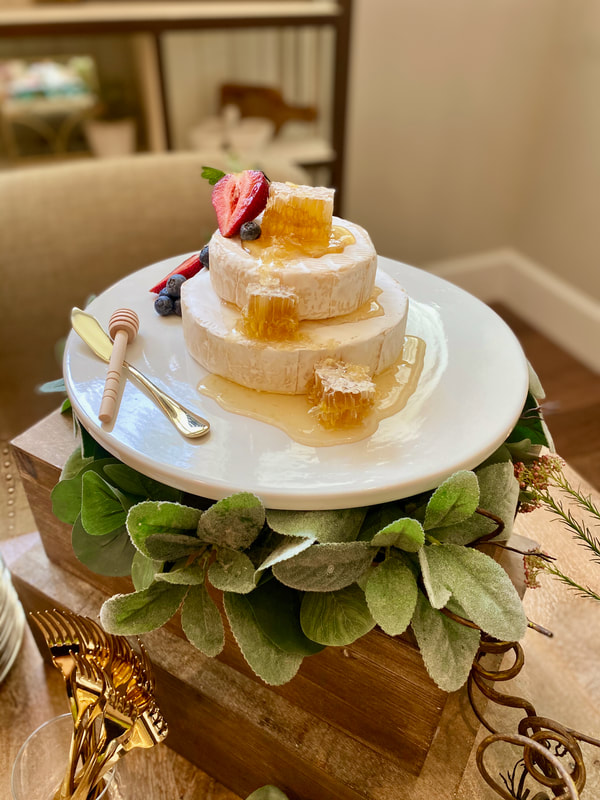
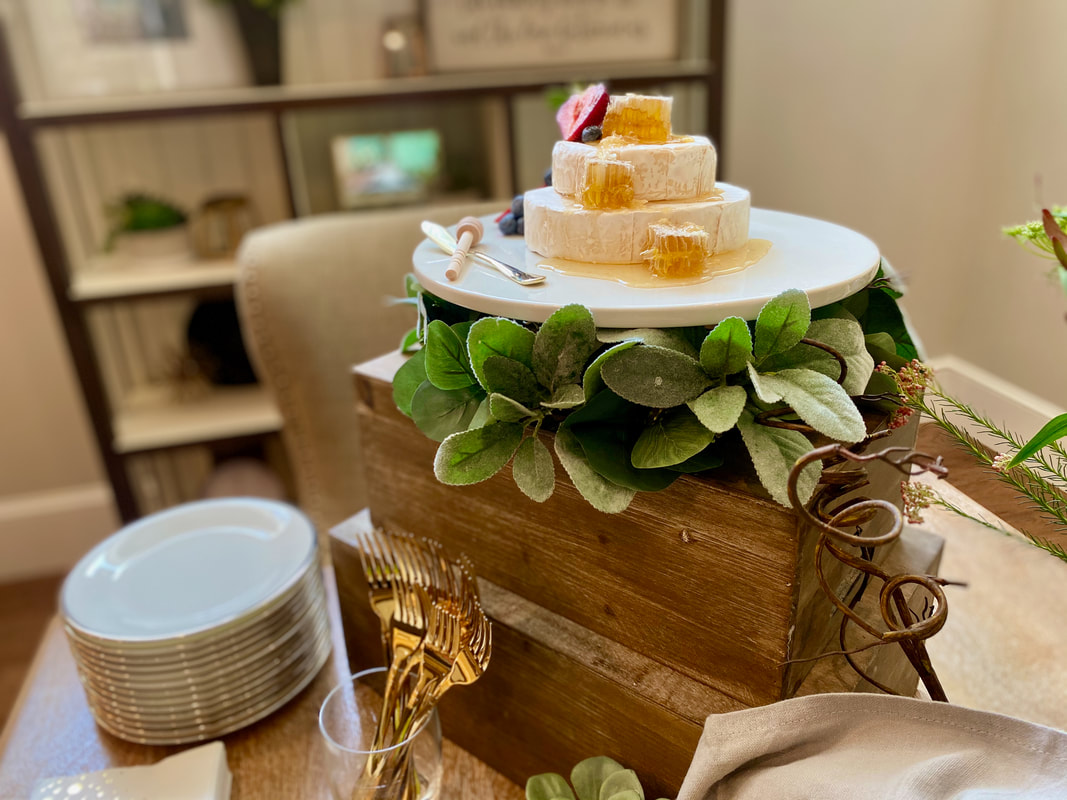
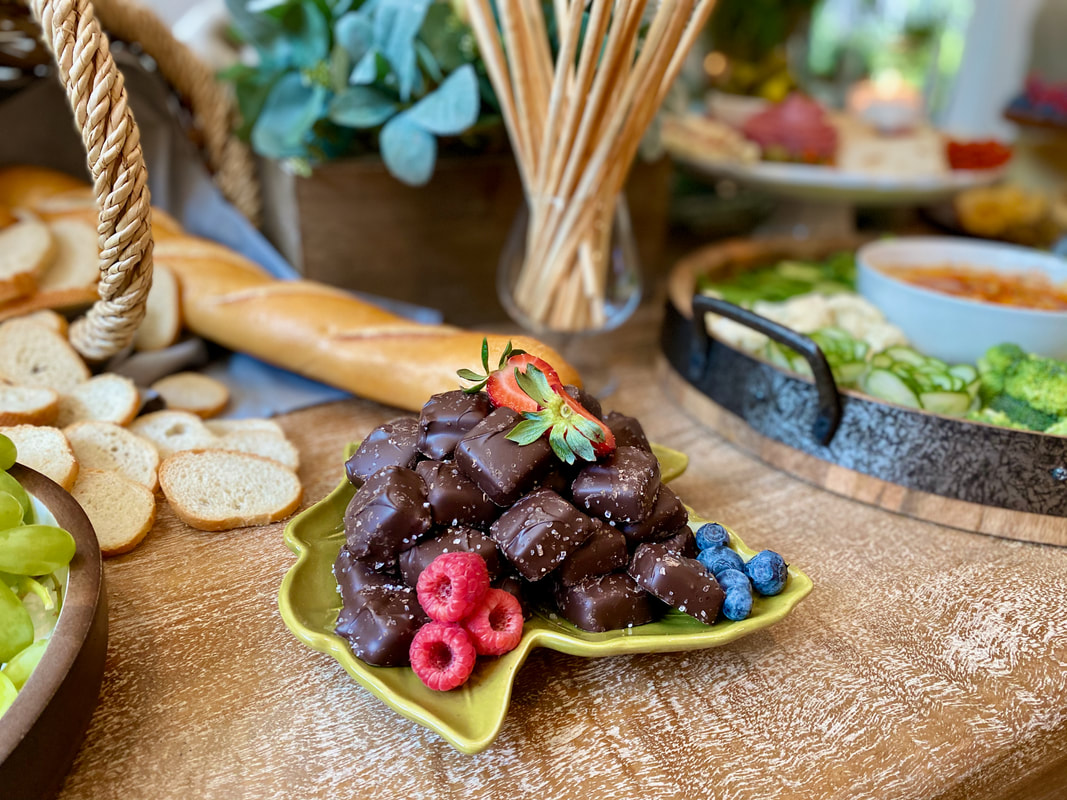
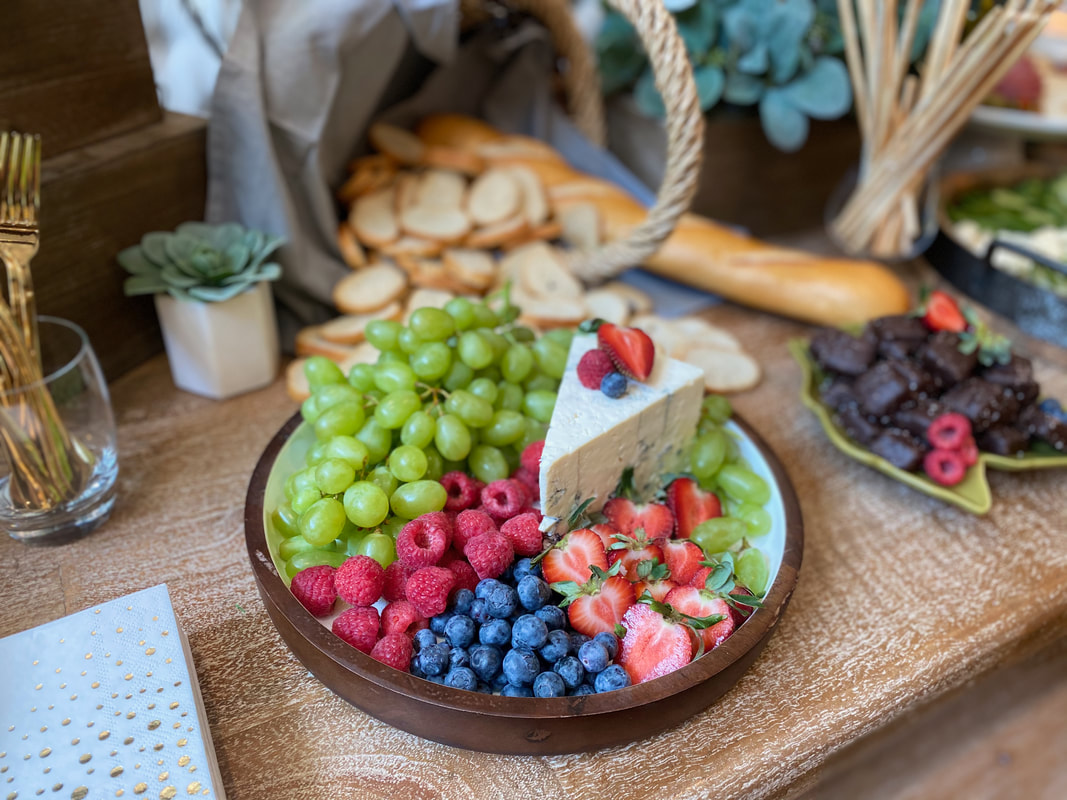
  Who doesn't love a good Cuban sandwich? They're so delicious, and such a treat! I wanted a way for us to enjoy the same flavors at home, without the bread, and of course, a quick way to make it for busy weeknight family dinners. So here's my Cuban Pork Tenderloin. The Tenderloin The trickiest part of this recipe is flattening out the pork tenderloins, but once I got over trying to make it perfect, it became a whole lot easier. I try my best to delicately filet it out with long, shallow cuts down the length of the tenderloin, but I inevitably get distracted with other things around the house demanding my attention. So I typically end up kind of hacking at this thing and end up with weird little grooves all along the inside of it, but you know what... it doesn't matter. Nobody sees that part! So as long as you can get it flat-ish... you're good. The Flavor You don't need 30 different herbs and spices to season this with either. Konriko Dry Mojo seasoning is everything! It has the perfect spice blend, without any preservatives or other yucky stuff. The Ham I've found that prosciutto works best. Now, that might be because I secretly think I should be the matriarch of a big Italian family with a brother Pauly, an Uncle Jimmy that's an attorney, a cousin Mikey that "knows a guy," and there has to be an Isabella that still lives in Naples, Italy. I digress. I've tried rosemary ham and regular deli ham, but I really prefer the flavor and texture of the prosciutto. The Pickles You can use the baby dill pickles like I did, or longer pickle spears. Slices or whole pickles, though, don't really work for me on this recipe. The Rice The yellow rice I made with organic brown jasmine rice and a few shakes turmeric, garlic powder, paprika, and salt. It was delicious. No yellow number 5 here! The next time I make this, I think I might slather the outside of the tenderloin roll with mustard as well, and then wrap it in even more prosciutto! TIP: When you're putting away your leftovers, put them directly into meal planning containers. That way, you have easy grab-n-go lunches or quick dinners for busy weeknights. 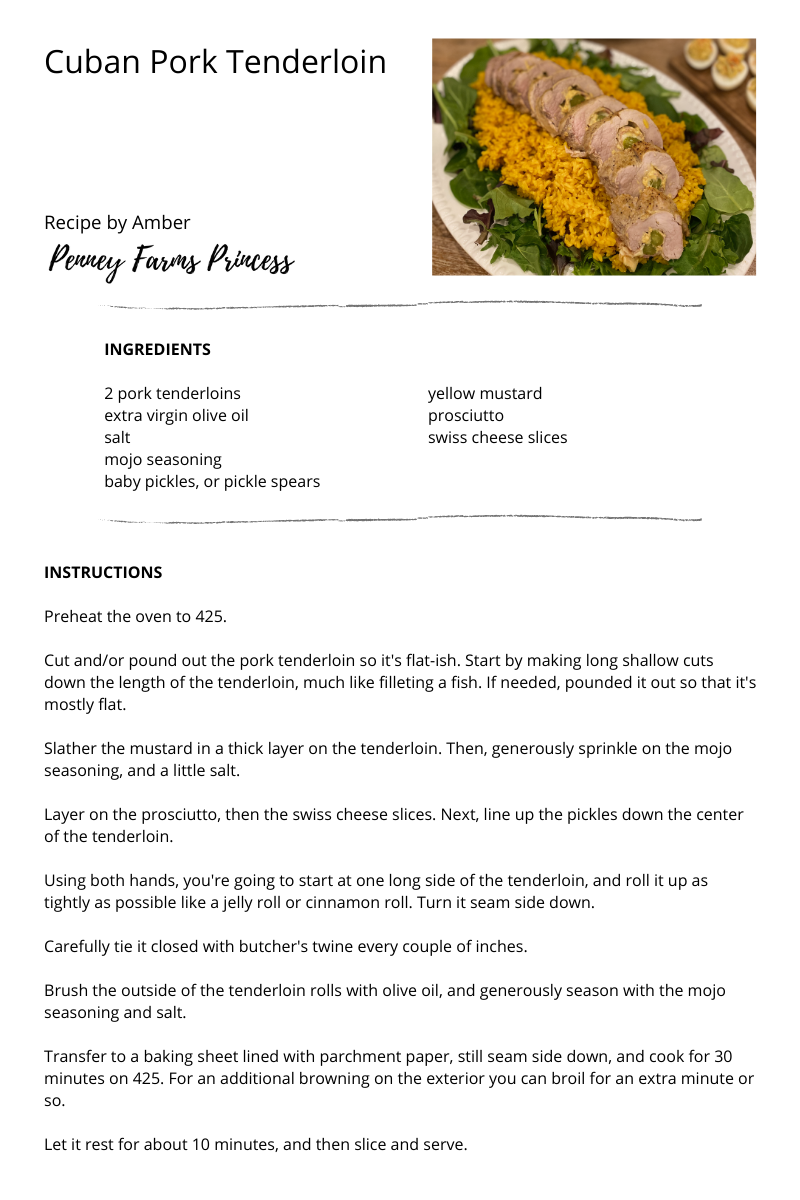  I had the honor of surprising friends with a picnic to celebrate the groundbreaking of their new home, built by Providence Homes. I wanted to make it extra special for them, and not just throw out a picnic basket and blanket. So here's how I planned their perfect picnic. I searched around the house and pulled out blankets, pillows, boxes, a small table, greenery, candles, lanterns, etc. I found 2 gray blankets, and 4 teal pillows. So I decided on a jewel tone color scheme. Then, I set up the picnic in my living room to see how everything looked together. This took about an hour of arranging, then rearranging, taking pictures, over and over again until I had a layout that I was happy with. When my mock up picnic set up was finished, I took a photo and saved it on my phone. This way, when it was time to set up the actual picnic, I didn't have to think about the design. I could just refer to the photo and focus on the set up. For me, the star of the show was the purple alstroemeria flowers. They were gorgeous on the grazing board! I actually had more to use around the picnic, but I forgot them in my rush to get to the picnic site. I've found that with every event I do SOMETHING always goes wrong. The napkins aren't the right color, missing an ingredient, forgot to light the candles... it's always something. I've realized, though, no one knows but me. And nobody cares! So there's no need to stress out over every detail being absolutely perfect. Try your best, have fun, and be proud of what you created. Grazing Board Shopping List *I purchased everything at Costco & Publix*
I've already started planning my next picnic, and ways to make it even more special. I can't wait!
Cheers! 
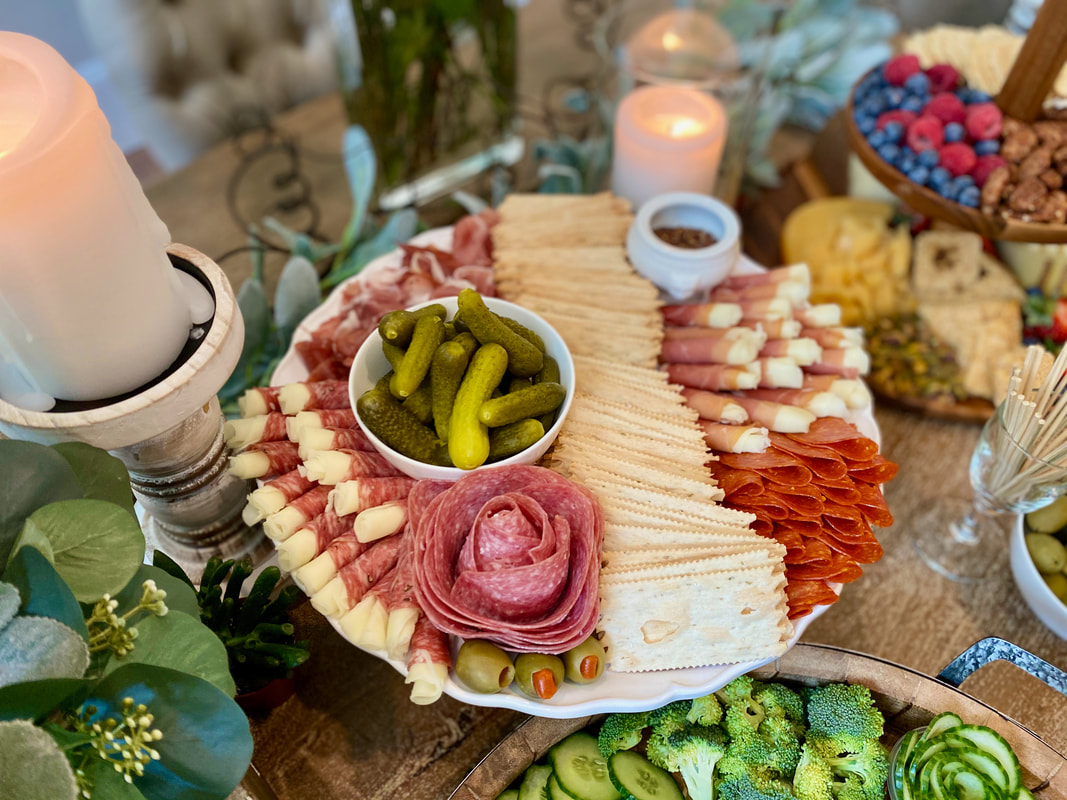
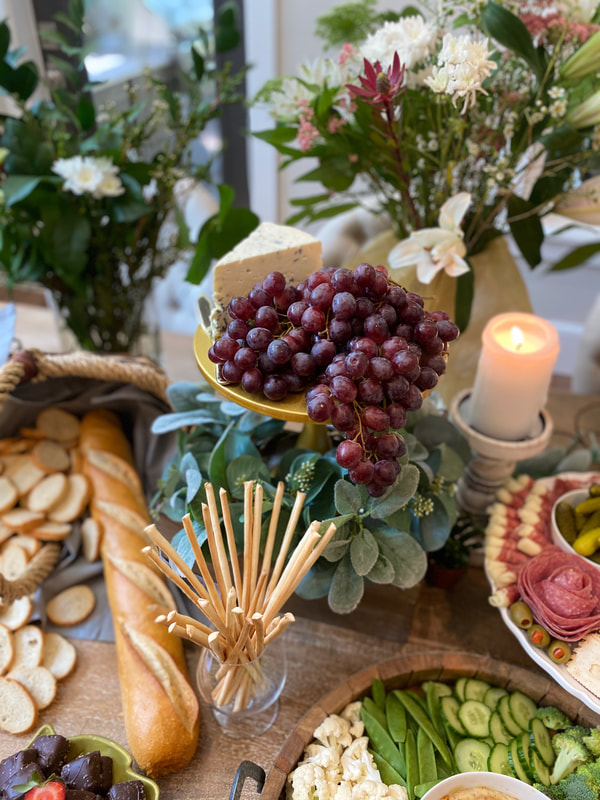
 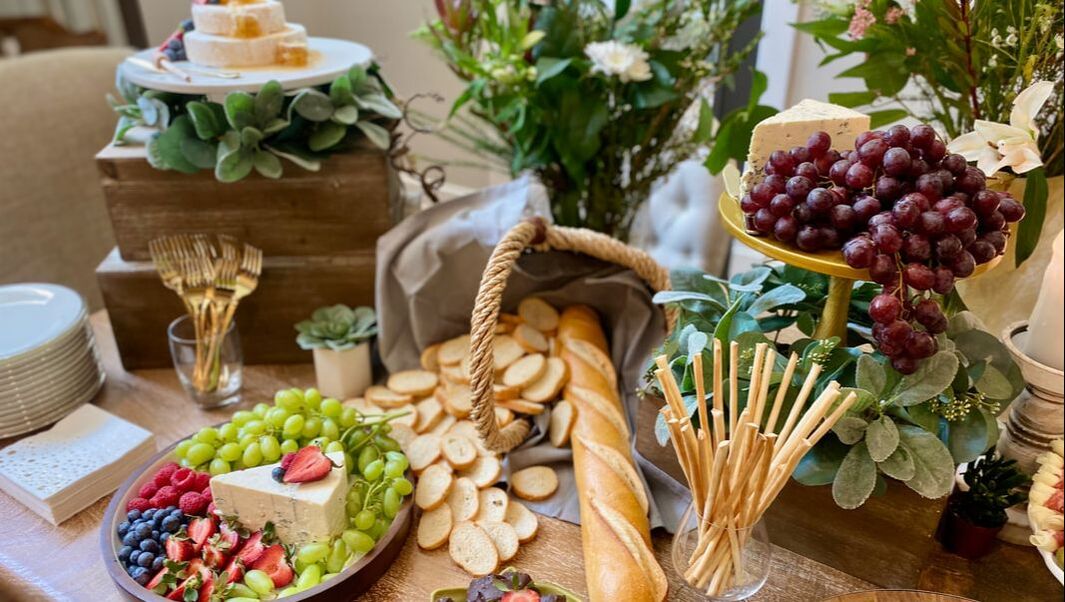 Making a grazing table can be intimidating, so I put together a few easy tips and a list of everything we used to create this beautiful spring grazing table.
Shopping List
*I purchased everything at Costco & Publix*
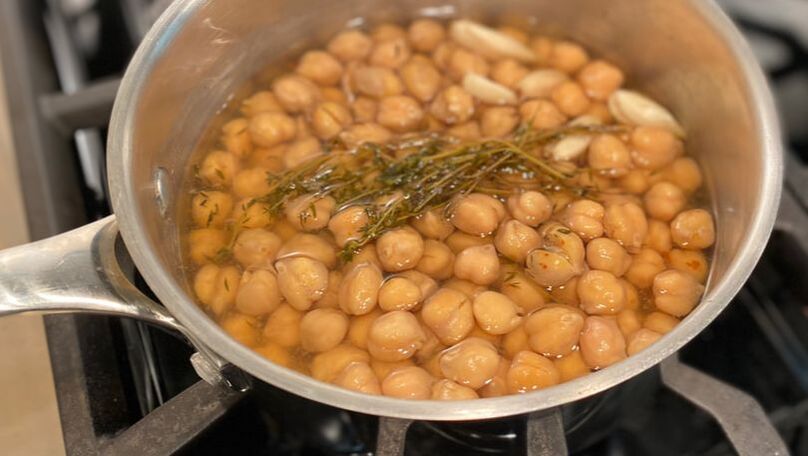
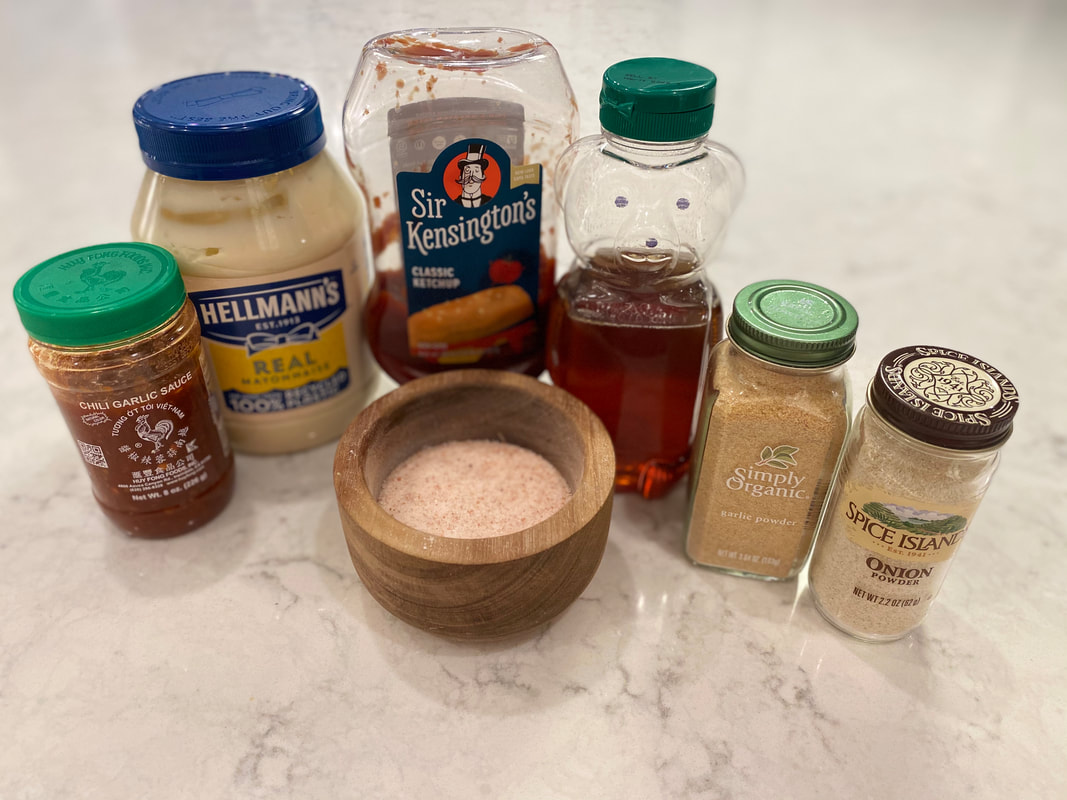
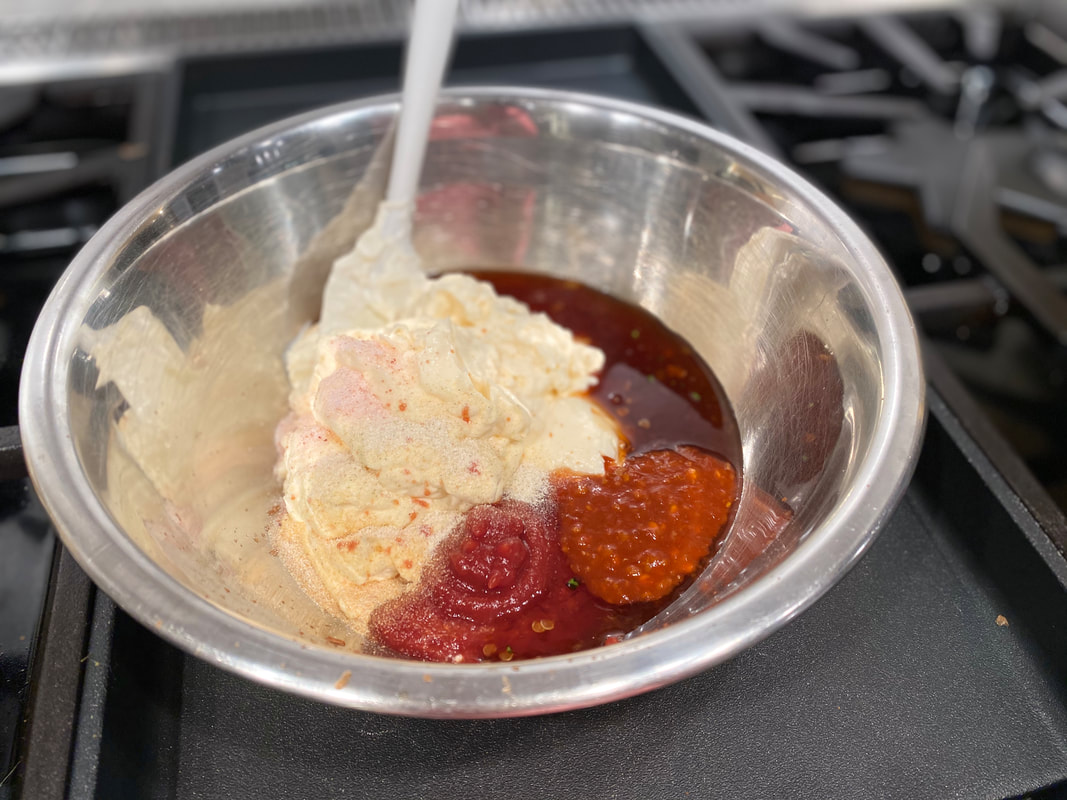
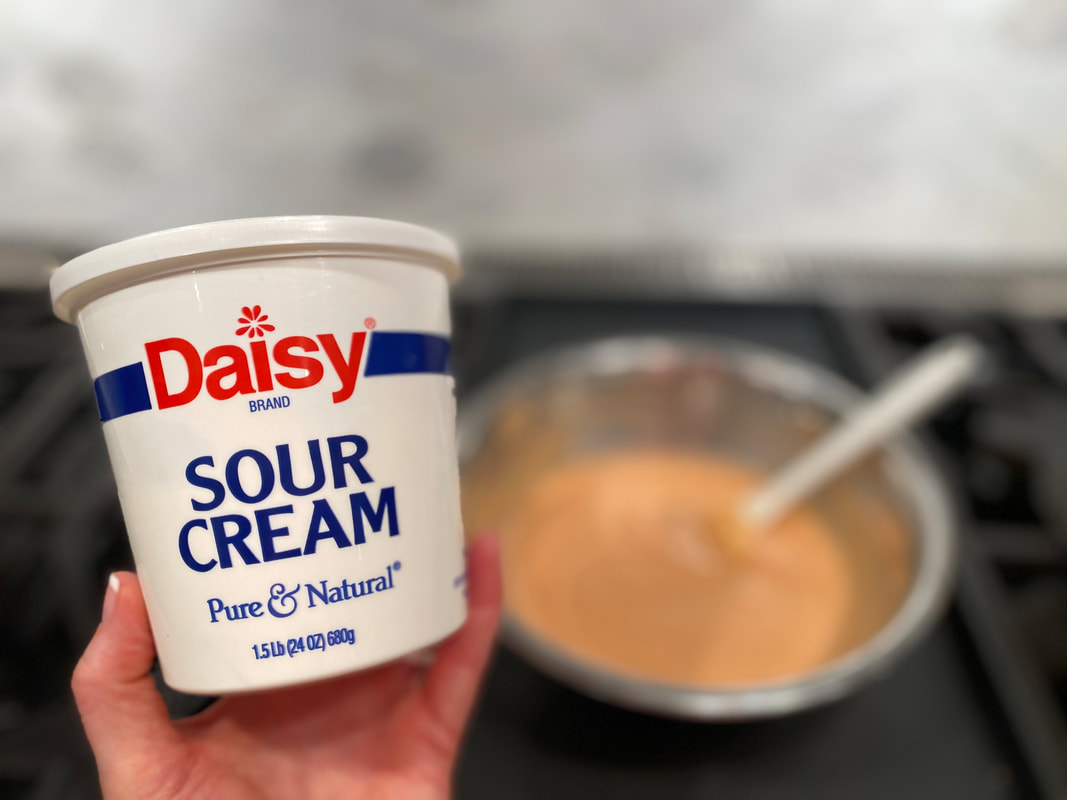
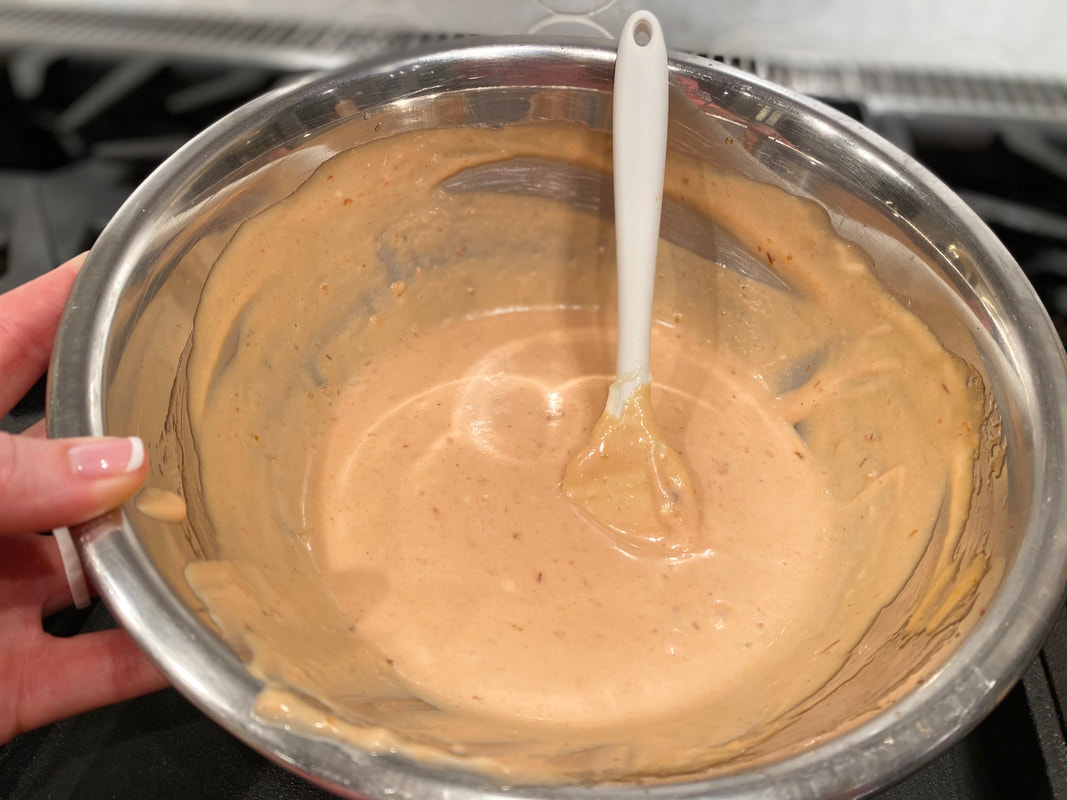
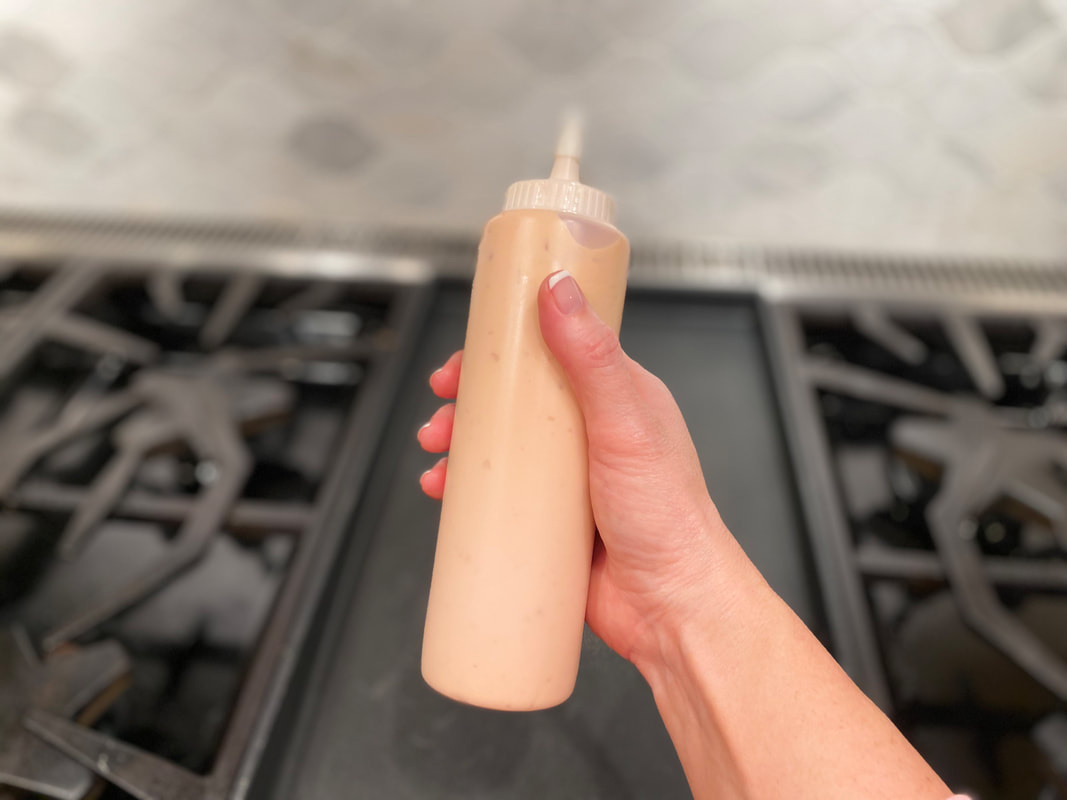
  Shrimp, yum yum, bang bang, boom boom… whatever you call it… sauce. It’s delicious, it’s easy to make, and it’s a great way to dress up a lot of dishes. My family loves it on my Easy Fried Rice, grilled shrimp, or chicken. I love making homemade sauces for my family so I can control the ingredients, bump up the flavor, and limit the amount of chemicals going in our bodies.  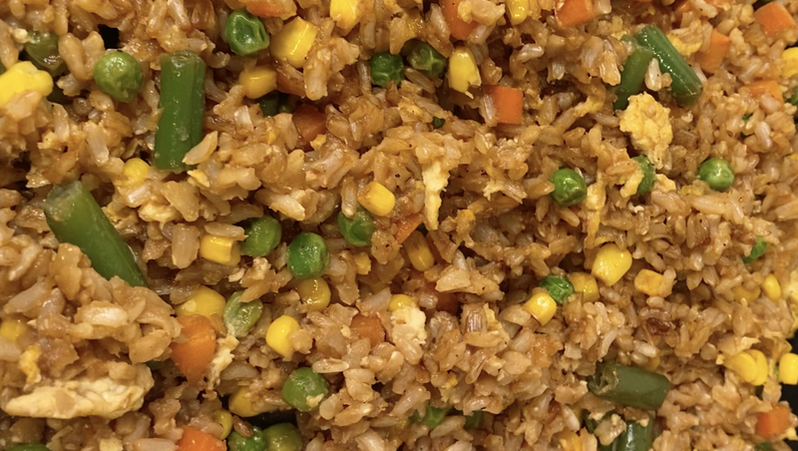 Have leftover rice? Fried rice! Want an easy make ahead meal prep idea? Fried rice! My boys love it when I make fried rice. It’s extremely filling and one of those comfort meals that just leaves you feeling happy. The Rice… With my recipe, you can use white rice, brown rice, sushi rice, jasmine rice… use whatever rice you have in the pantry or leftover from another meal. The Veggies… You can pretty much use any veggies you like for this. I’ve used Publix Mixed Vegetables, leftover grilled vegetables, Japanese blend frozen vegetables, etc. So just use whatever makes your little heart happy. The Eggs… You can add the eggs 2 different ways.
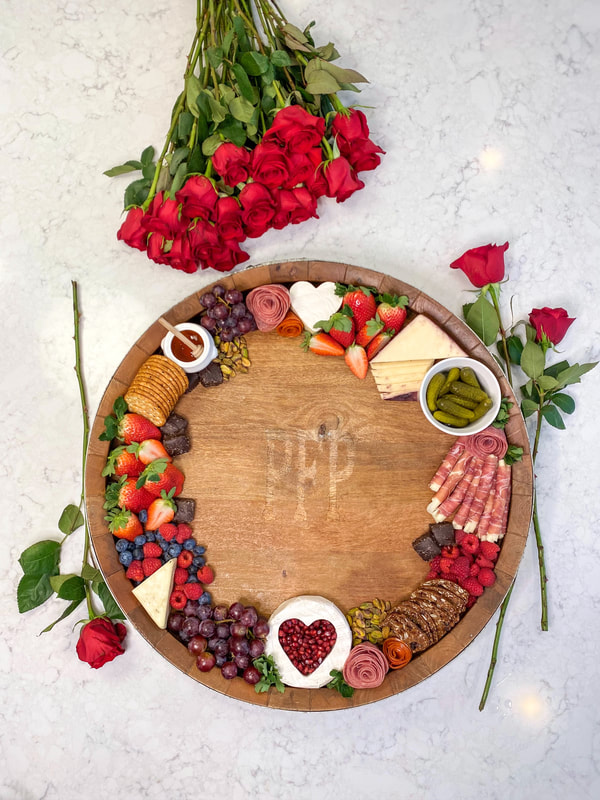
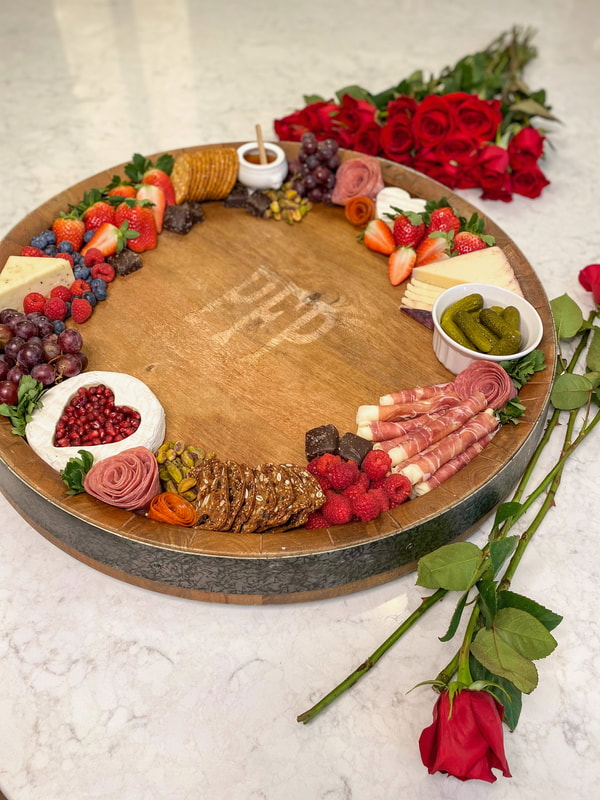
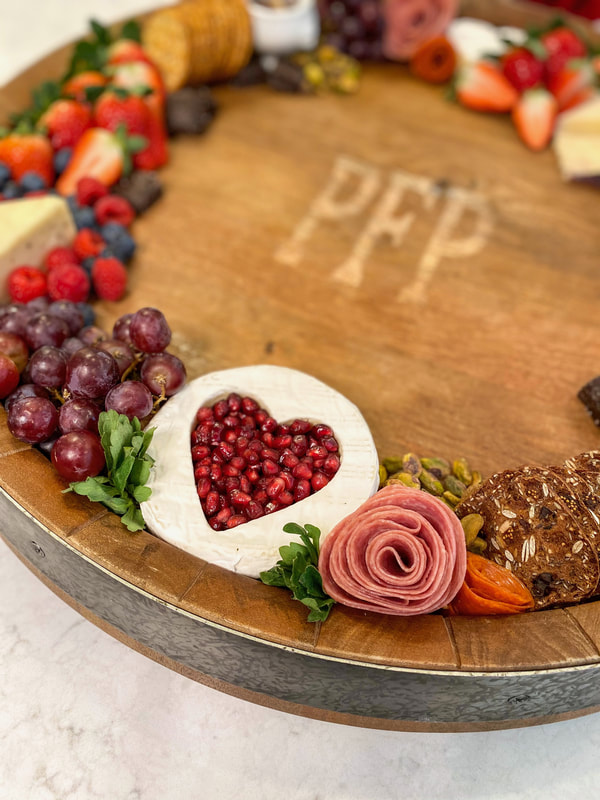
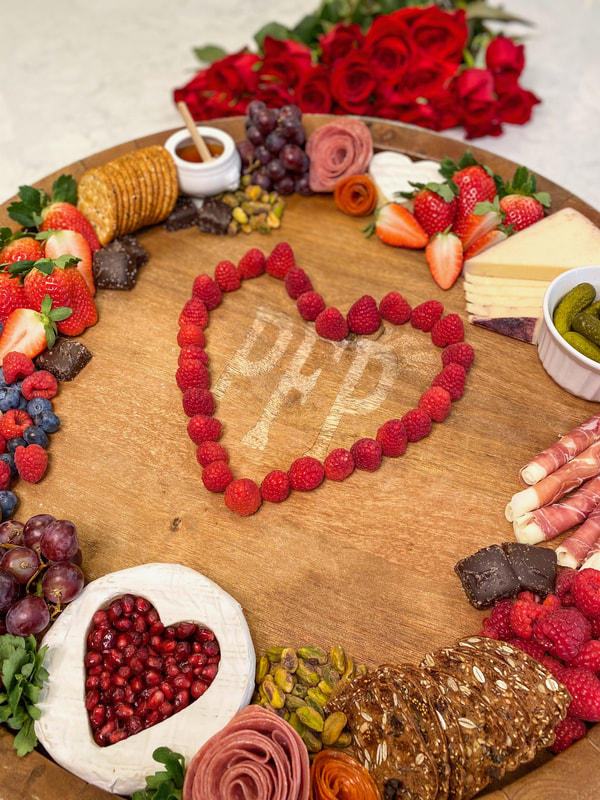
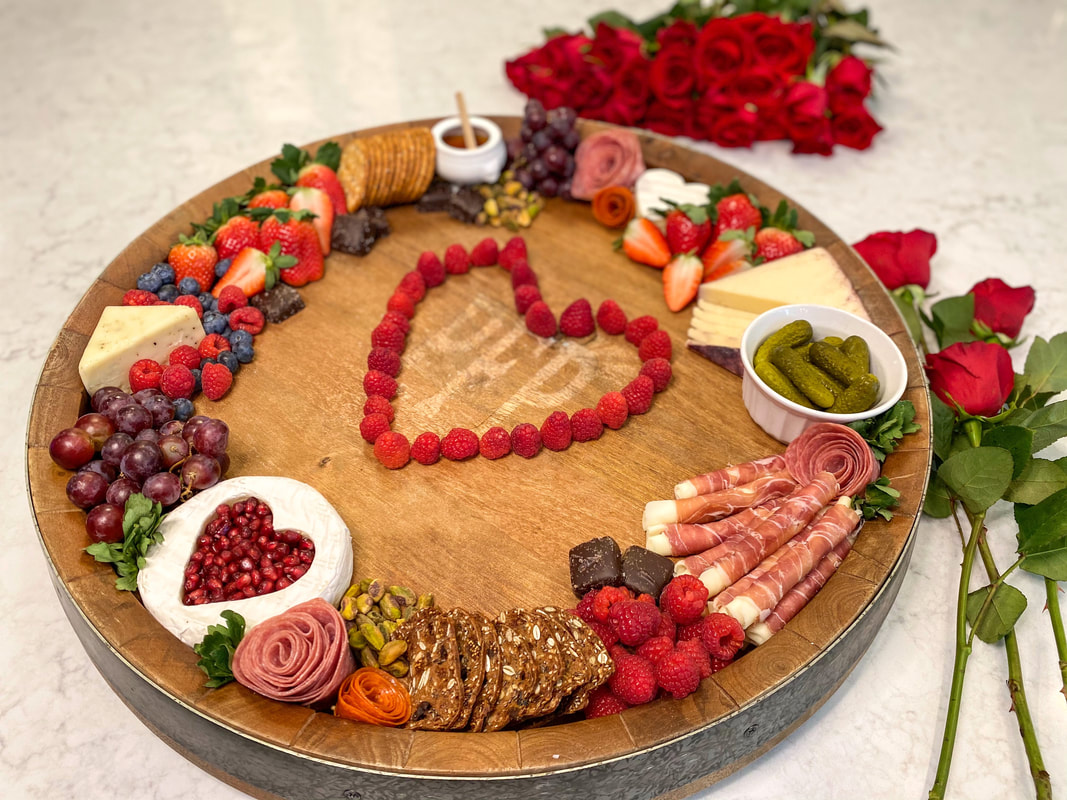
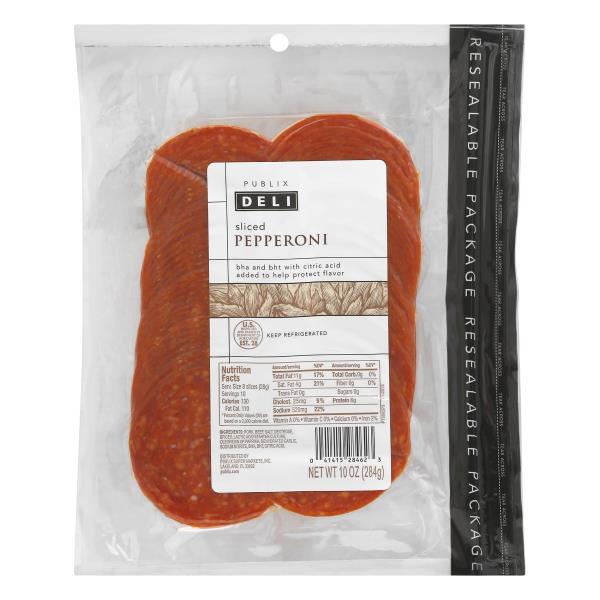
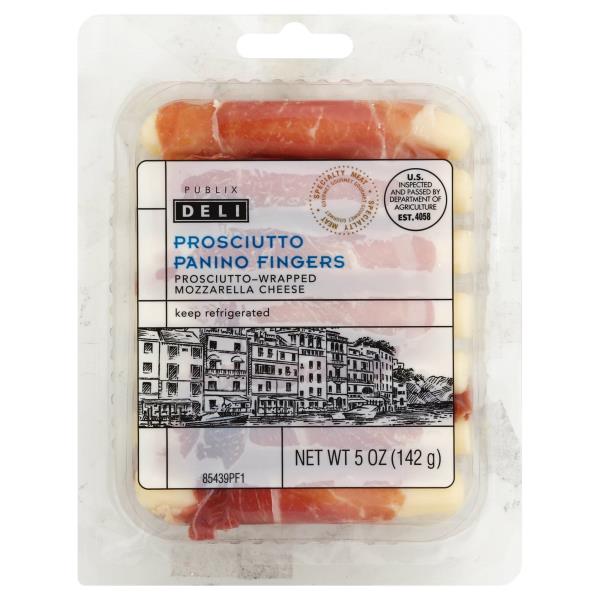
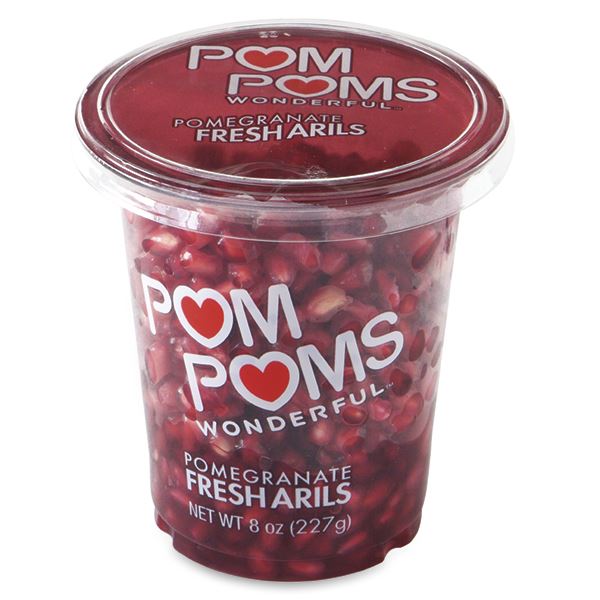
The Flavor… I really like the flavor of Kinkoman’s Organic Soy Sauce. It just tastes better to me, but you can use any soy sauce you like. To add some brightness to the dish, I like to splash a little rice wine vinegar over the rice. You can get fancy and add a little sprinkle of ground ginger, turmeric, onion powder, and garlic powder, or you can just keep it simple with soy sauce and a splash of rice wine vinegar. Seared chicken is delicious with the fried rice. I season it with a little ground ginger, turmeric, onion powder, garlic powder, salt and pepper, and sear on each side for about 6 minutes. You can mix the chicken into the rice, serve it separately, or leave it out all together for a vegetarian version. Skirt steak or shrimp would also be great!  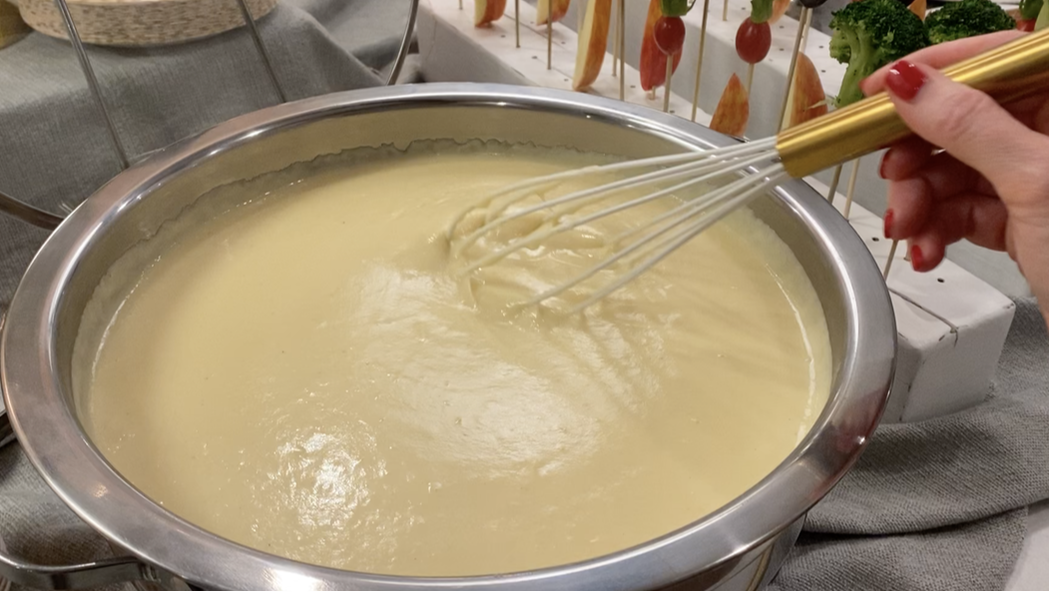 Here’s a few tips for my ultimate cheese fondue! I like to grate the cheese ahead of time, so I’m not in a panic trying to get everything done right before serving. Food prep is everything. Use a microplane grater or rasp for the garlic. This way, you’re guaranteed not to have any hunks of garlic in your fondue. You can use any dry white wine, but I always seem to have Pinot Grigio or Chardonnay on hand, so that’s what I use. For the nutmeg, I REALLY prefer to buy it whole and grate it myself with a microplane grater. If you don’t already have one, you can typically pick one up at the grocery store, or you can find one like this on Amazon. If you’re cooking your dippers, make sure you don’t overcook them. Nobody likes a floppy dipper. That’s it! That’s all my tips! Now go fondue it! 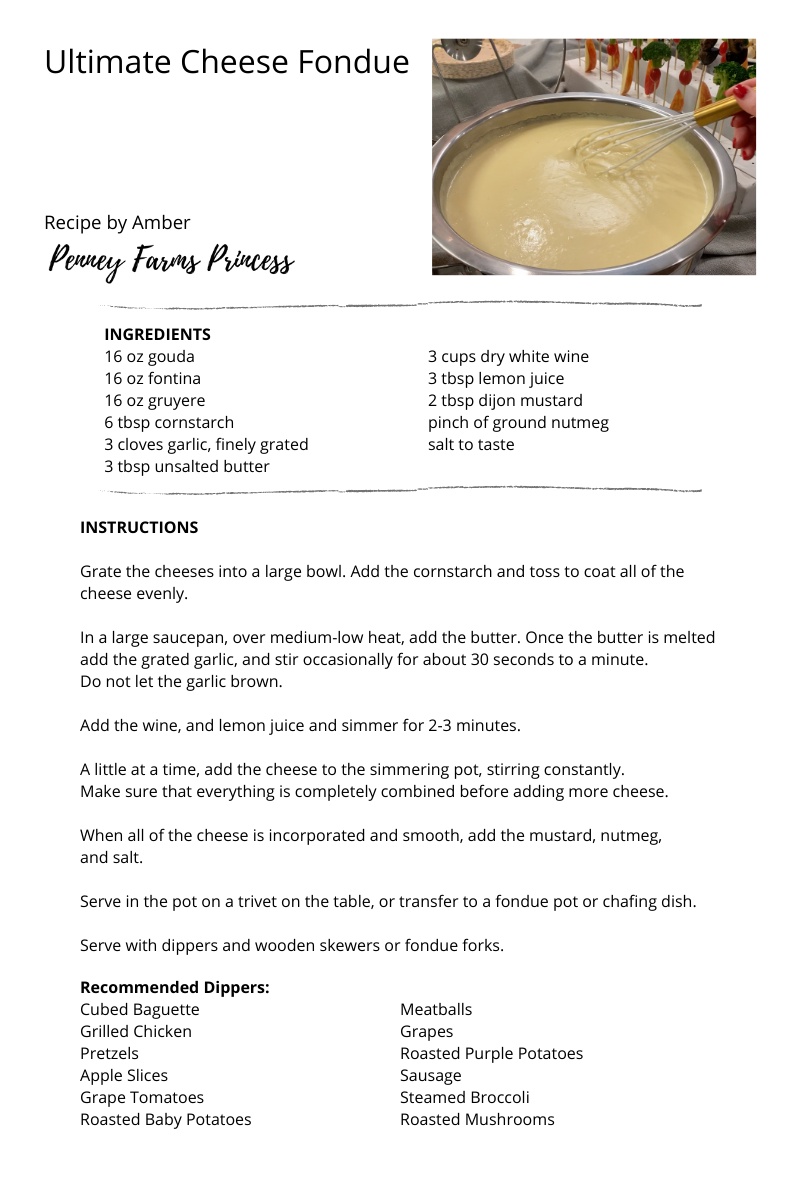 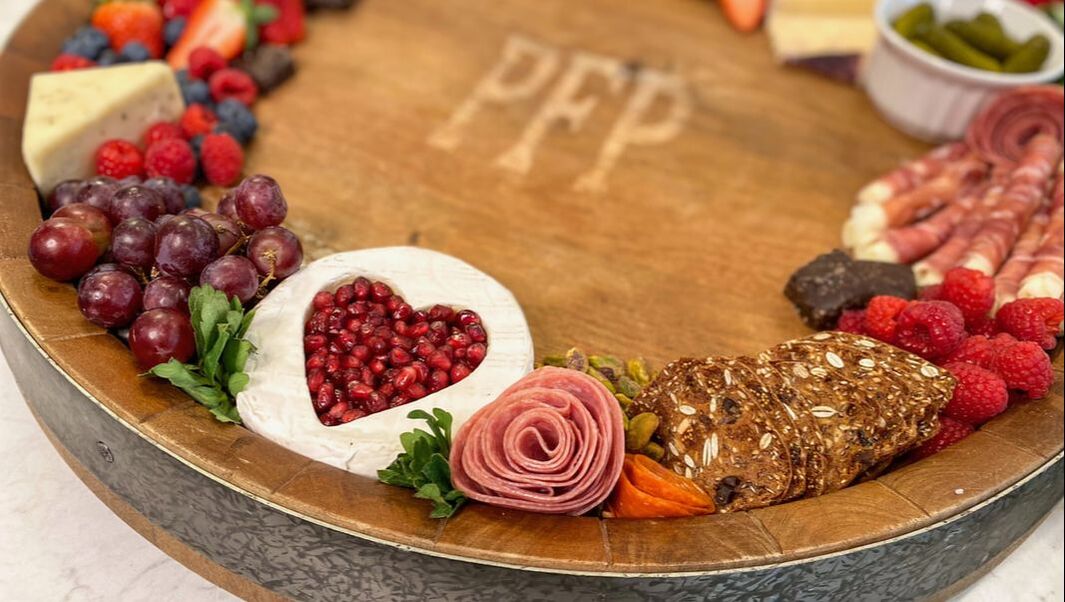 Here’s my Valentine’s Day grazing board! If you want a fun way to celebrate Valentine’s day, but don’t want to cook, put together a grazing board! It’s beautiful, delicious, and you don’t have to turn on the oven. For this board, I tried to incorporate flavors that go well together and a festive color scheme of reds and pinks. To create the brie and pomegranate heart, just use a heart shaped cookie cutter. Make sure your brie is very cold, so it’s easier to cut. Otherwise you’ll have a gooey mess. As soon as you take it out of the refrigerator, unwrap it and use the cookie cutter to gently press out your heart shape. Once the heart shape is removed, drain your pomegranate arils and carefully spoon them in the space. Ingredients Here’s a list of everything I used to create this board as well as links to where I purchased them.
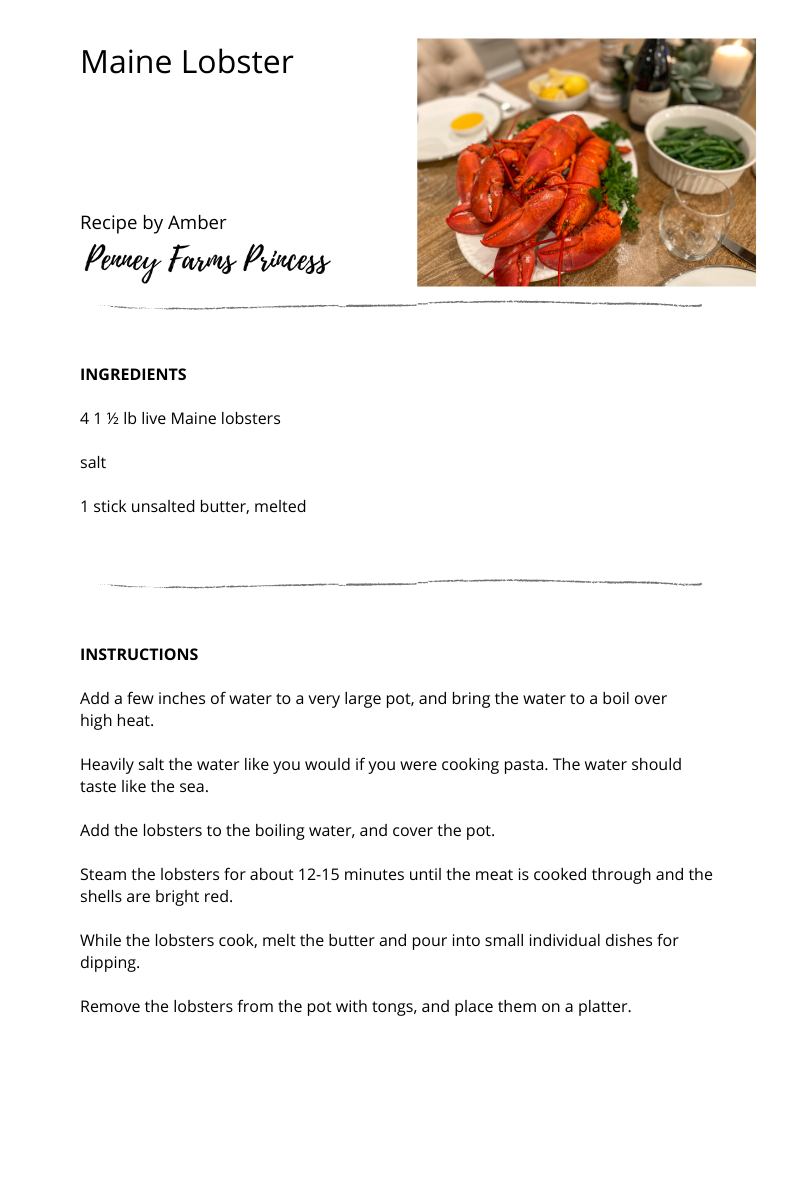
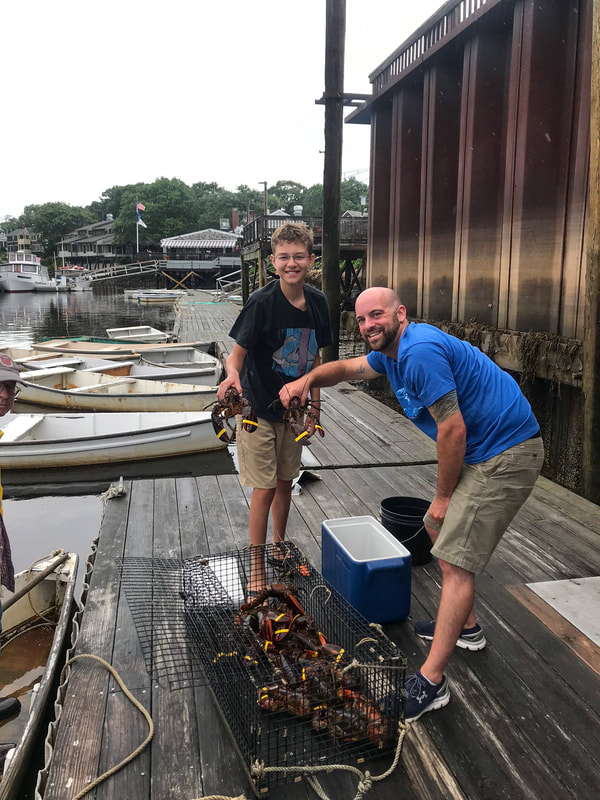
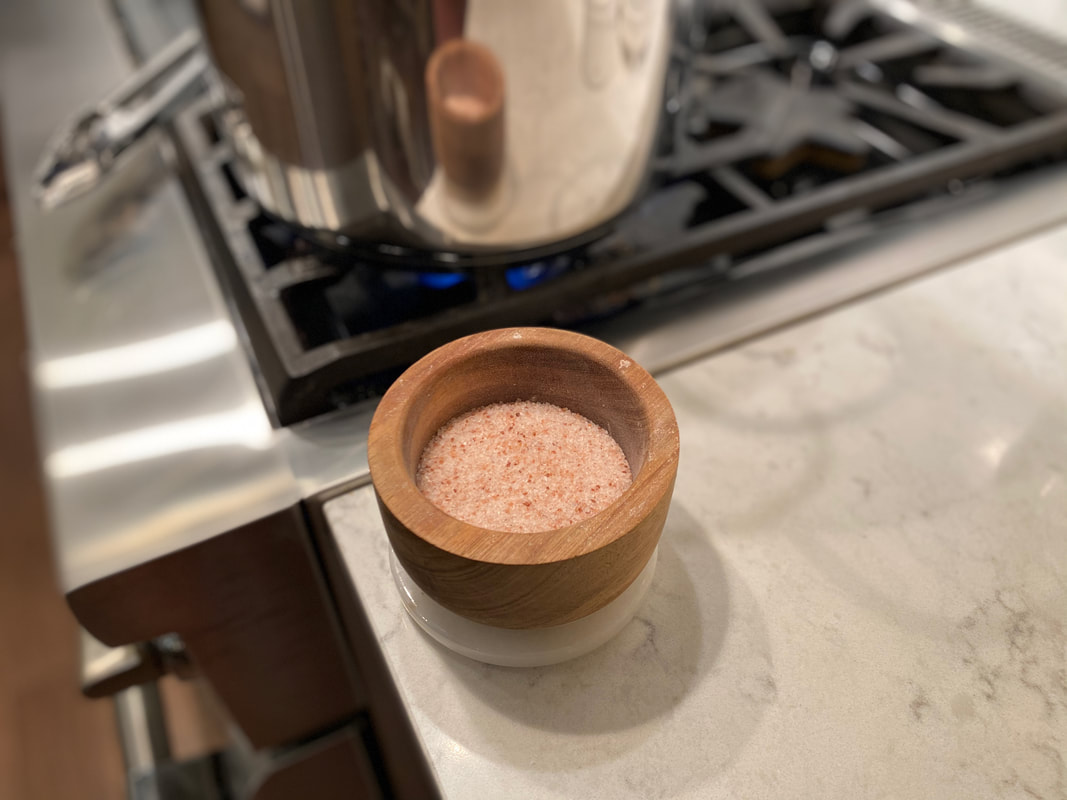
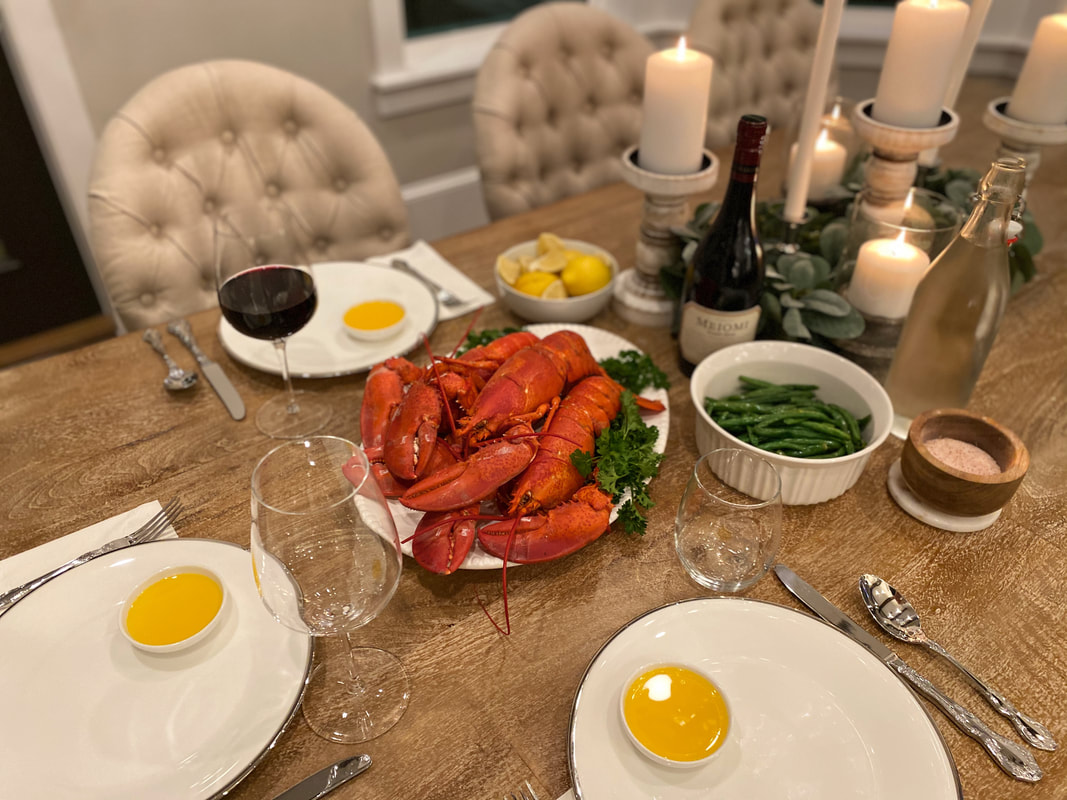
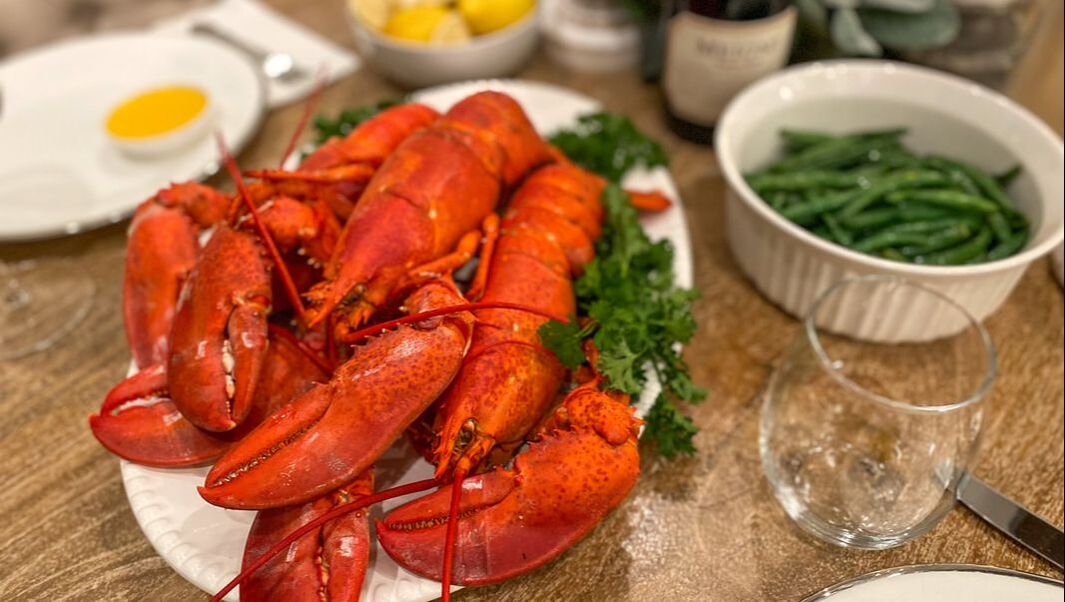 We have family in Maine and when we visit, we literally have fresh Maine lobster at almost every meal. It’s so delicious. Growing up, I always thought of lobster as such a fancy dish. Then, I visited Maine and discovered the best way to have lobster is at a picnic table with butter dripping down your elbows, and salt and vinegar potato chips on the side. Heaven!
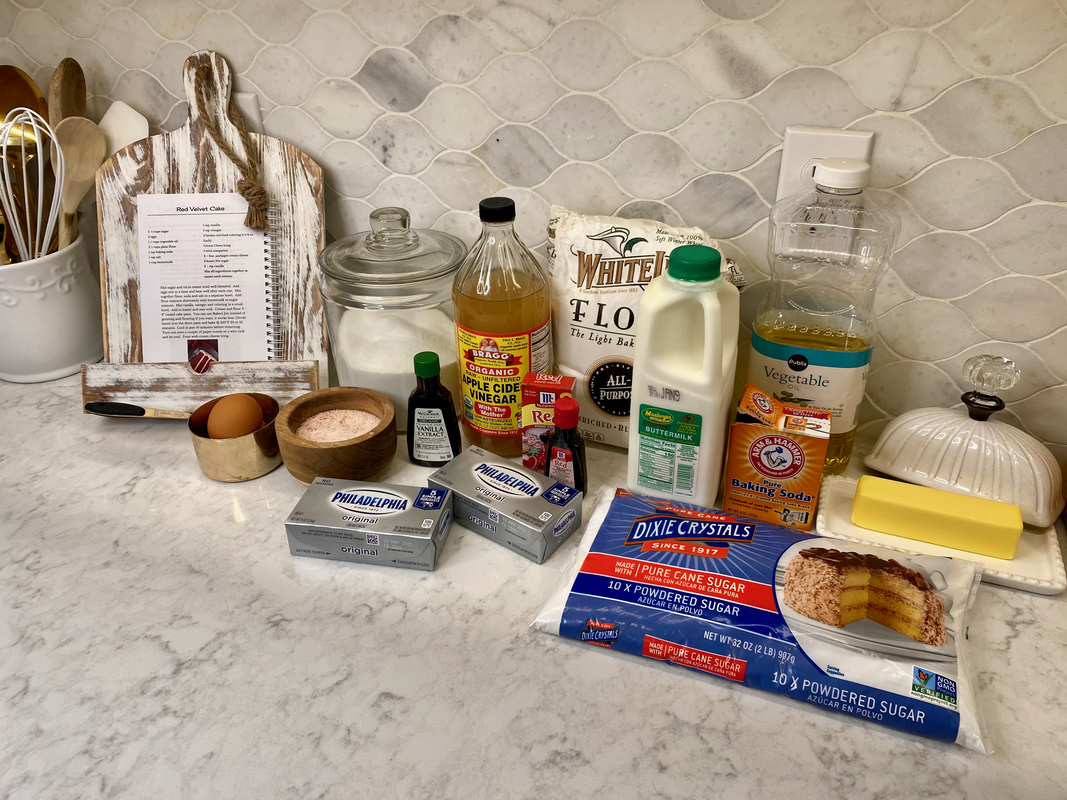
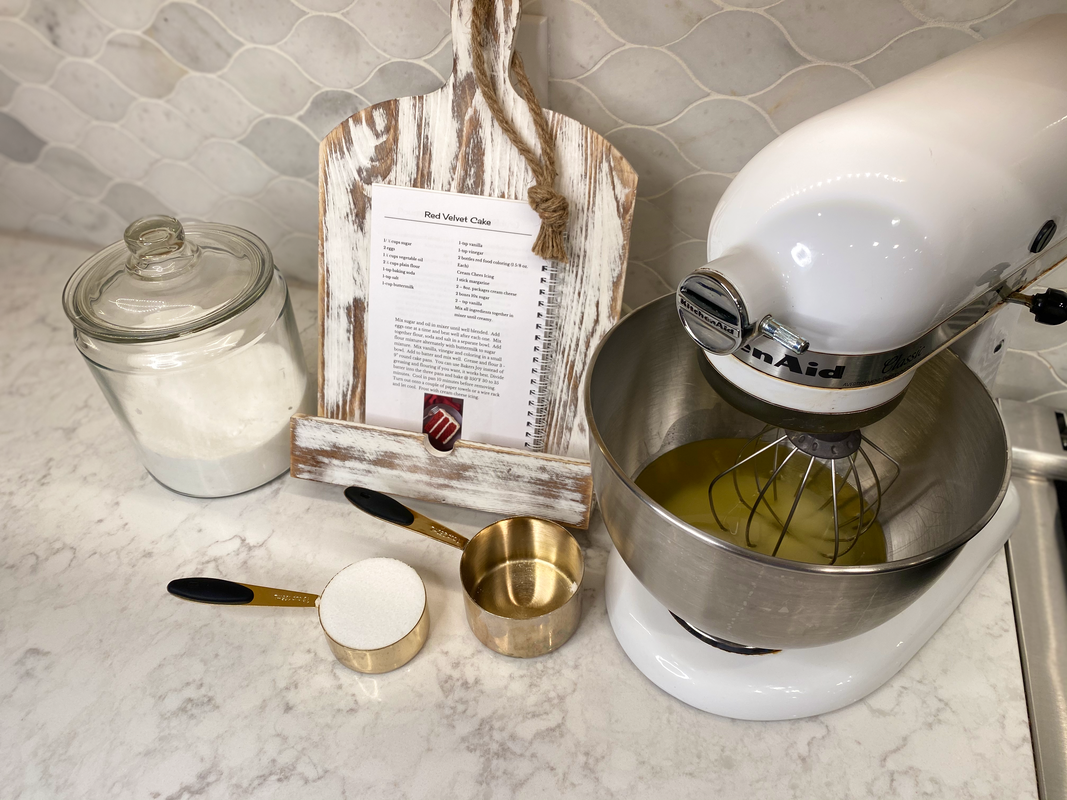
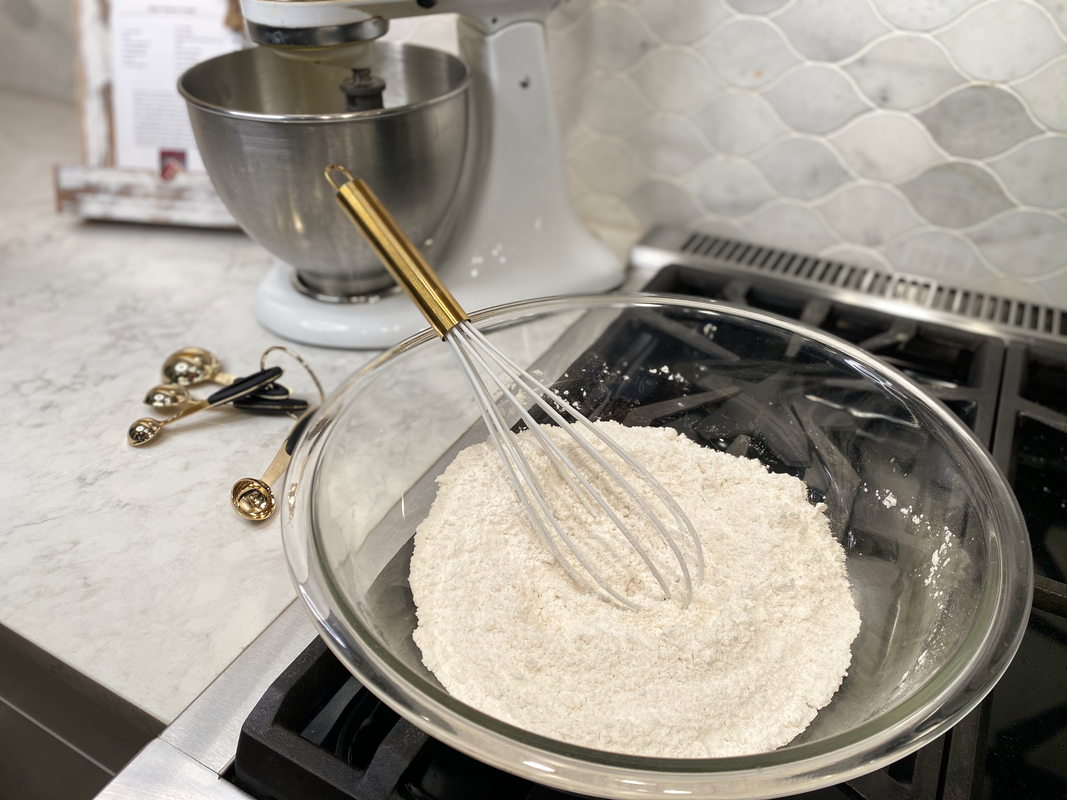
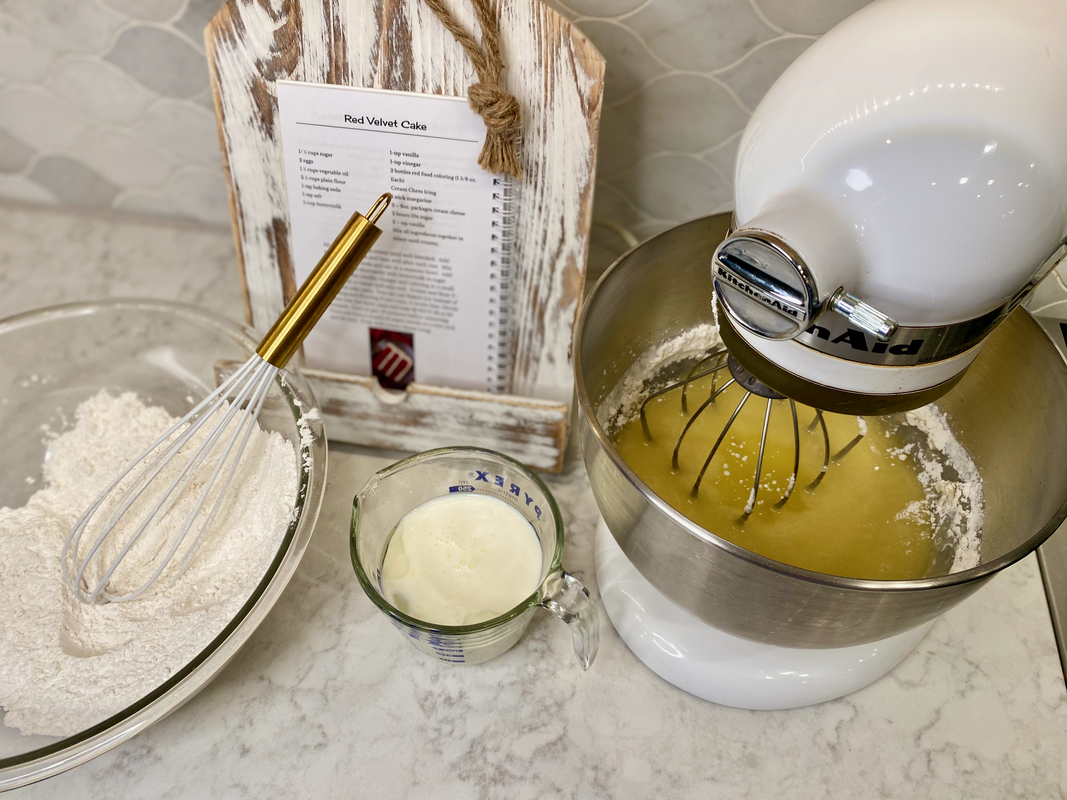
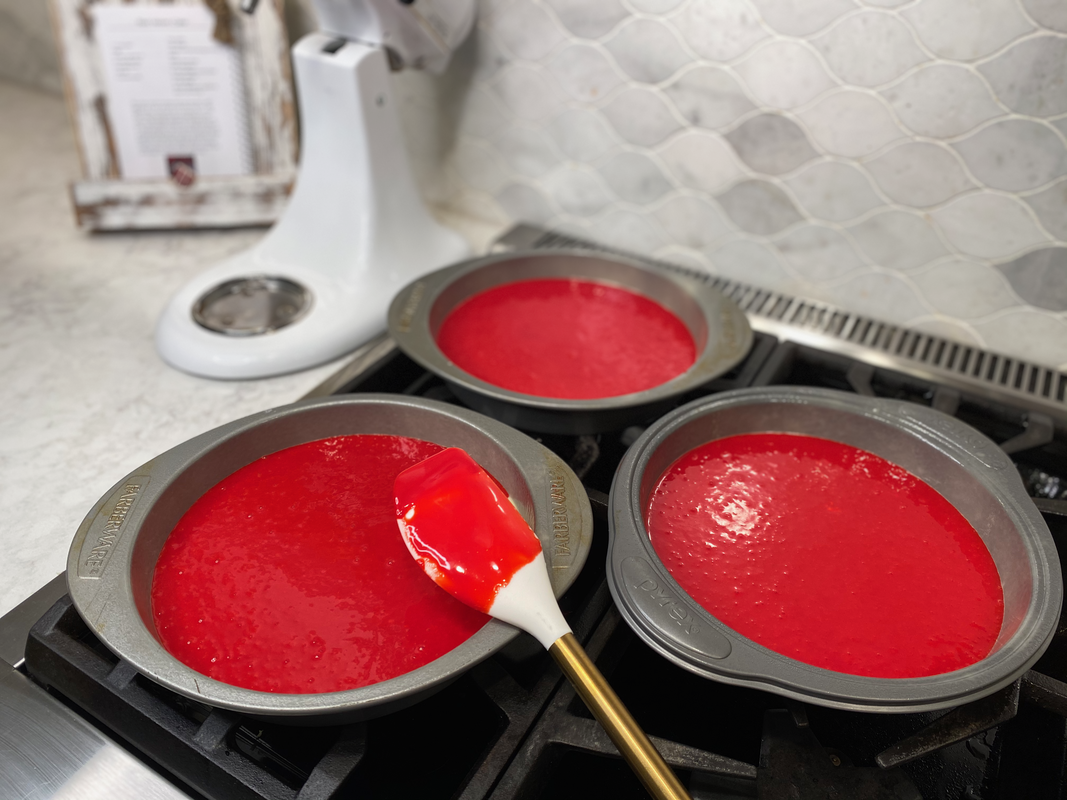
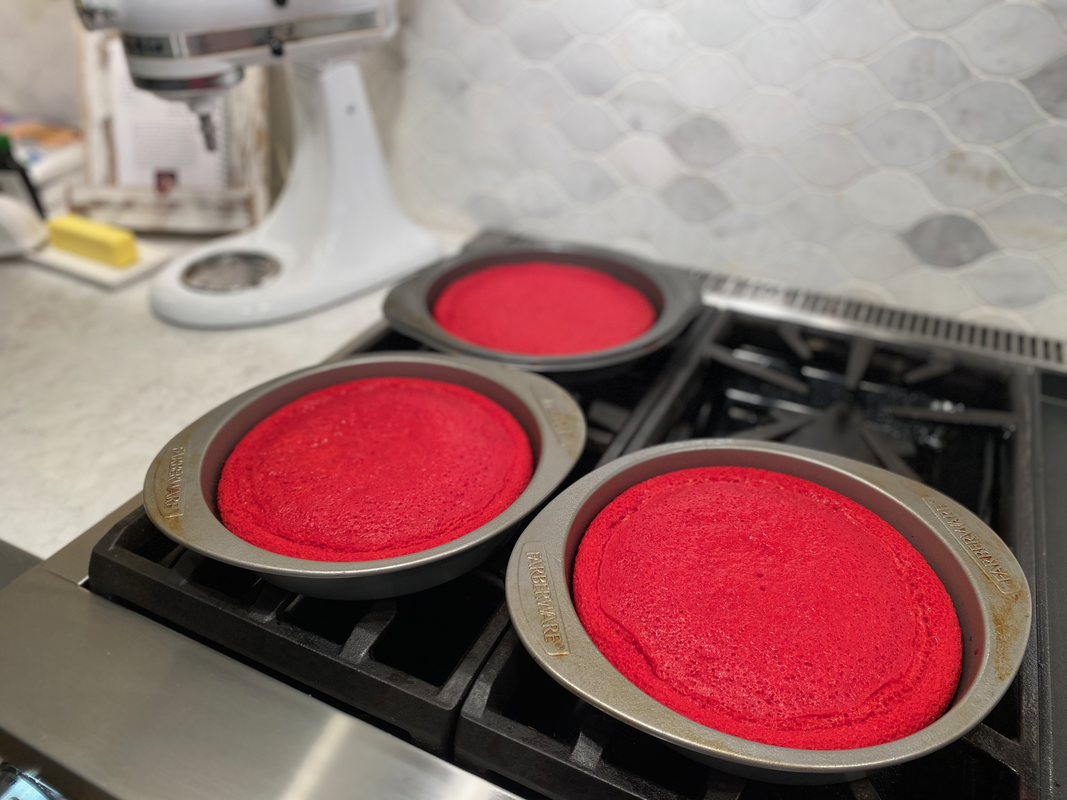
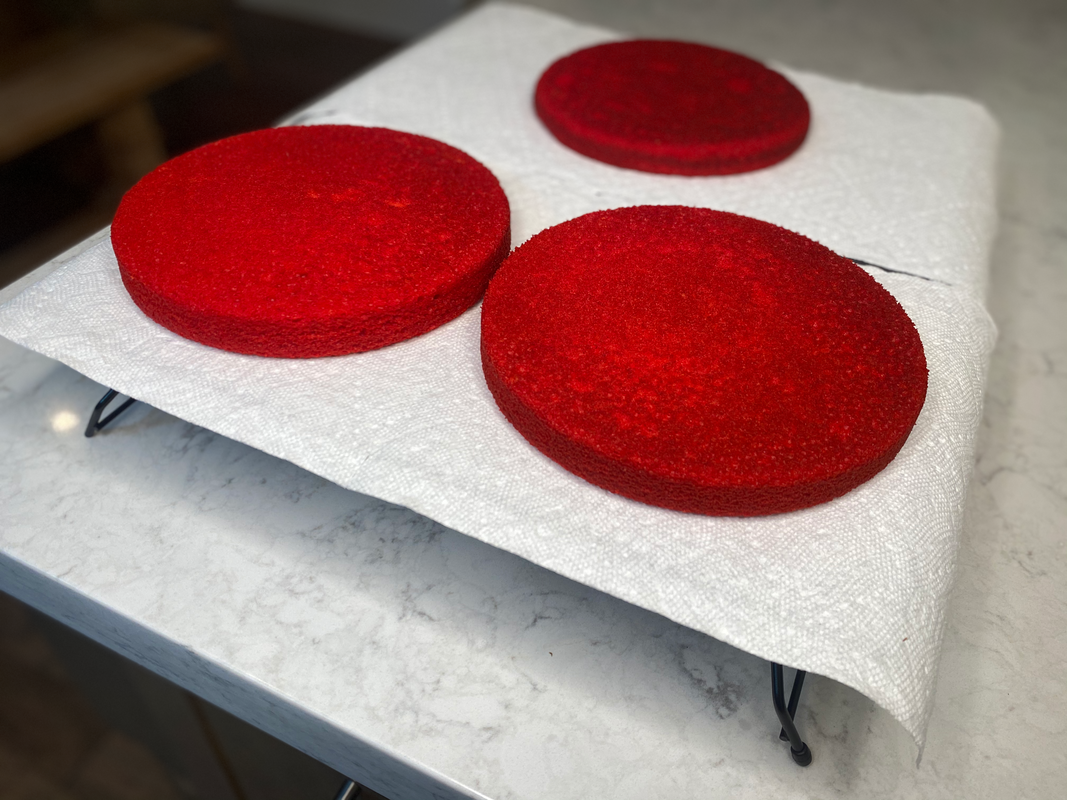
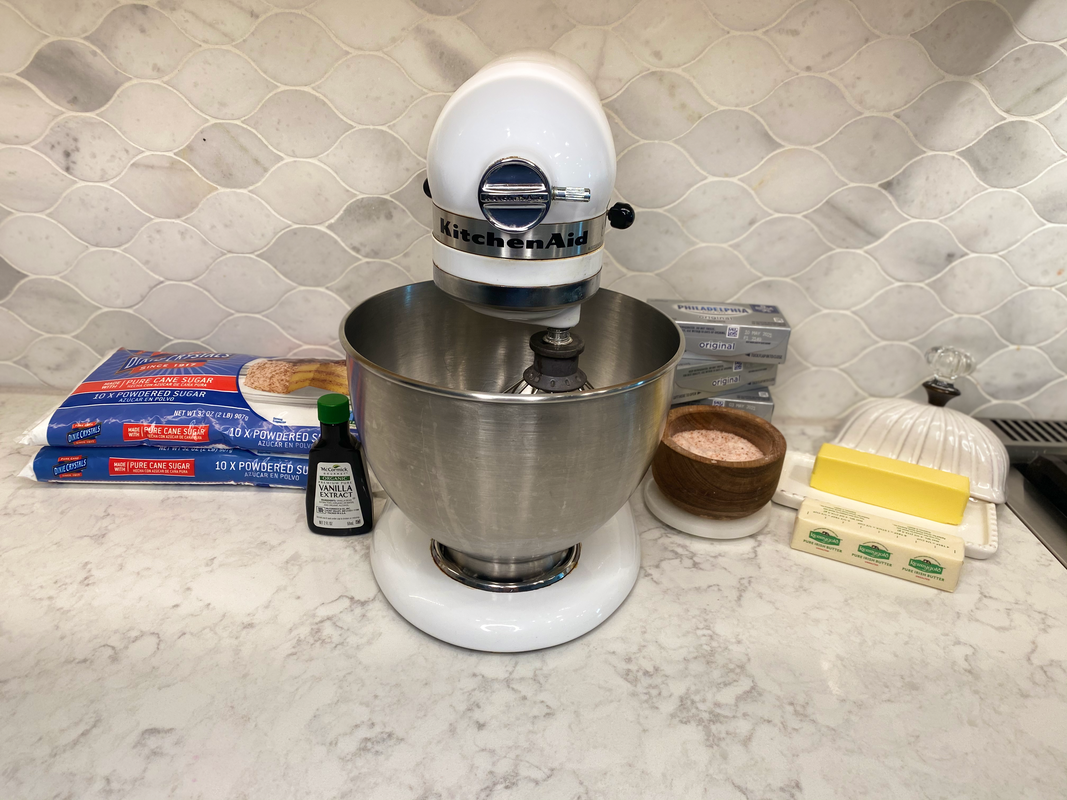
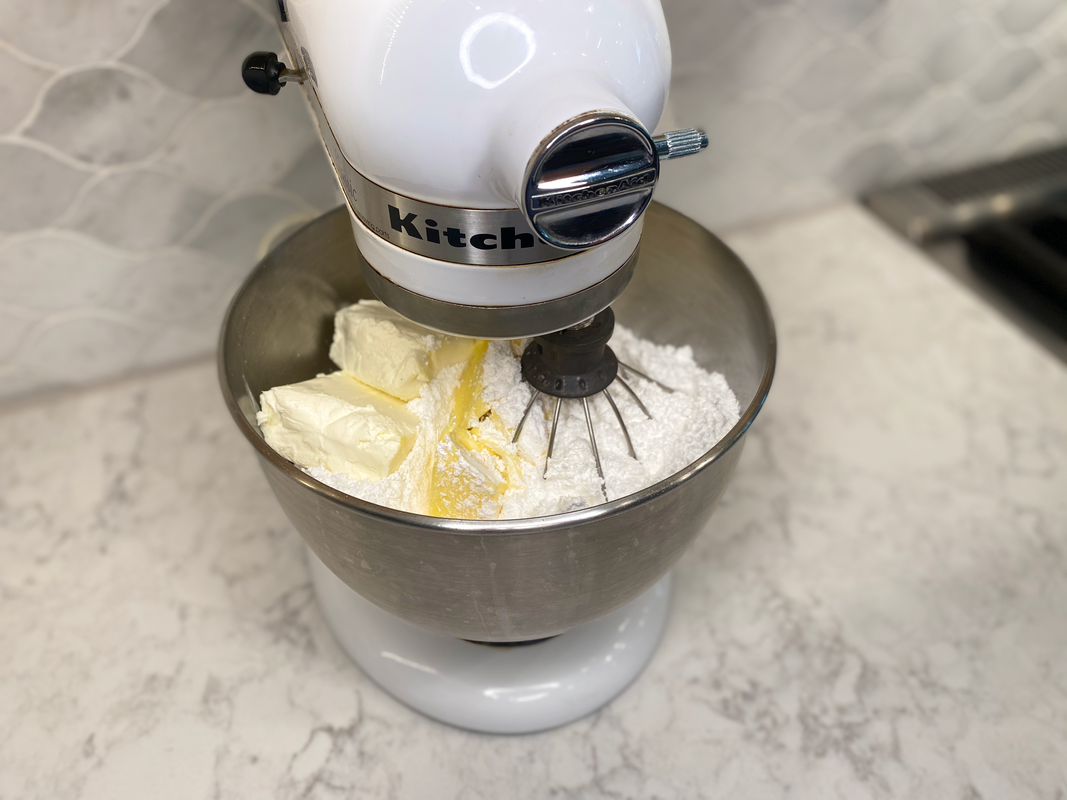
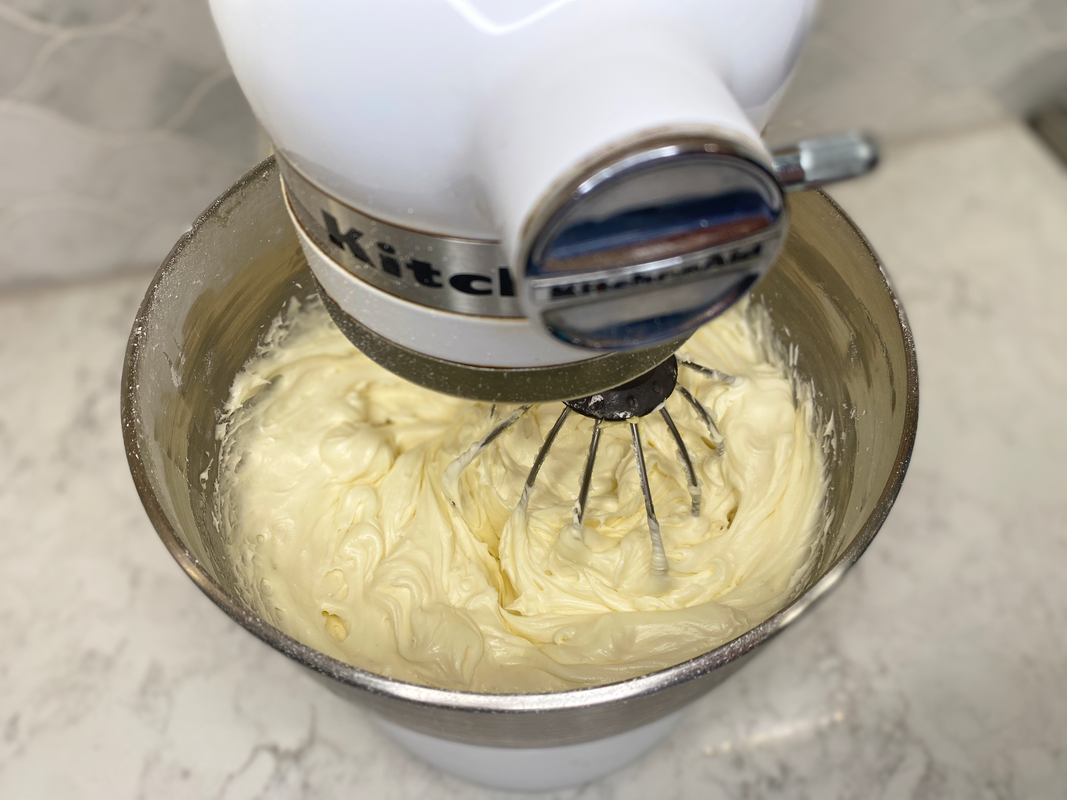
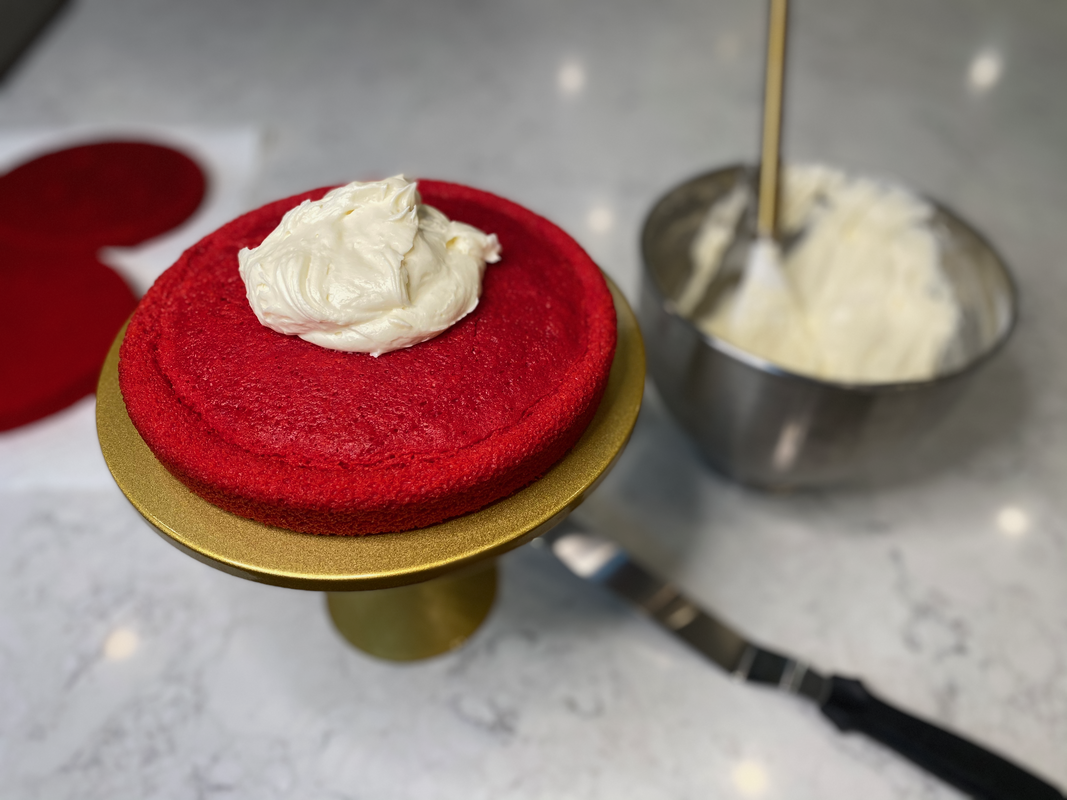
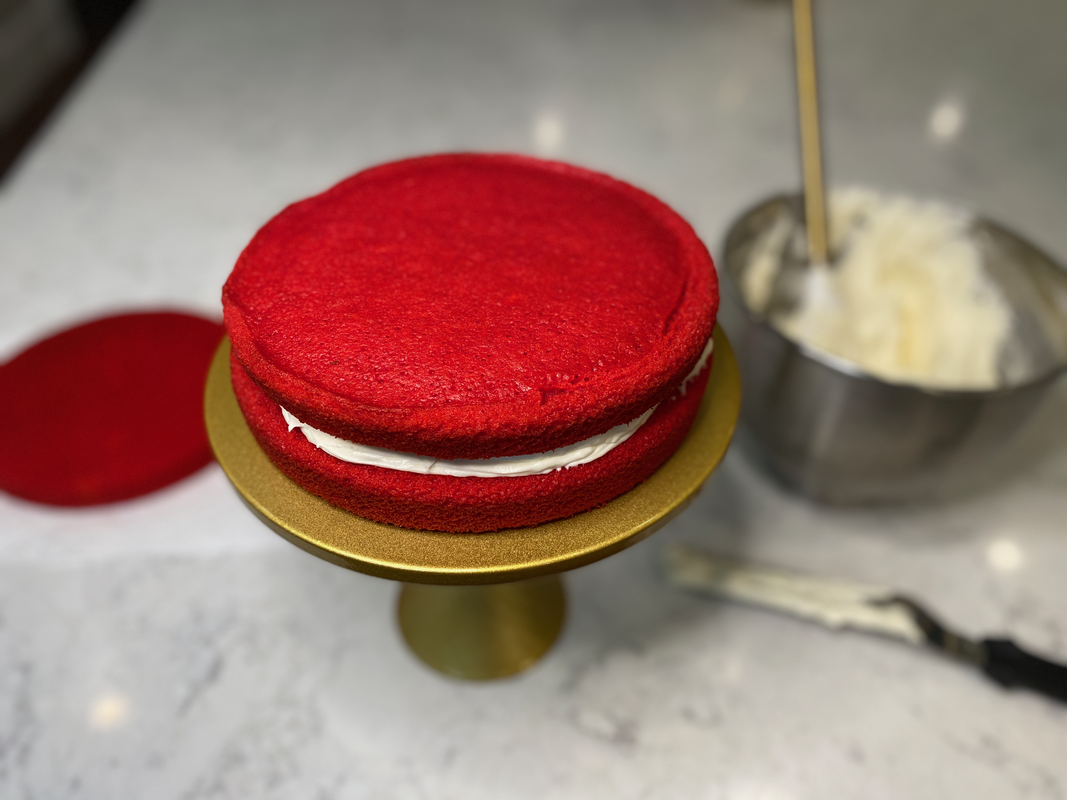
   Me & Granny Guynell Me & Granny Guynell Granny Guynell made the best red velvet cake I’ve ever had. Every year at Christmas time our family would pile in the car and make the 8 hour drive to North Georgia to see Granny. When we arrived at Granny’s house, there would be a huge display of desserts in the formal dining room. Red velvet cake, orange cake, tea cakes… There were so many desserts. The red velvet cake, though, was always my favorite. The vibrant red color of the cake, the decadent cream cheese icing, and the glass plate it was displayed on. It felt so fancy to me, and y’all know this country girl loves all things fancy. Granny’s recipe is a classic southern red velvet cake. There’s no cocoa in her recipe, which would make some sticklers say it isn’t a true red velvet cake. As far as I’m concerned, though, Granny’s red velvet cake is the best I’ve ever had. Now, I continue her tradition and make this cake every year for my family. Preheat your oven to 350 degrees. With a mixer, whisk the oil and sugar together until blended. 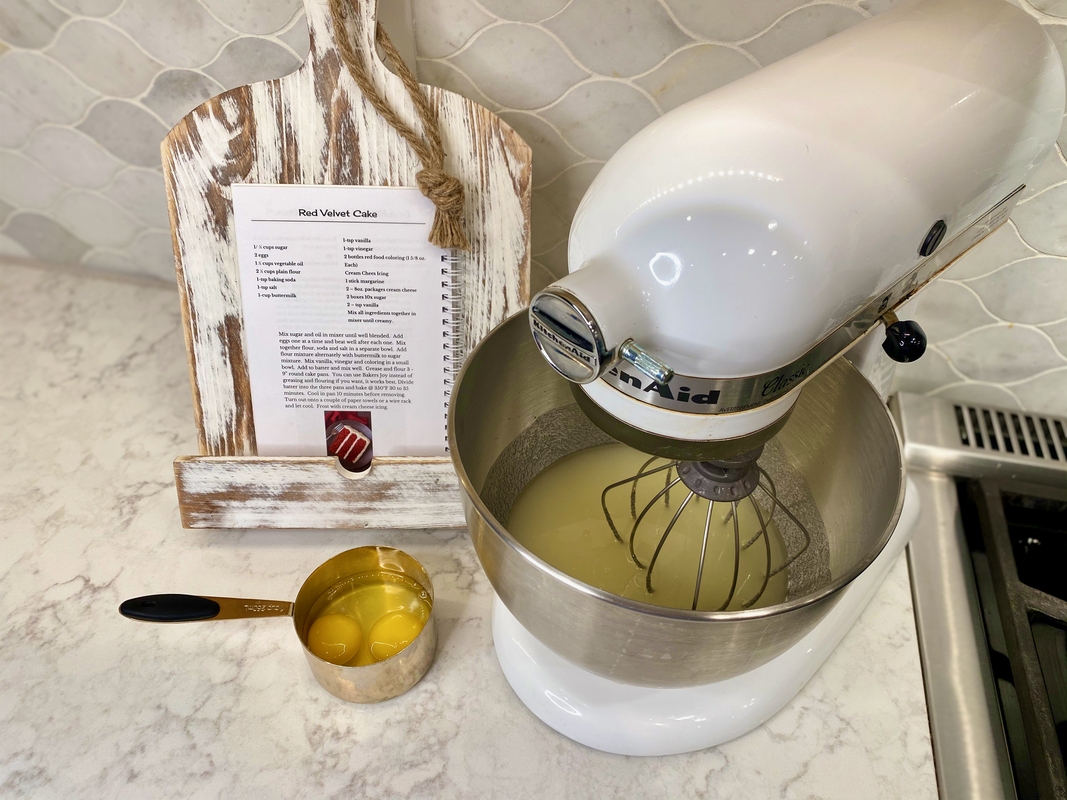 Add the eggs one at a time, mixing well after each one. In a separate bowl, mix together the flour, baking soda and salt. Add the buttermilk and flour mixture alternately to the batter in the mixer. 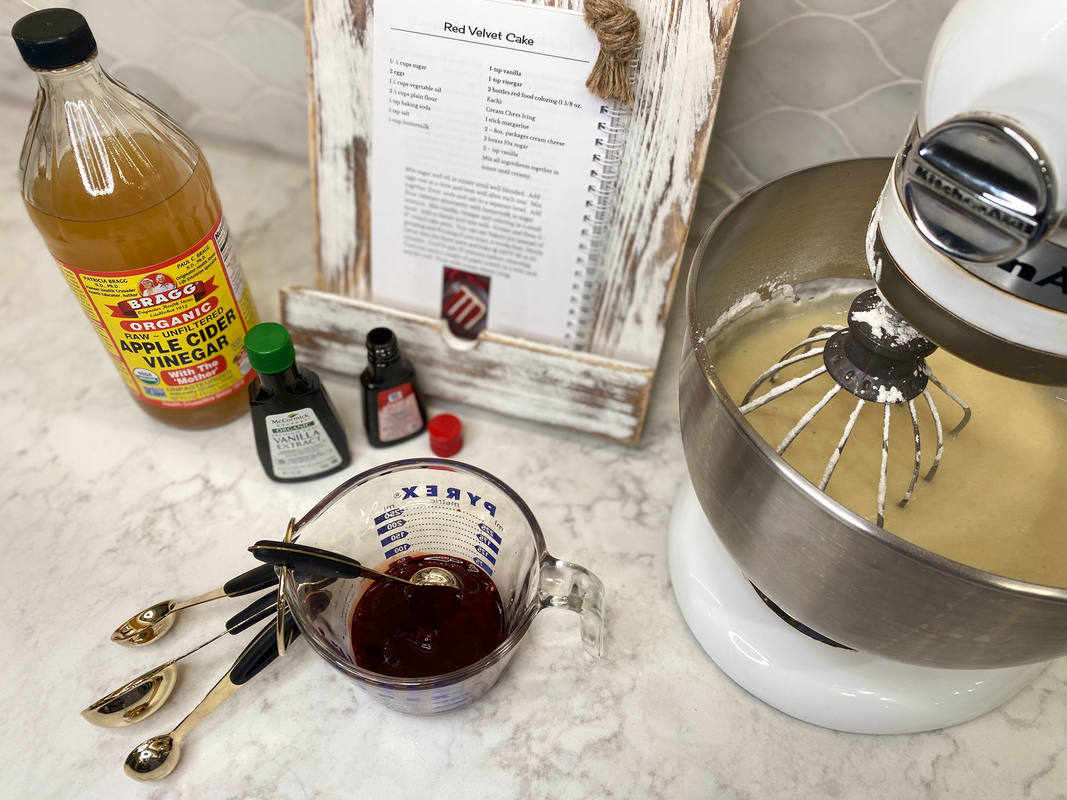 In a small dish, mix the vanilla, vinegar and red food coloring. Carefully add this to the batter. Mix on low or by hand until the coloring is consistent throughout the batter. Be very careful with the red food coloring. It will stain EVERYTHING. Your hands, your nails, your countertops, etc. I like to wear gloves & work over a plate or cutting board when handling it. Butter & flour 3 9” round cake pans. Pour the batter equally into each pan. I like to use Bakers Joy nonstick baking spray instead of buttering and flouring the pan. It works like a dream, and is a big time saver. 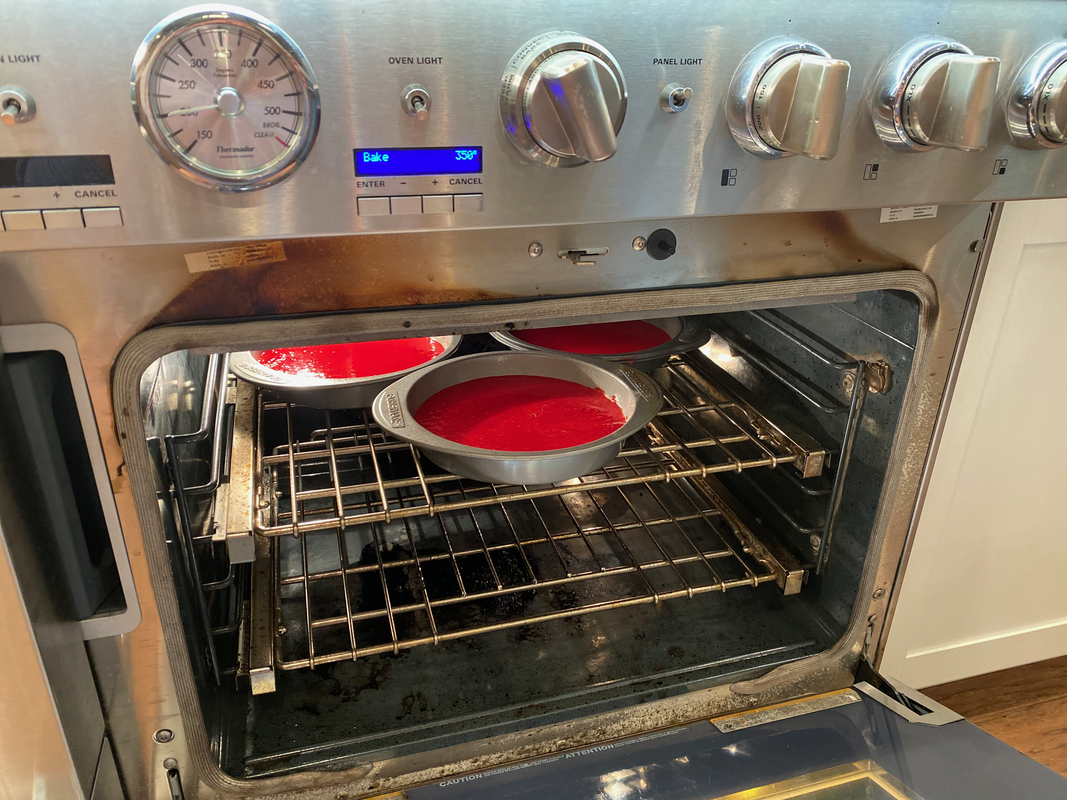 Bake at 350 for about 20 minutes or until a toothpick comes out clean from the center. Let the cakes rest for 10 minutes before removing them from the pans. Line cooling racks with paper towels or parchment paper, then turn out the cakes onto the racks to cool completely. FOR THE ICING Add the butter, cream cheese, powdered sugar, vanilla and salt to a mixer. Start on the lowest setting until everything is blended to prevent the powdered sugar from spilling out of the mixer. Once the icing starts coming together, slowly increase the speed to medium, then whisk on high for 60 seconds until light and fluffy. To frost the cakes, start by placing a small amount of icing in the center of a cake stand or serving platter. Add the first cake layer in the center of the dish. Spoon some of the icing onto the top layer, and use an offset spatula to evenly spread the icing out to the edges. Repeat this process for the second layer. Place the third layer upside down on the top of the cake. Then, place a skewer through the center of the cake to stabilize it. Using small amounts of icing, frost the sides of the cake first. Then spoon the icing onto the top of the cake and evenly spread it out to the edges and over the sides. 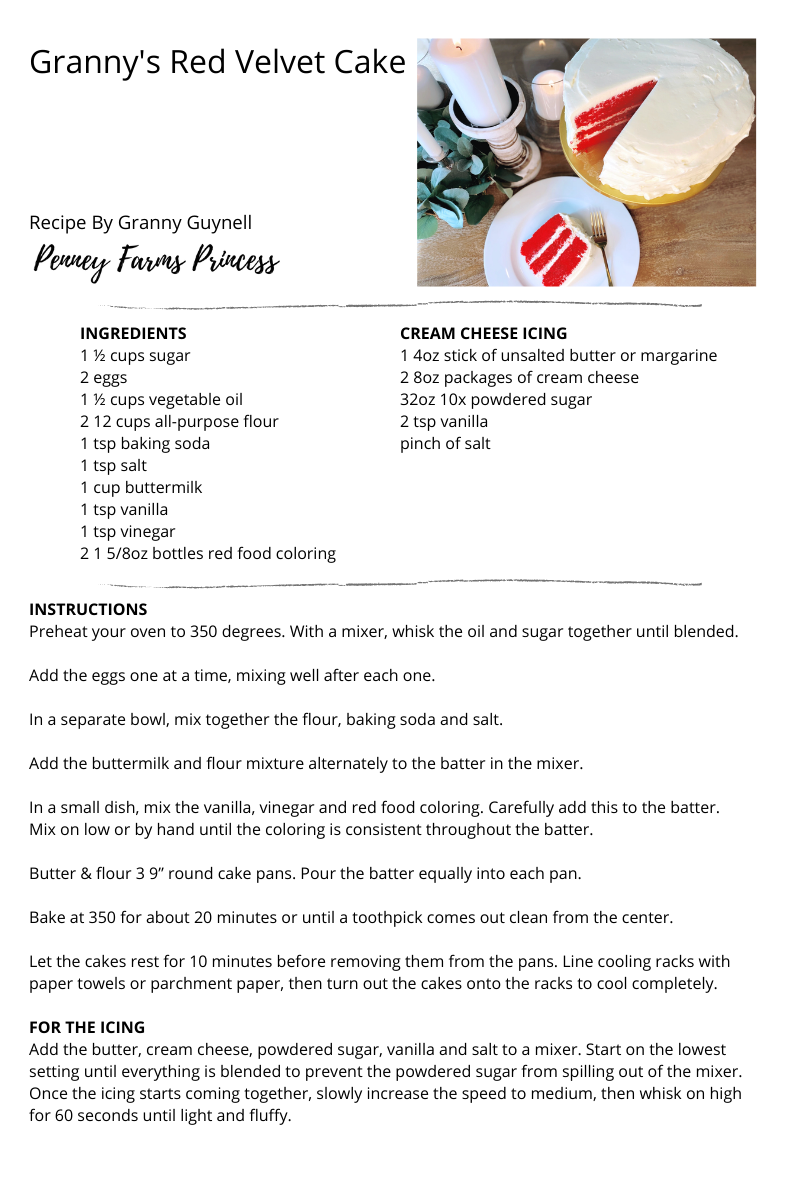 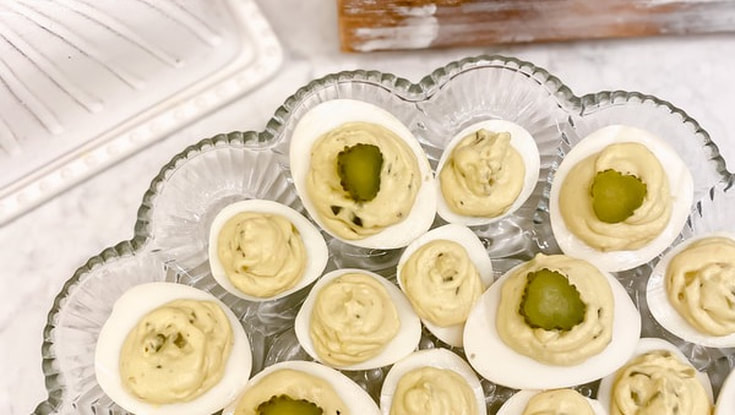
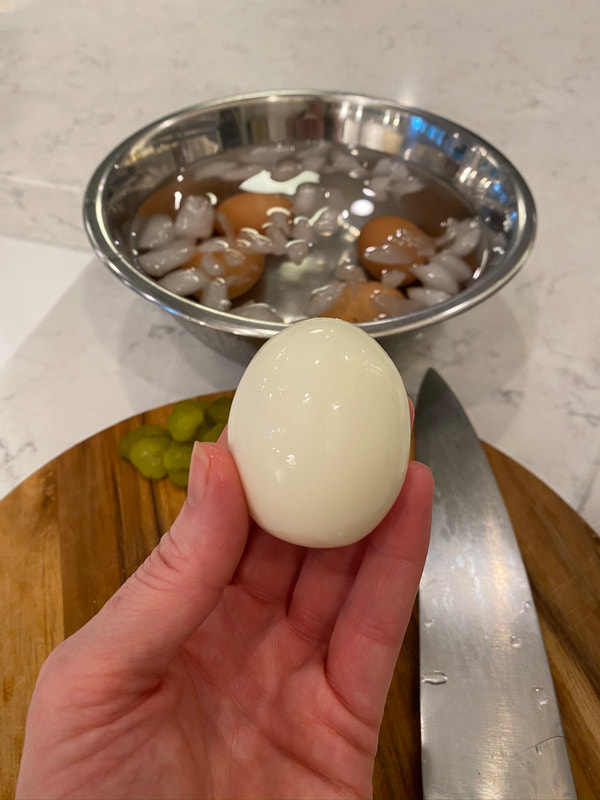
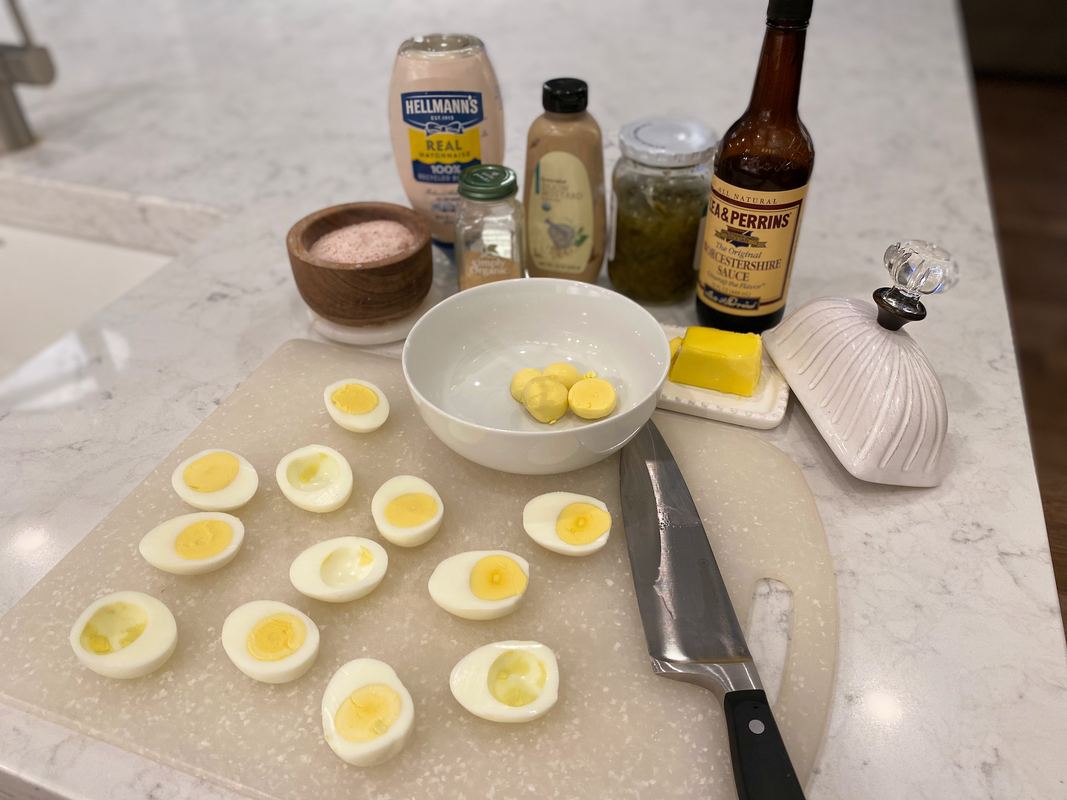
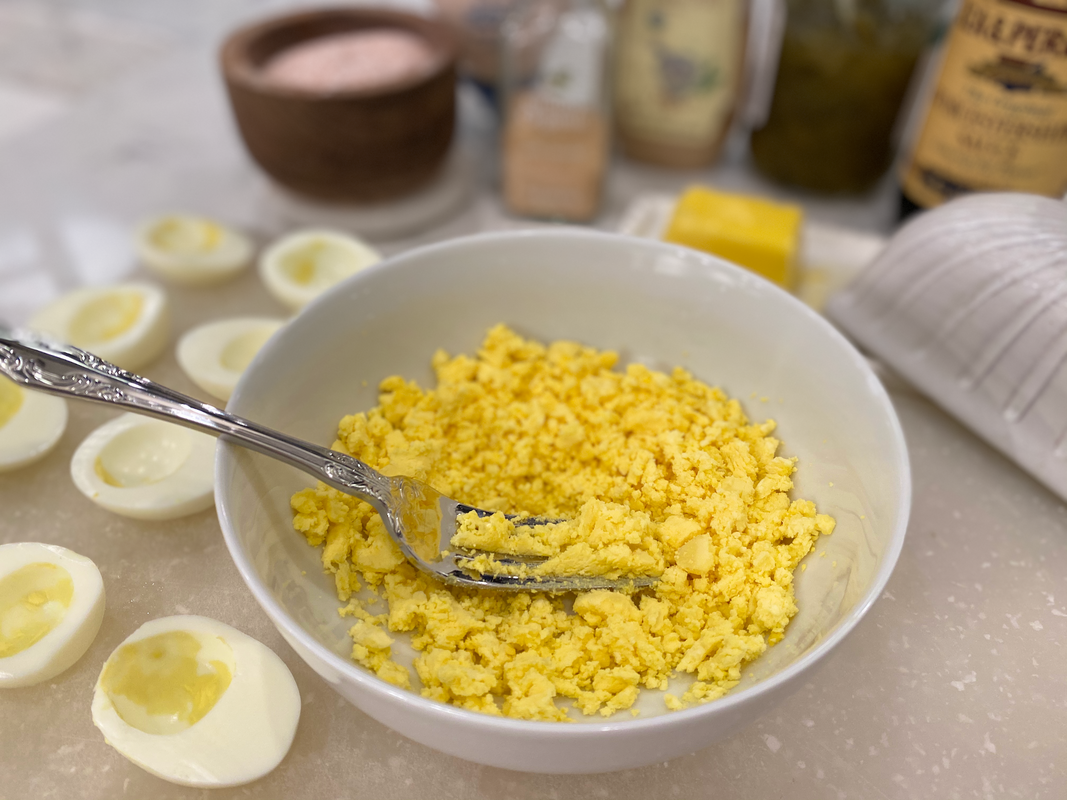
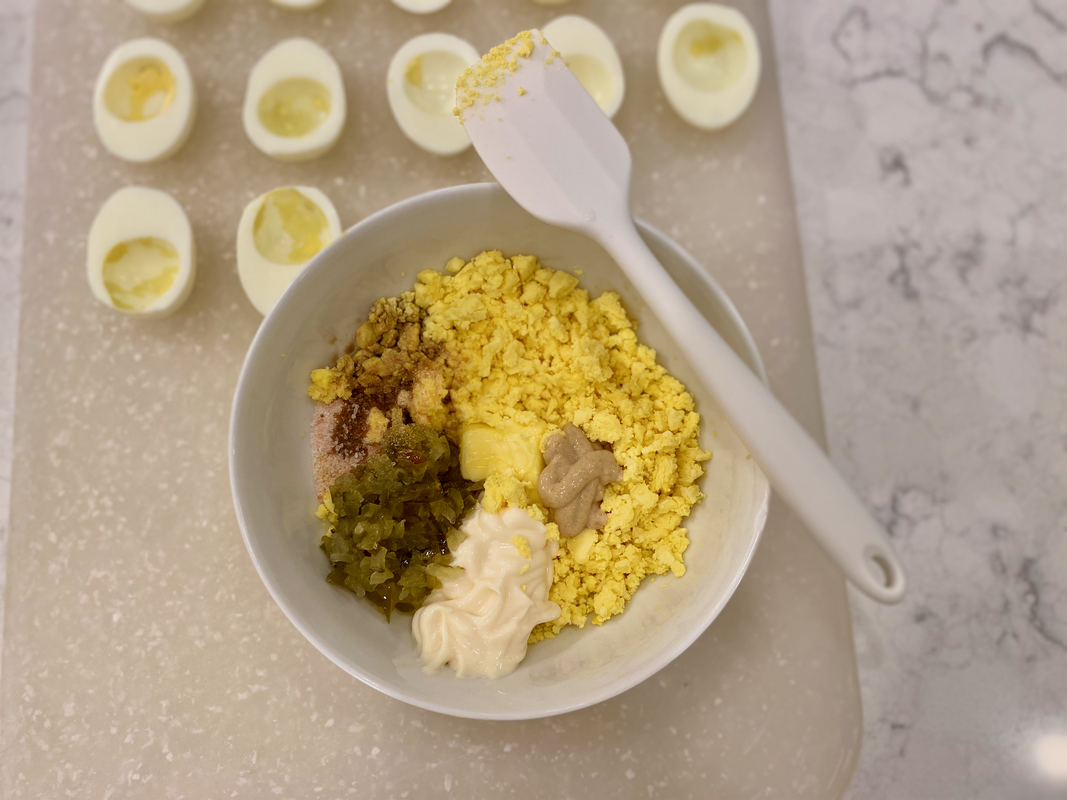
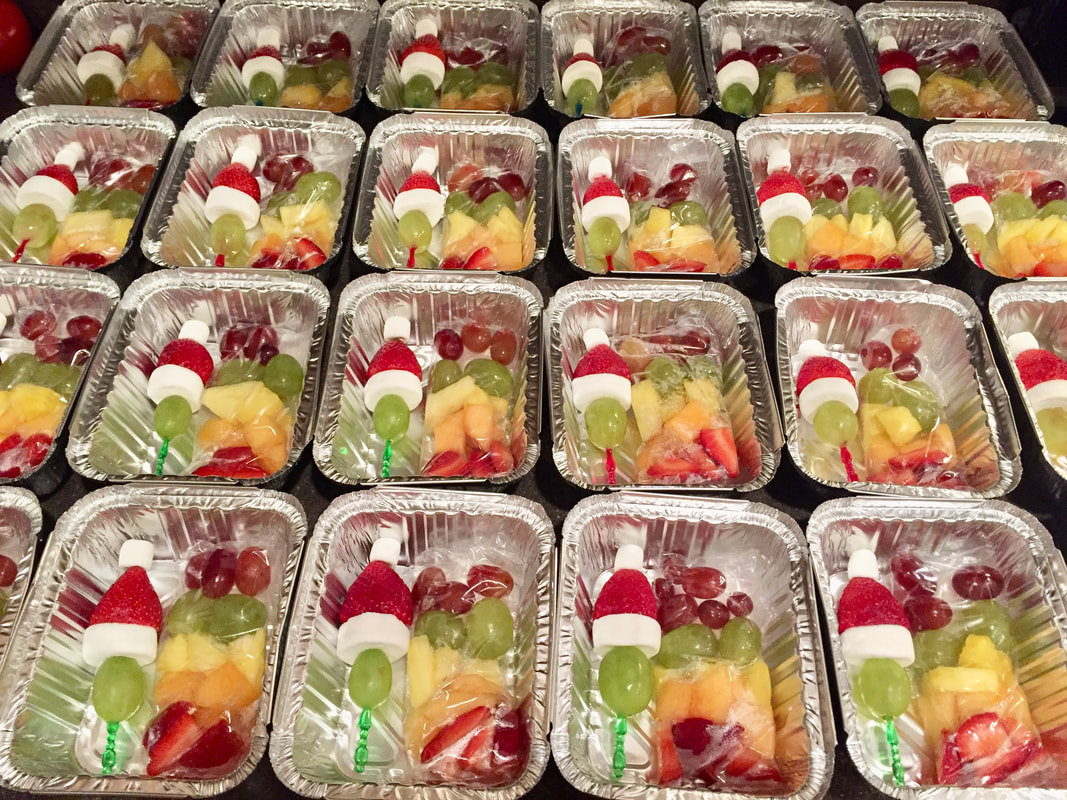
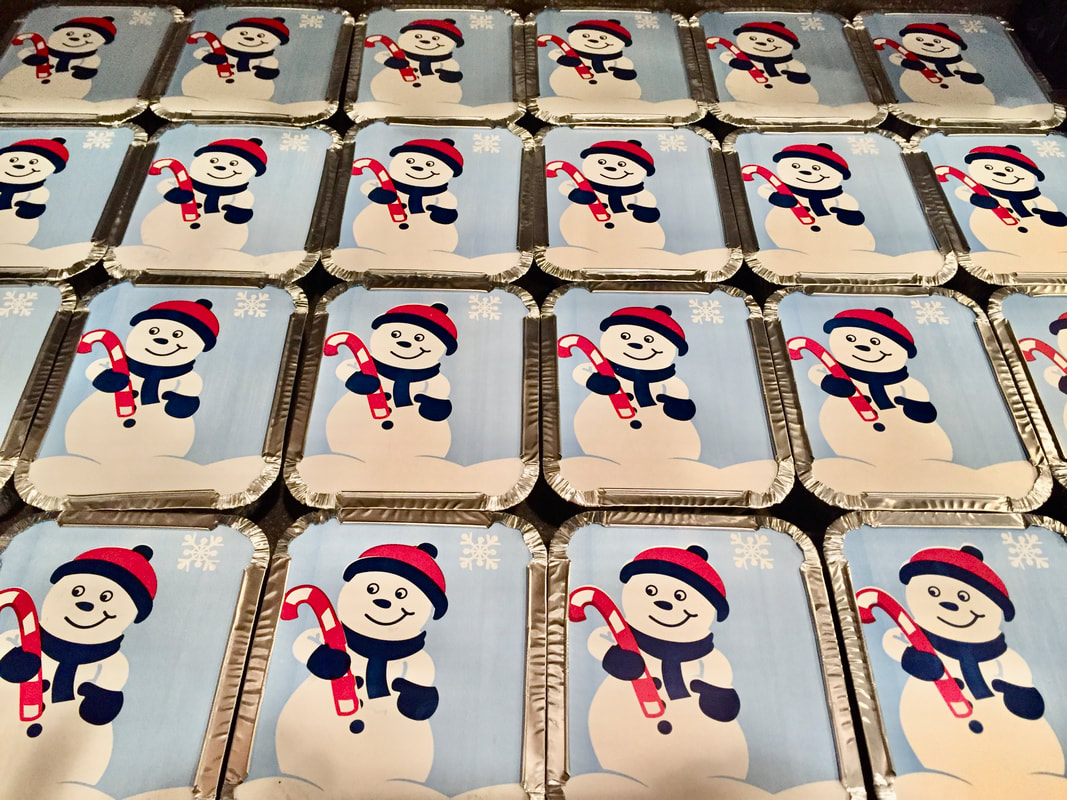
TIP Corey recommends putting the eggs in an ice bath immediately after cooking. This makes the eggs easy to peel. Otherwise you could end up with deviled eggs that look like dimpled golf ball. Ew. David. Secret Ingredient Corey’s secret ingredient is… well, she has two secret ingredients. First, butter. Like any good southern belle, she believes that butta makes everything betta. (If you read that in your best southern draw, you read it correctly.) The other secret ingredient is, in the words of the great southern queen Trisha Yearwood, “what’s this here sauce.” A few dashes of Worcestershire sauce gives Corey’s deviled eggs that little something extra. TOPPING IDEAS Paprika • Bacon Crumbles • Crispy Prosciutto • Spanish Olive Slice • Sprig of Fresh Dill • Sliced Cornichon • Blue Cheese Crumble & Grape Tomato Slice 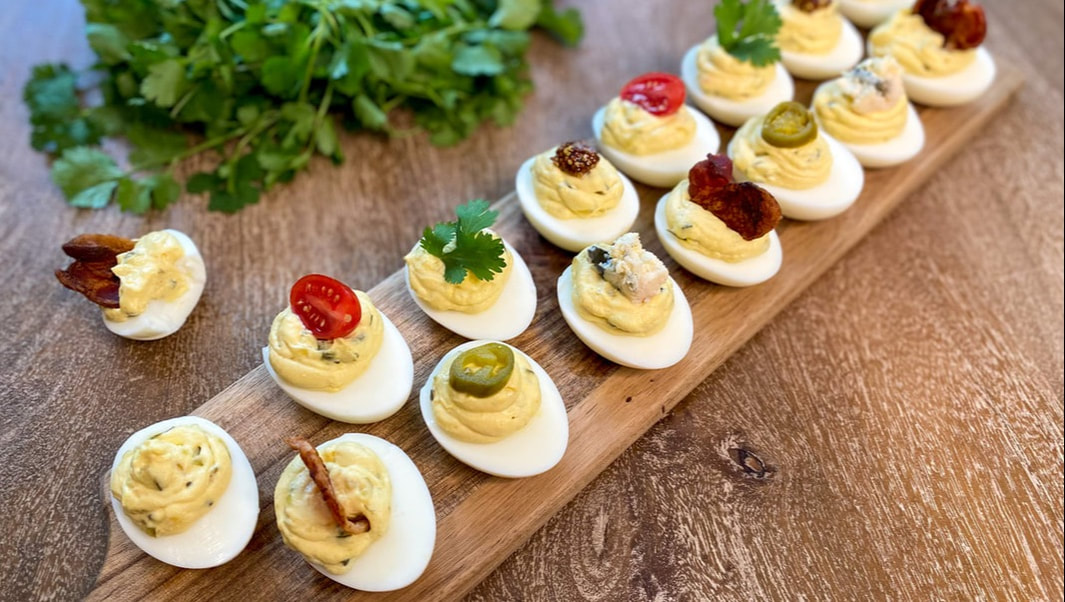 Meet Corey… Y’all, I can’t say enough about this beautiful soul. She’s my best friend in the whole world, my confidant, fellow foodie, and favorite travel partner. God surely had a plan bringing the two of us together. I’m blessed to have her in my life. 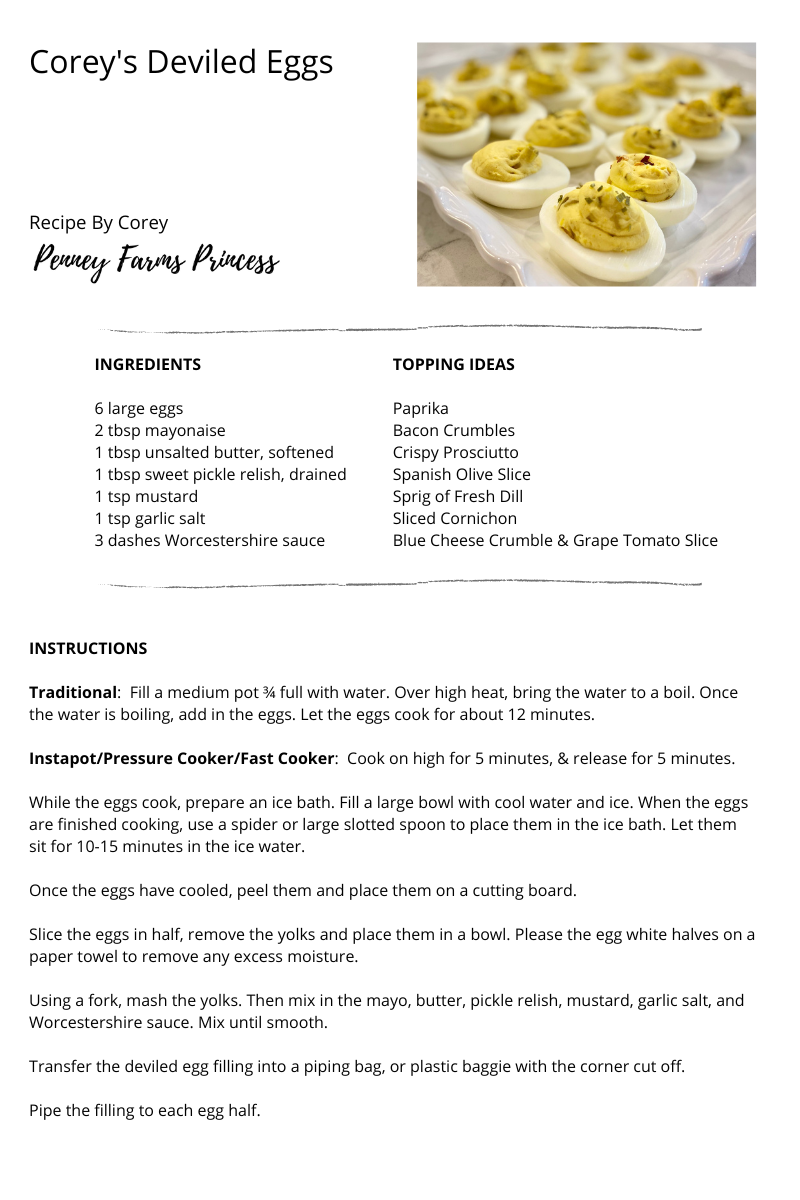 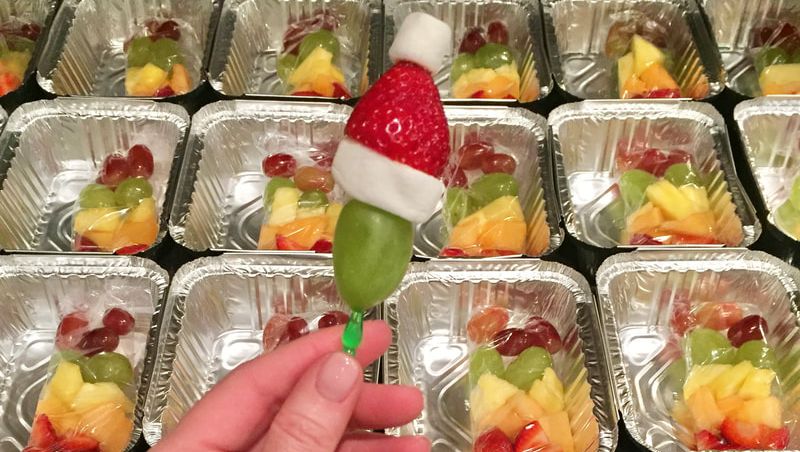 I made these adorable Grinch Fruit Skewers for my stepson’s elementary school Christmas celebration years ago. They were a hit with the kids and the parents loved them because it wasn’t packed with a ton of refined sugar. WHAT YOU NEED
HOW TO DO IT
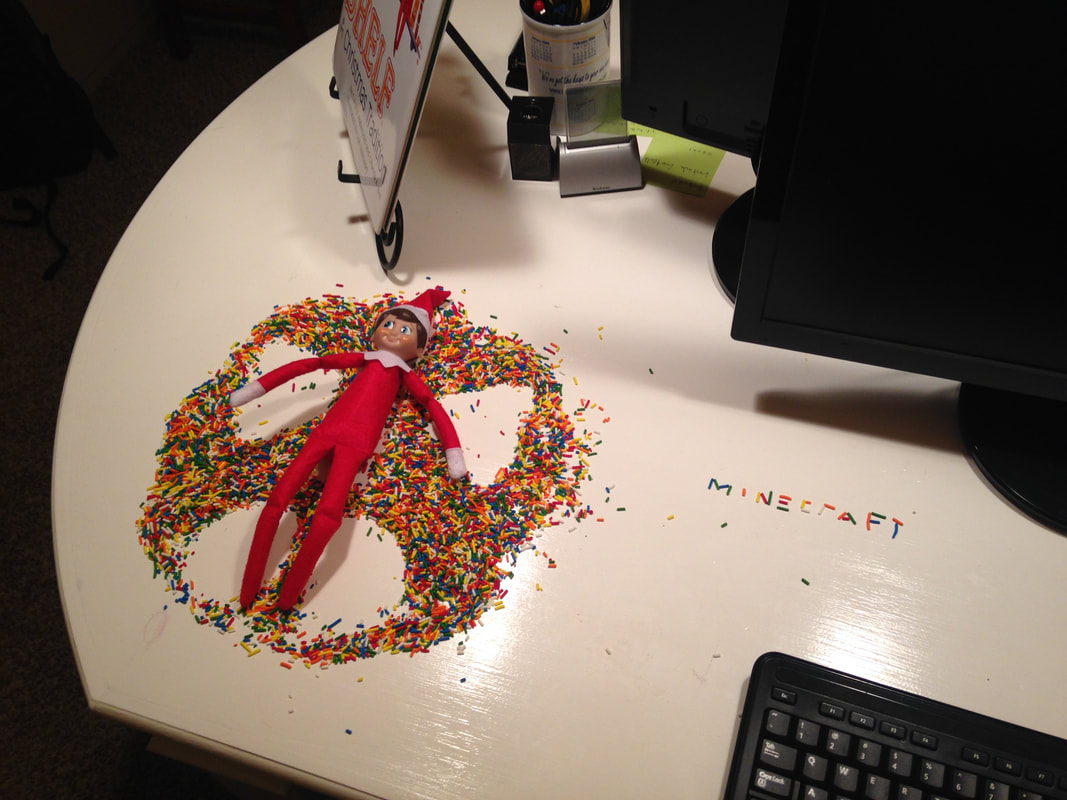
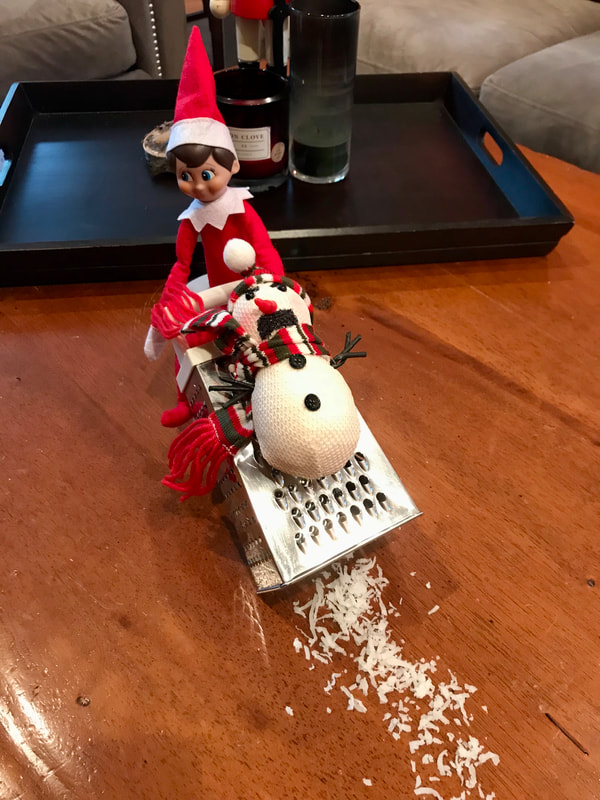
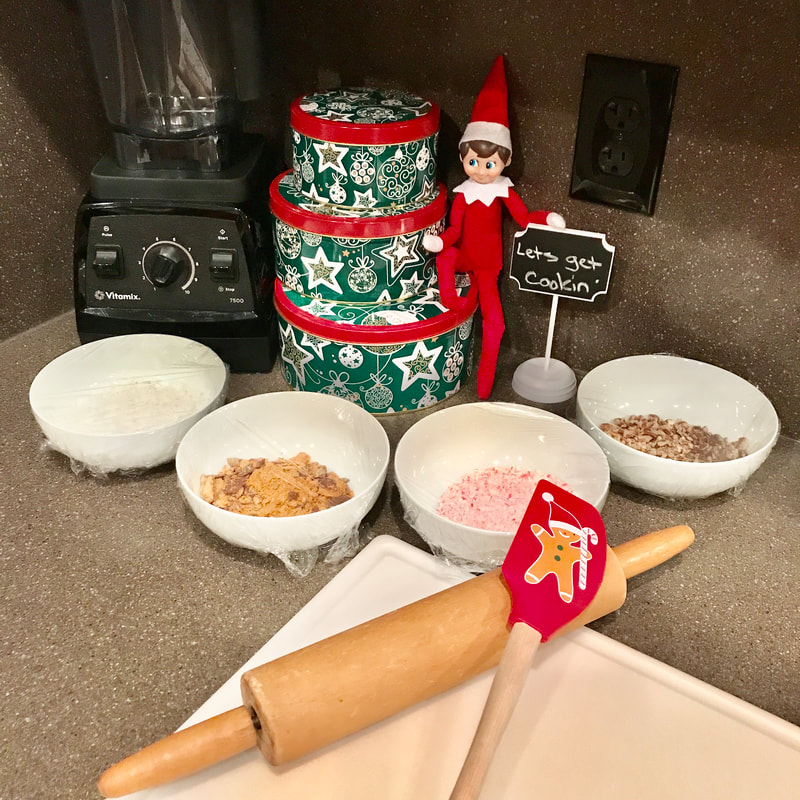
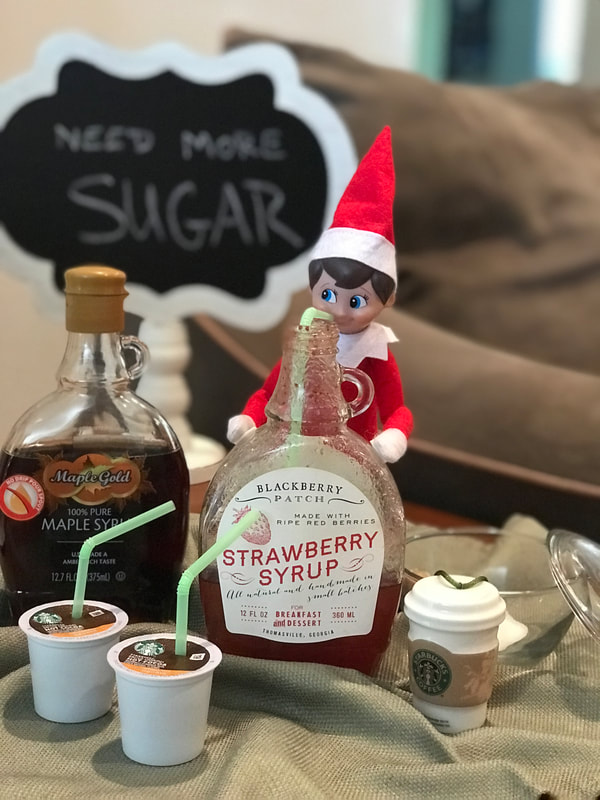
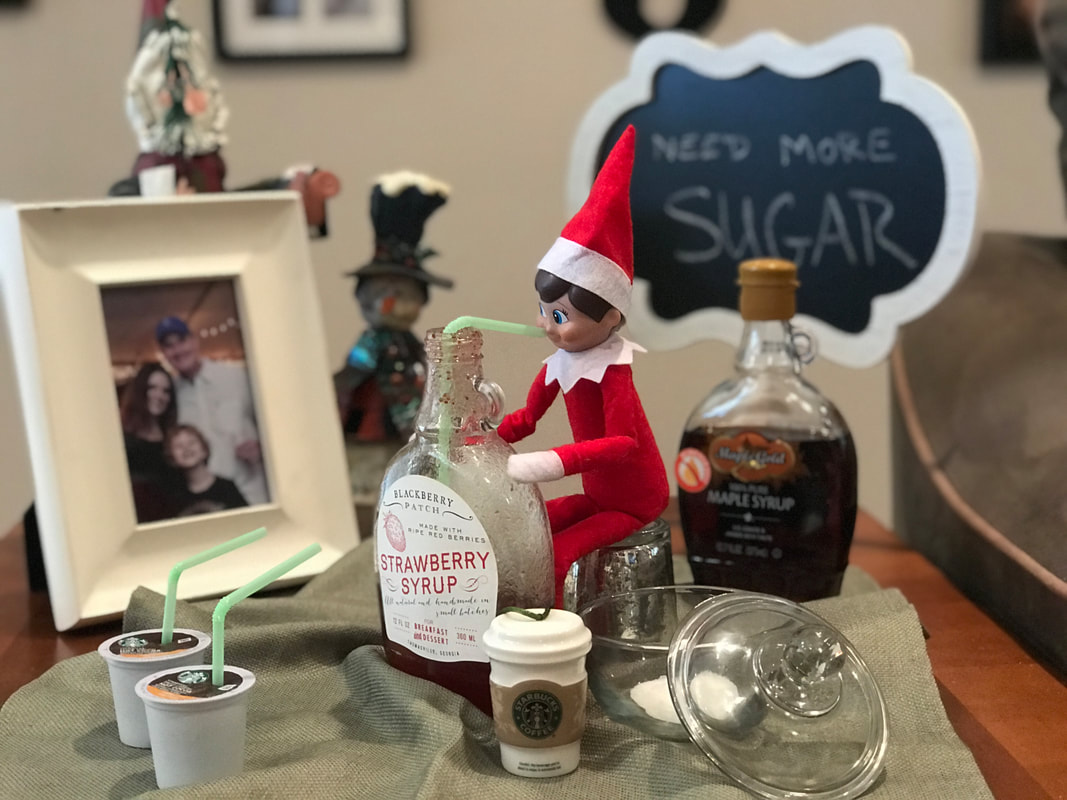
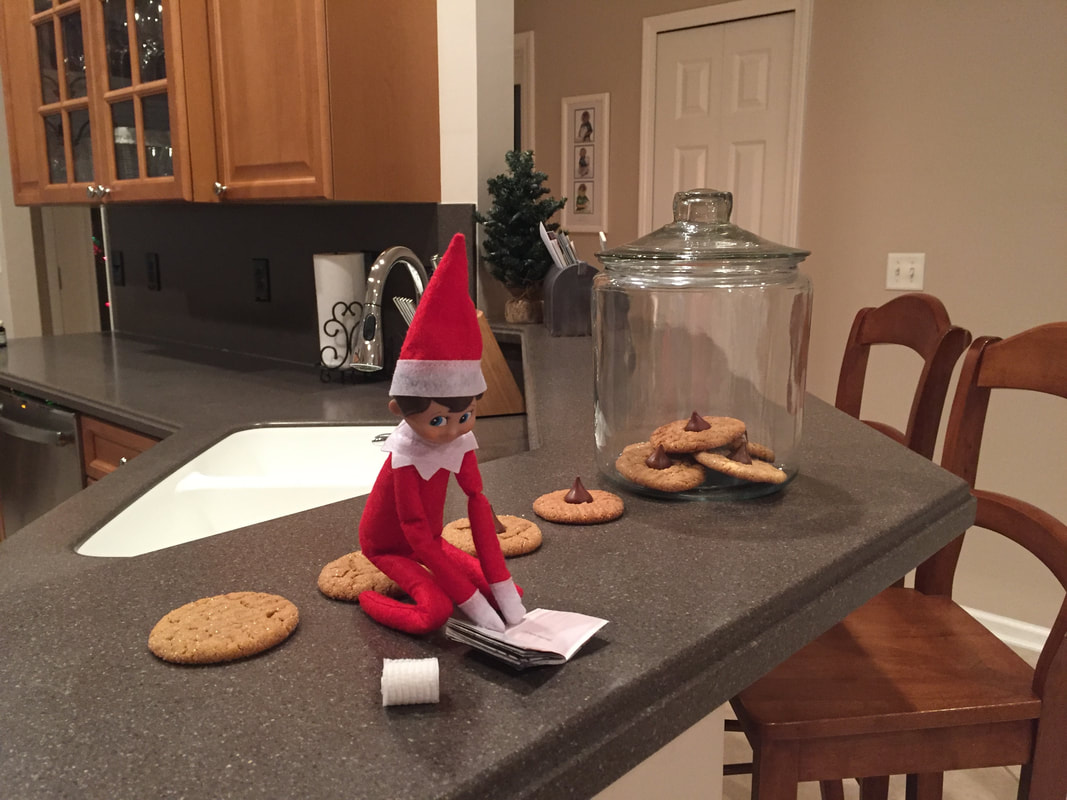
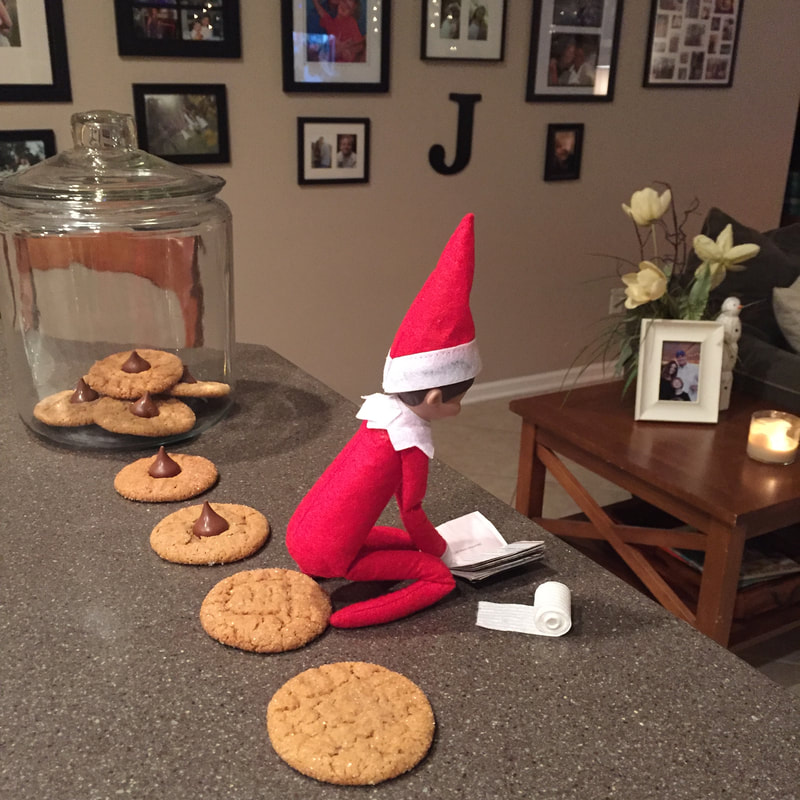
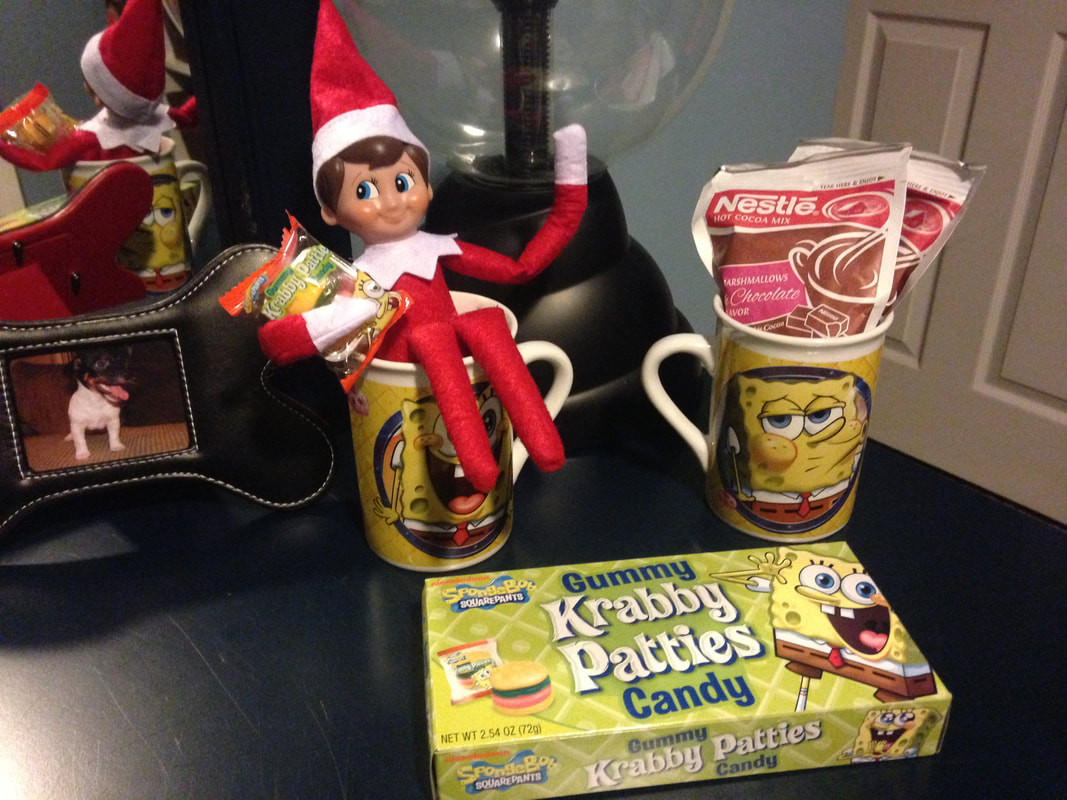
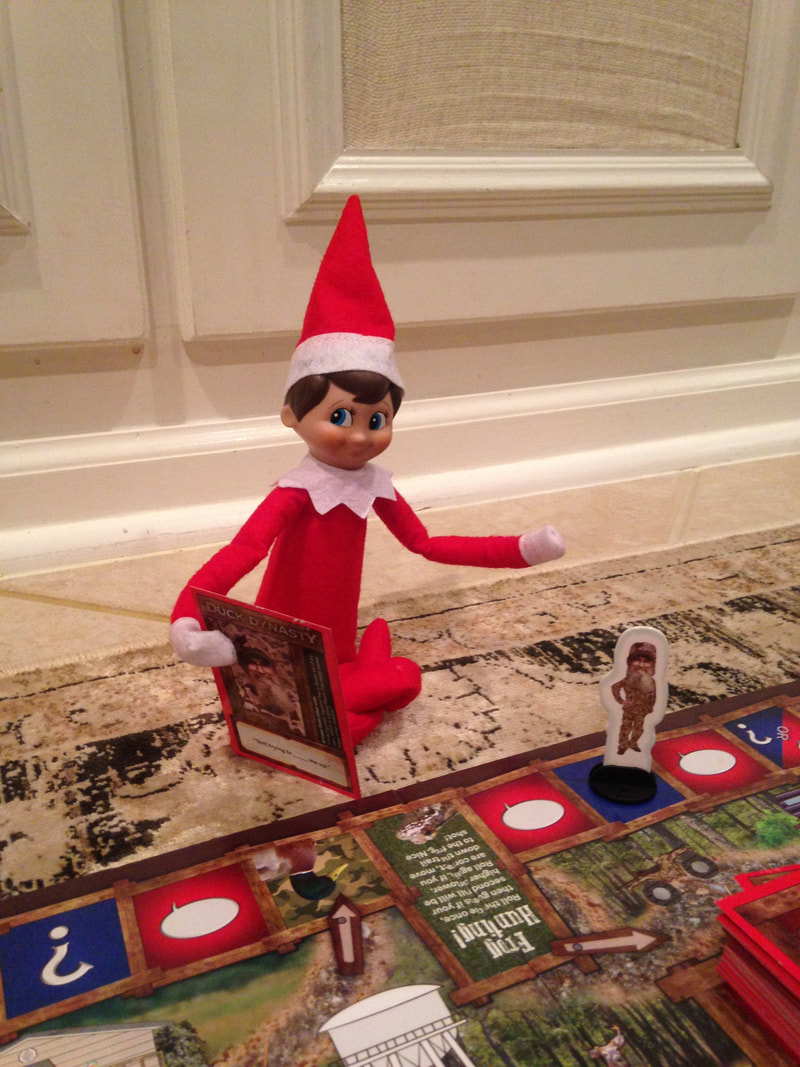
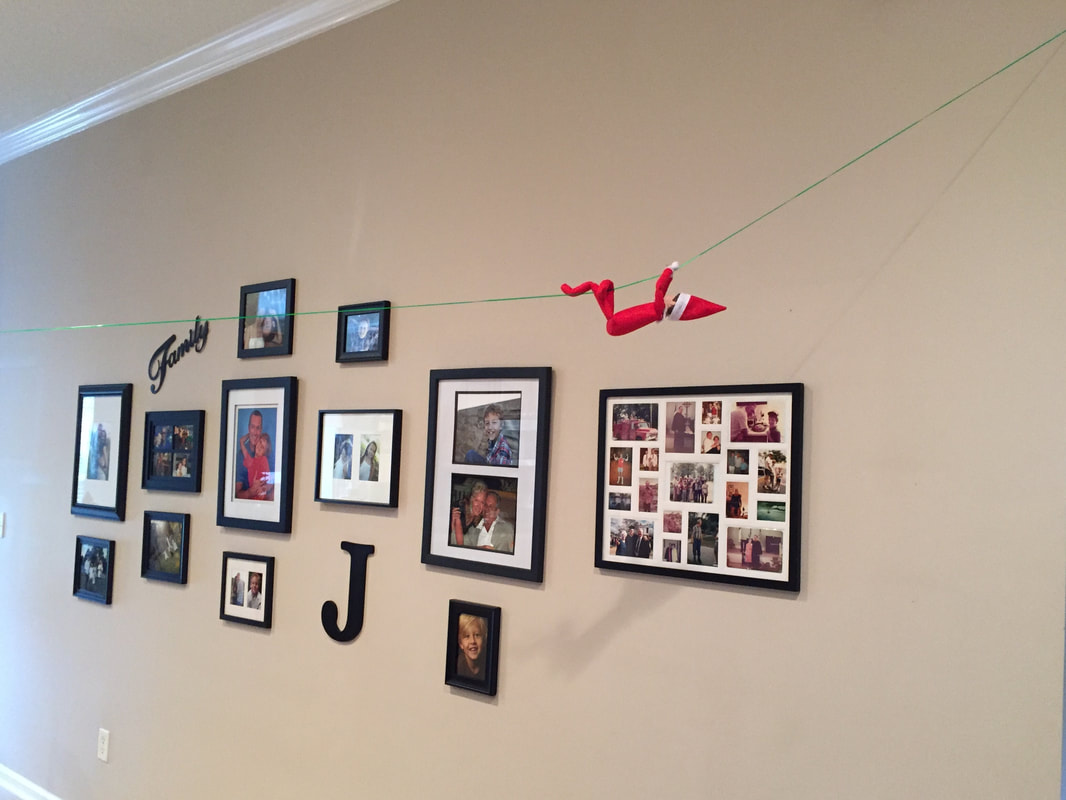
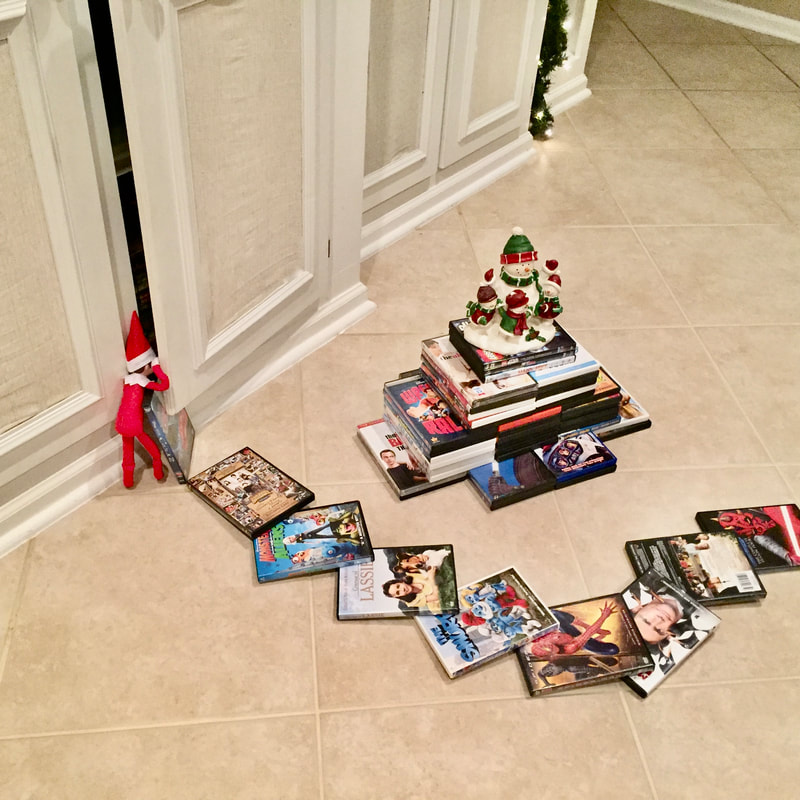
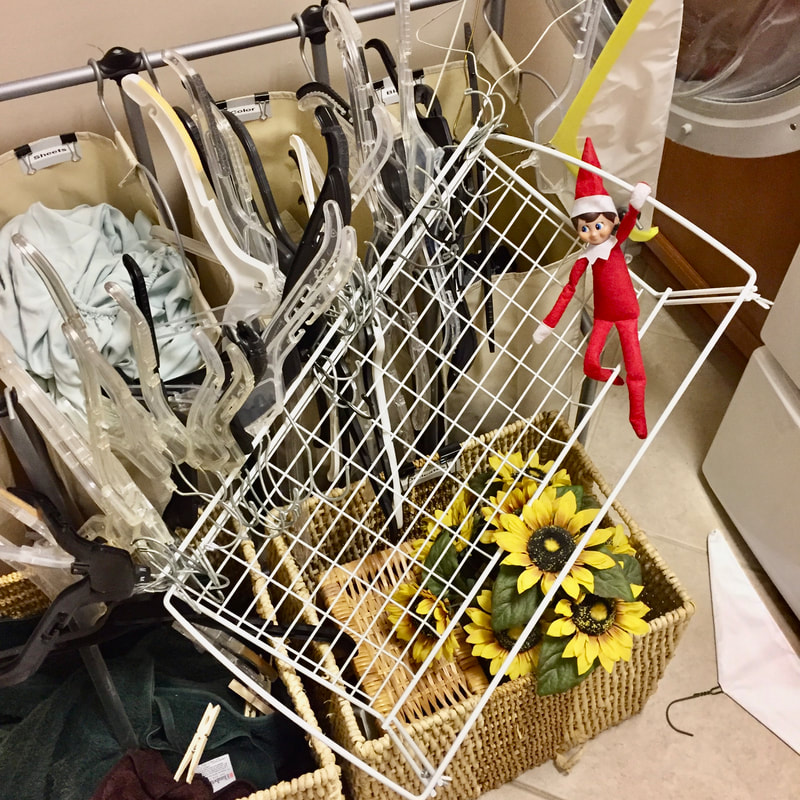
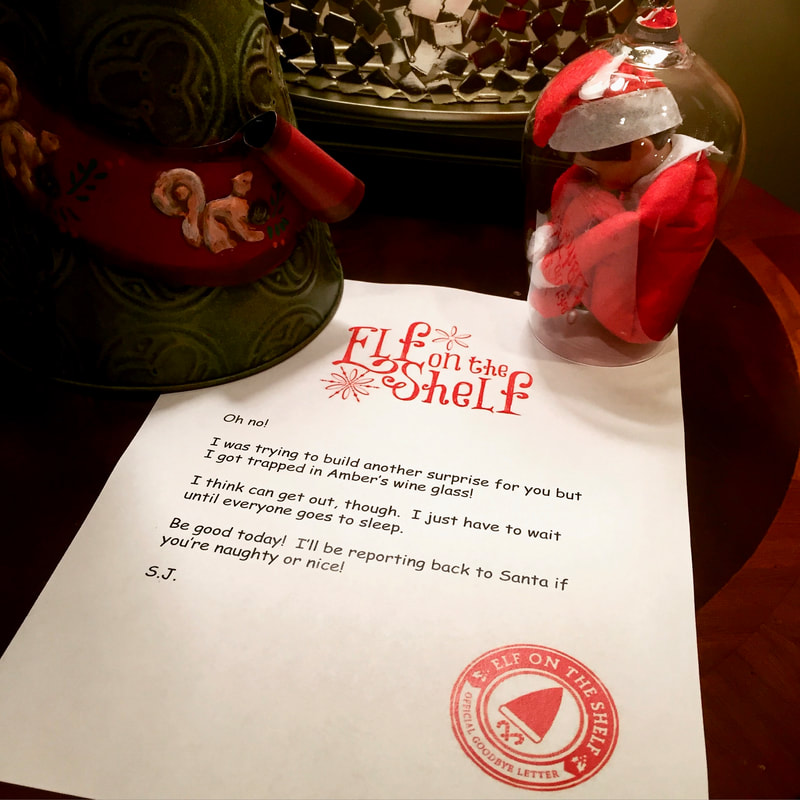
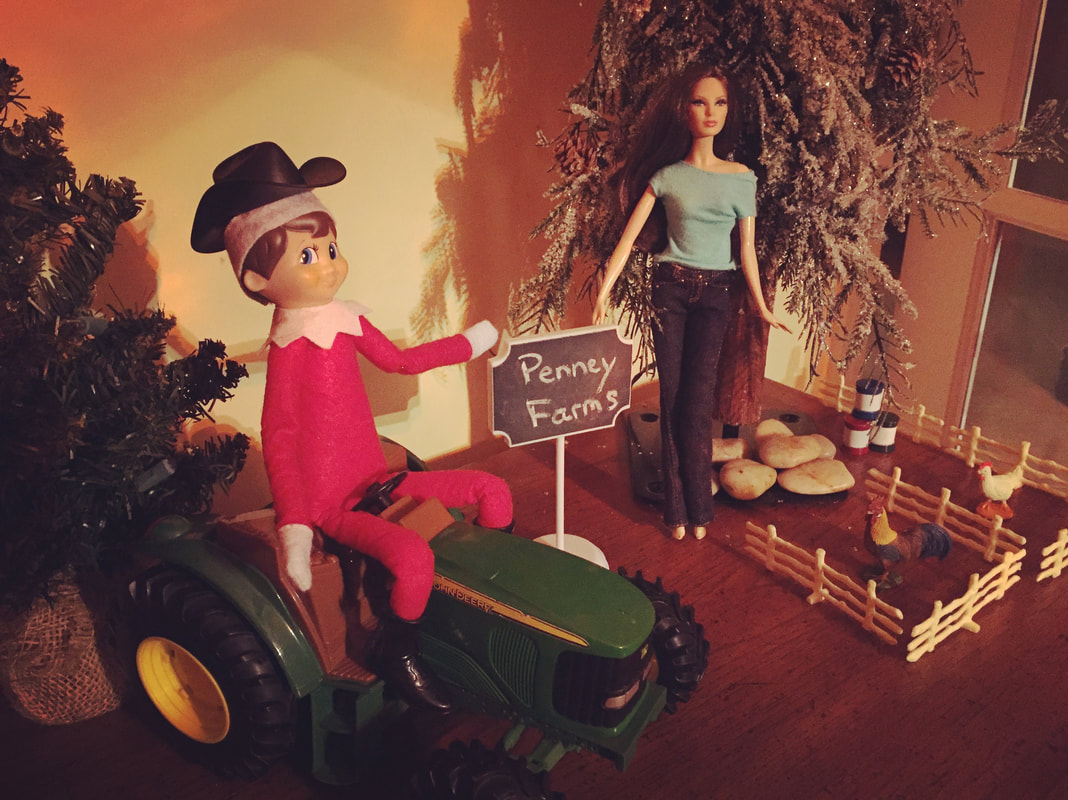
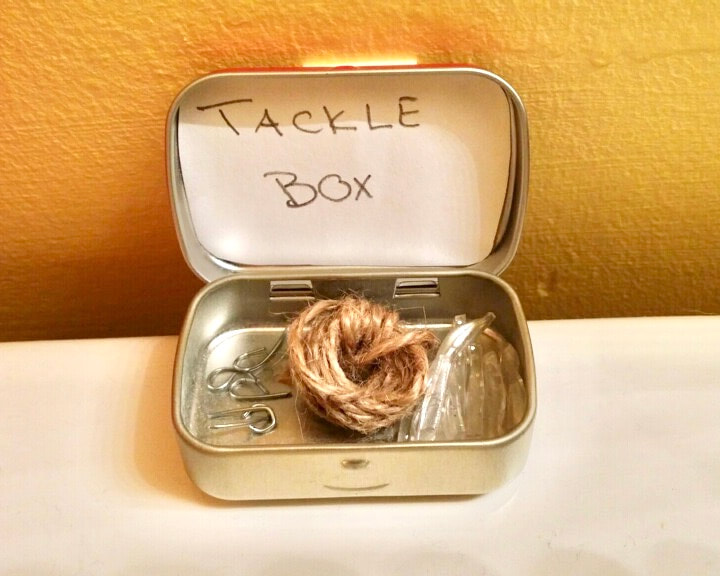
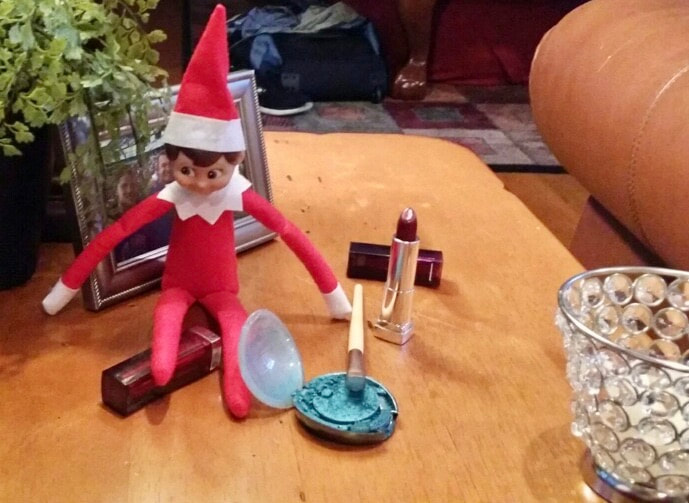
TIP: Make sure the fruit is dry before stacking it with the marshmallows. To assemble a Grinch, place the items on the skewer in this order: Grape Large Marshmallow Half Strawberry (Upside Down) Mini Marshmallow Viola! You just made yourself a Grinch. I paired these cuties with a simple baggie of rainbow colored fruit, and packaged them all in Christmas themed containers. 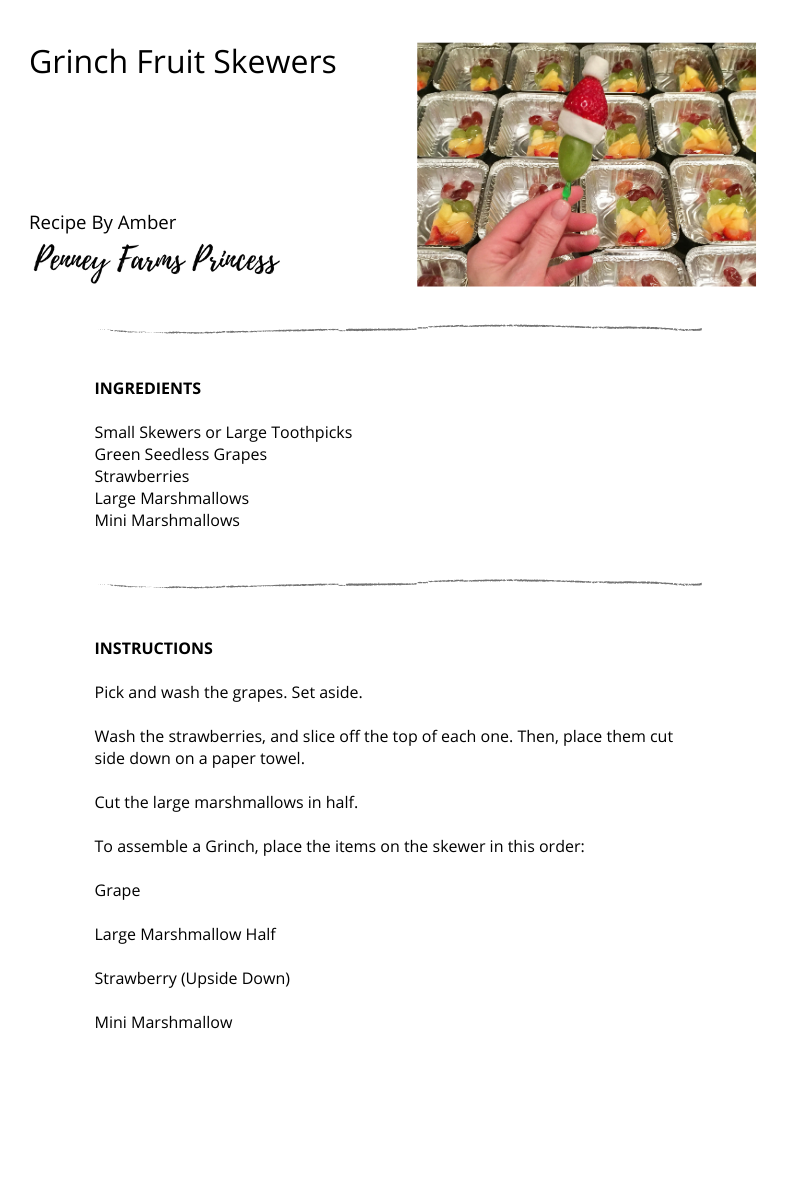  Our family had so much fun with the Elf on the Shelf. We started it when he was about 9 years old, and continued it until he was about 13. My son would request the return of SJ, his elf, because “it just wouldn’t be Christmas without him.” Melt. My. Heart. Sweet boy, I would move mountains for you, so if you want an Elf on the Shelf, you’re going to get the best Elf on the Shelf ever. And so we did. If the thought of creating something completely over the top every single night stresses you out, Here are some tips:
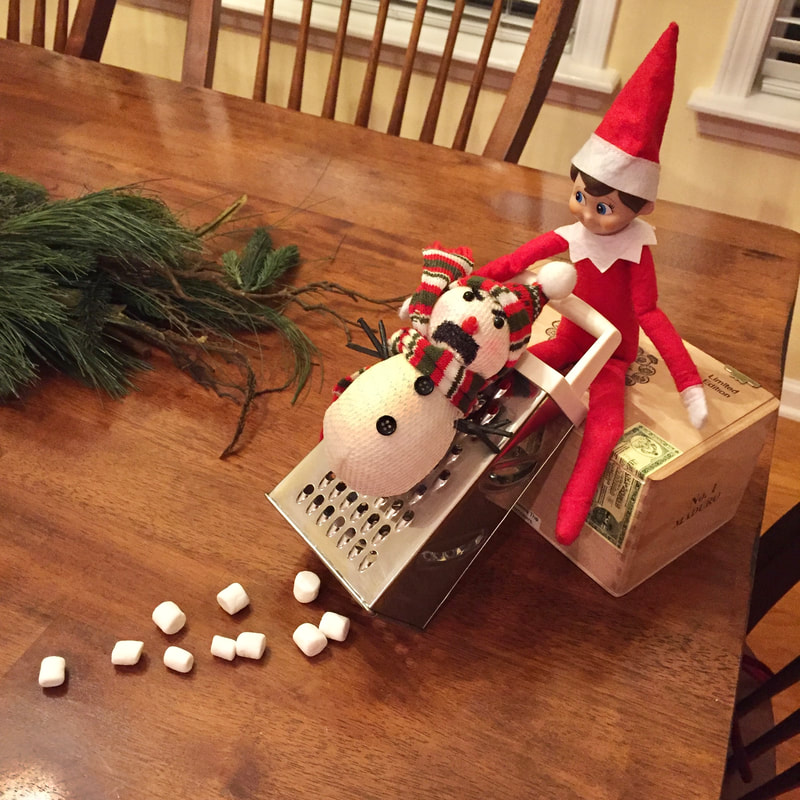
My son would cackle with laughter each morning when he saw the mischief that SJ created. THAT is what it was all about for me. Seeing his face light up was everything. From shredding a snowman, to “making” cookies SJ created some pretty fun memories for our family. The introduction of our Elf on the Shelf, SJ. Some of my favorites... When your child visits the other parent... We have our son the majority of the time, but when he would visit his biological mother, I would come up with cute ways for SJ to let my son know that he'd be right there waiting for him when he came back home. Free Downloads for YouMerry Christmas y'all!  On the years where my stepson isn’t with us for Thanksgiving, I prepare Thanksgiving twice. Once for him so he can have a nice Thanksgiving dinner with family, and then I prepare a second feast on Thanksgiving day.
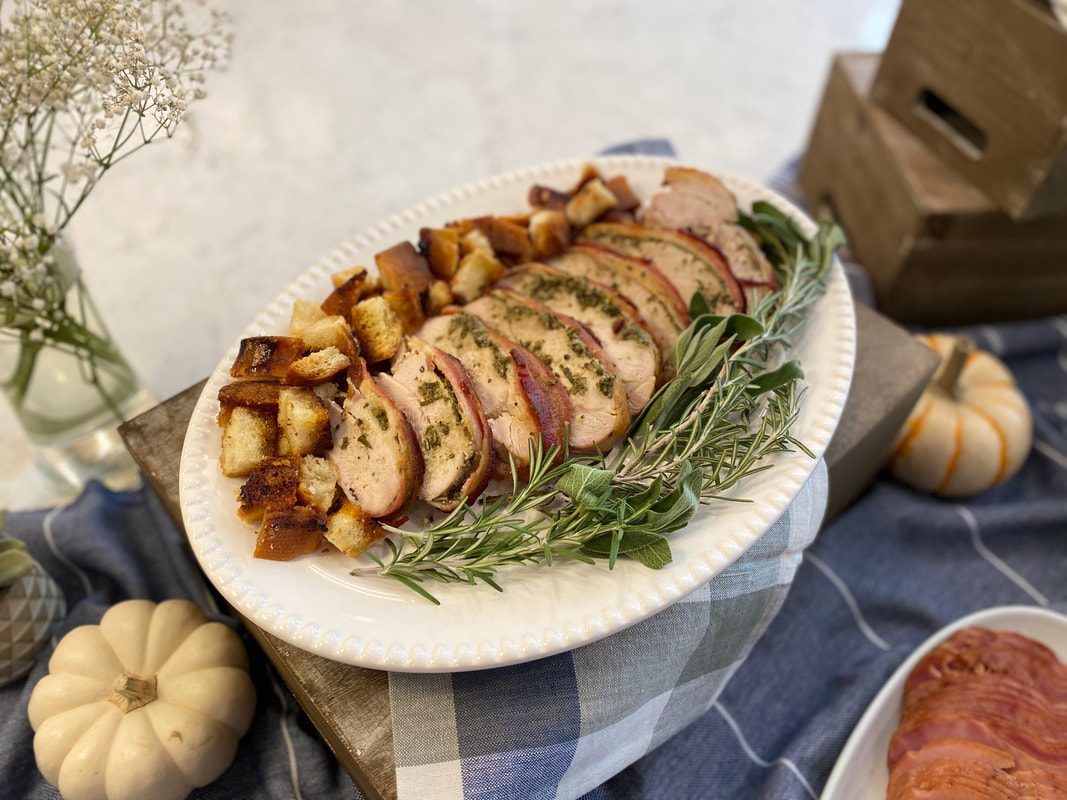
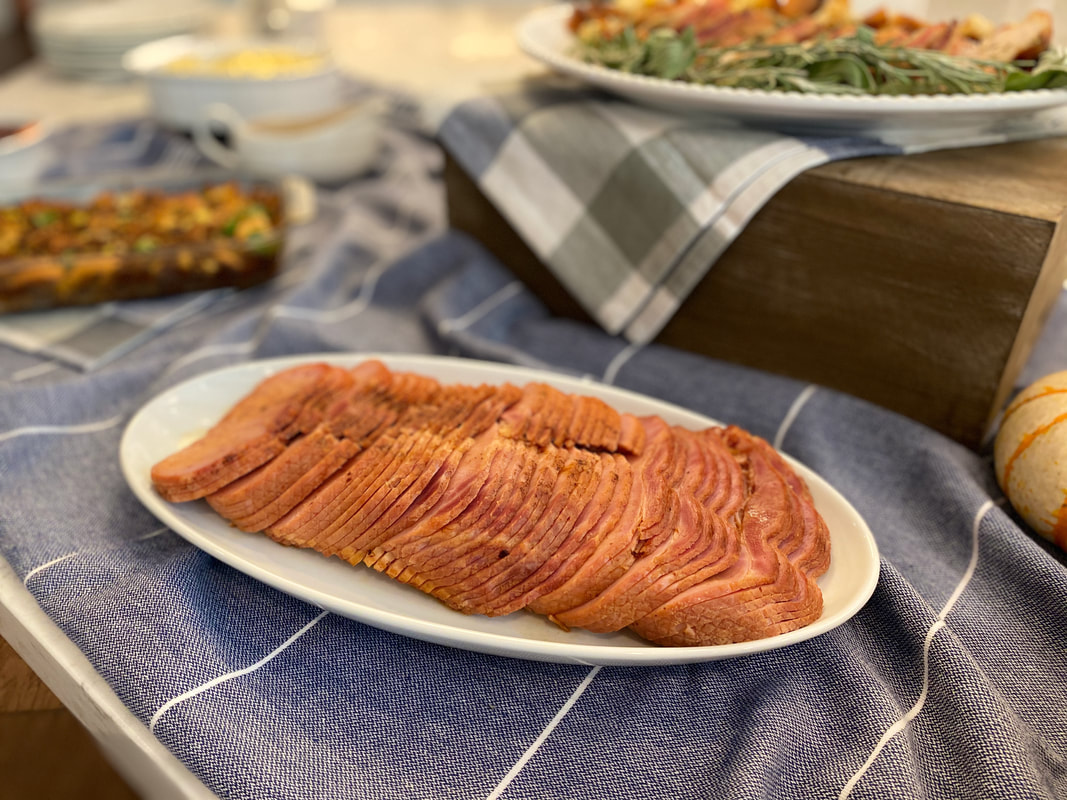
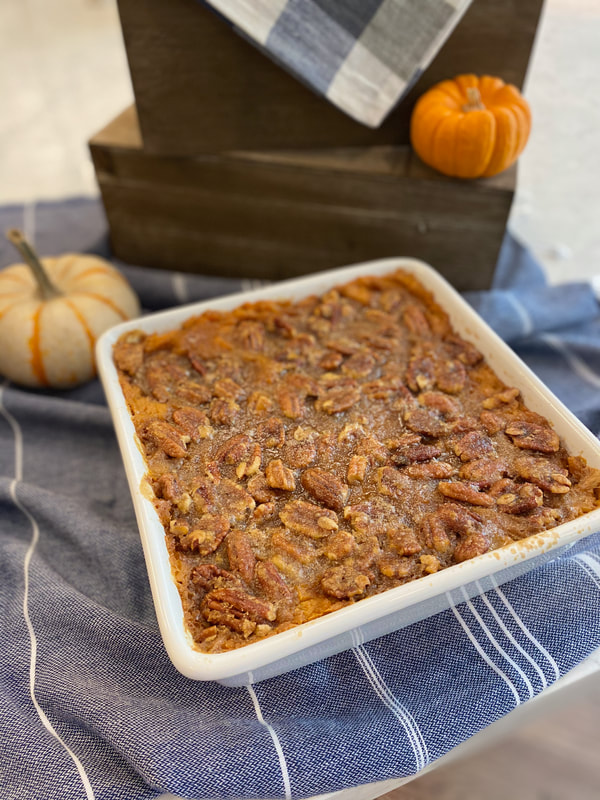
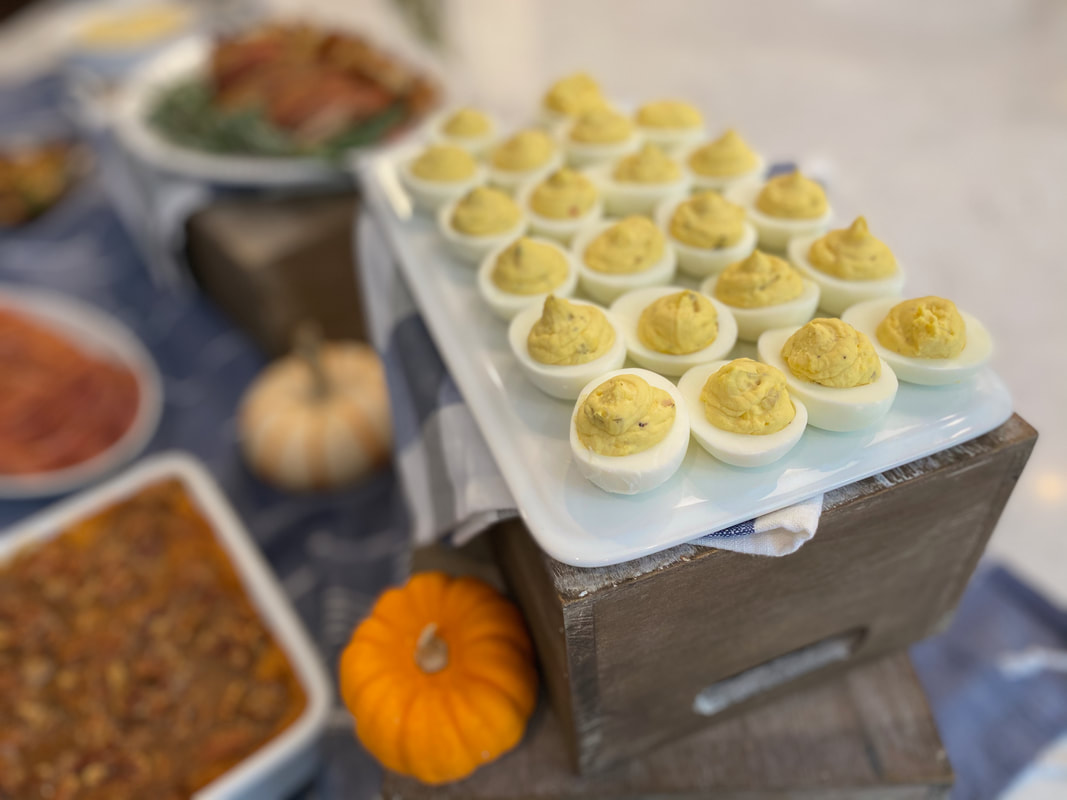
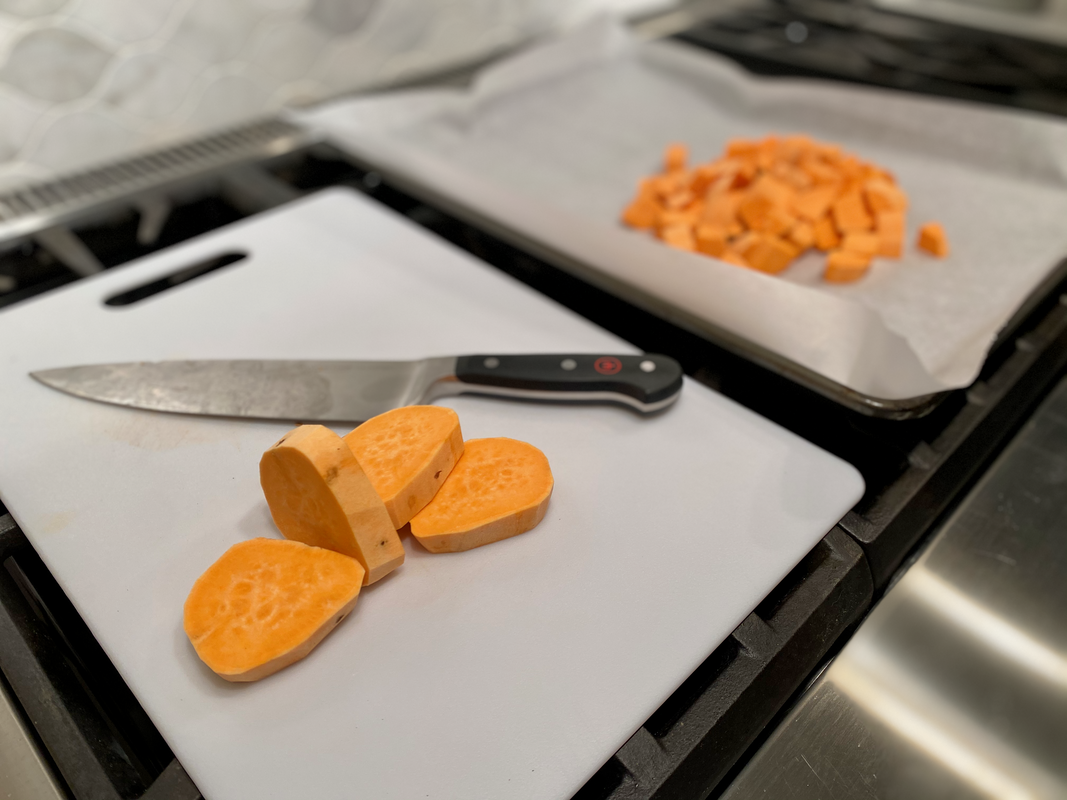
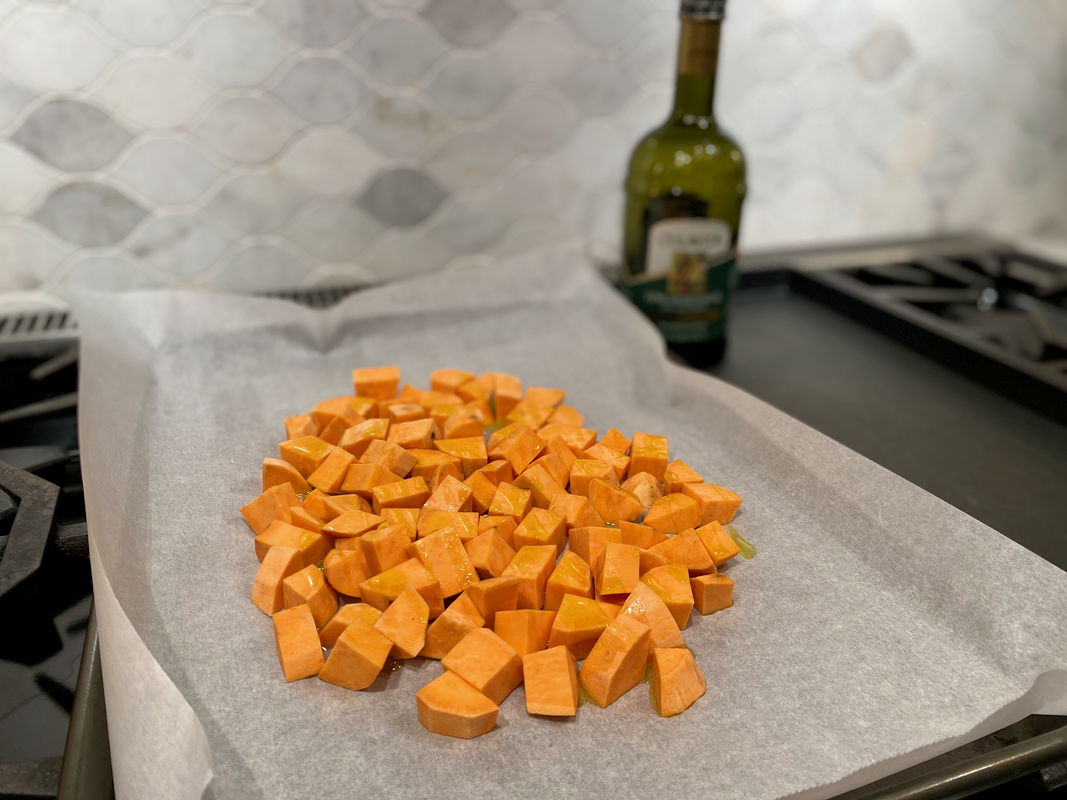
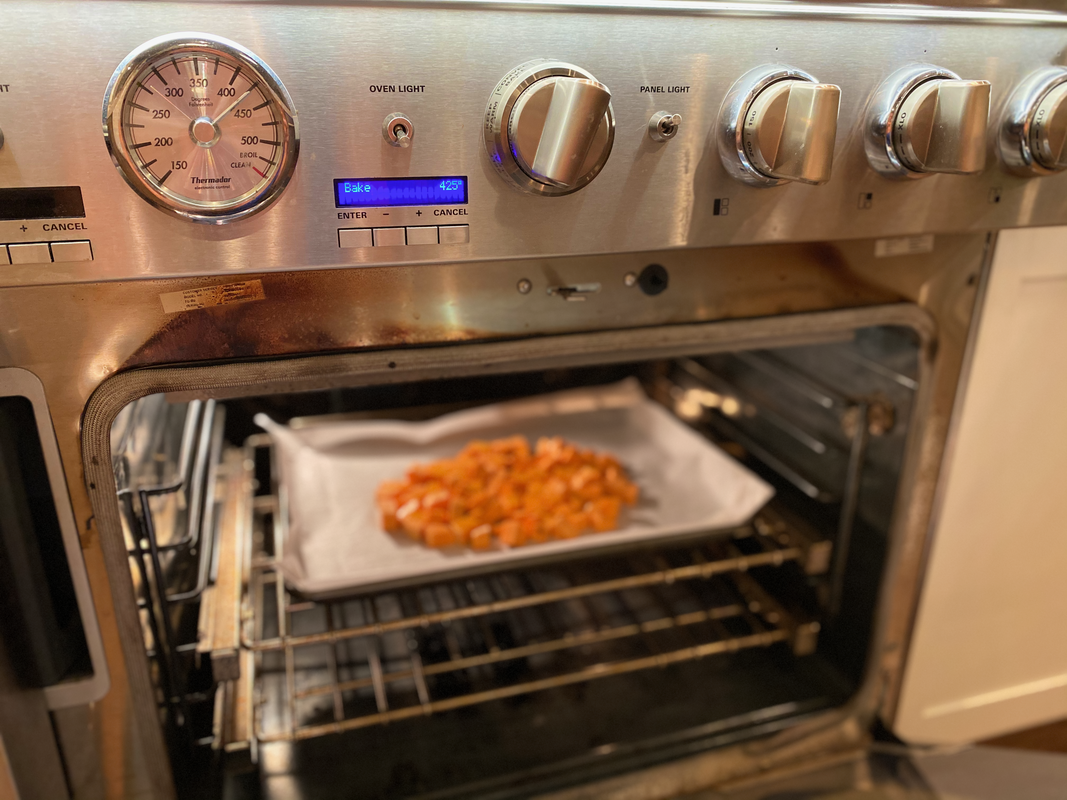
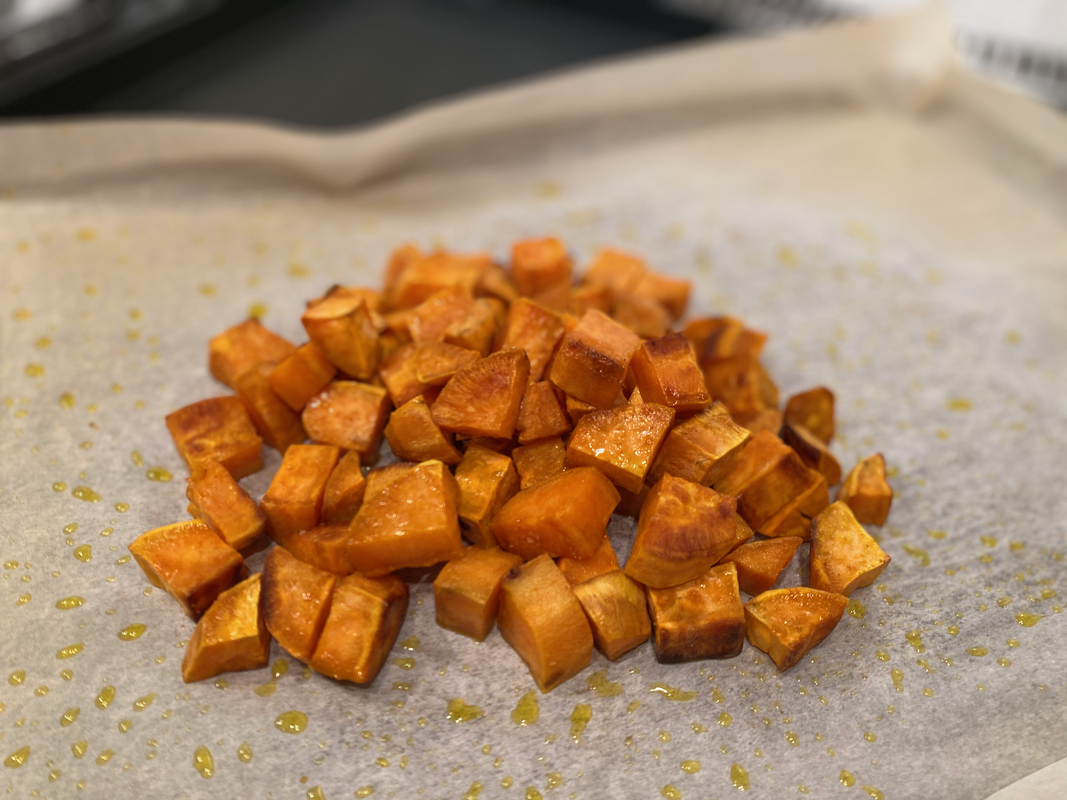
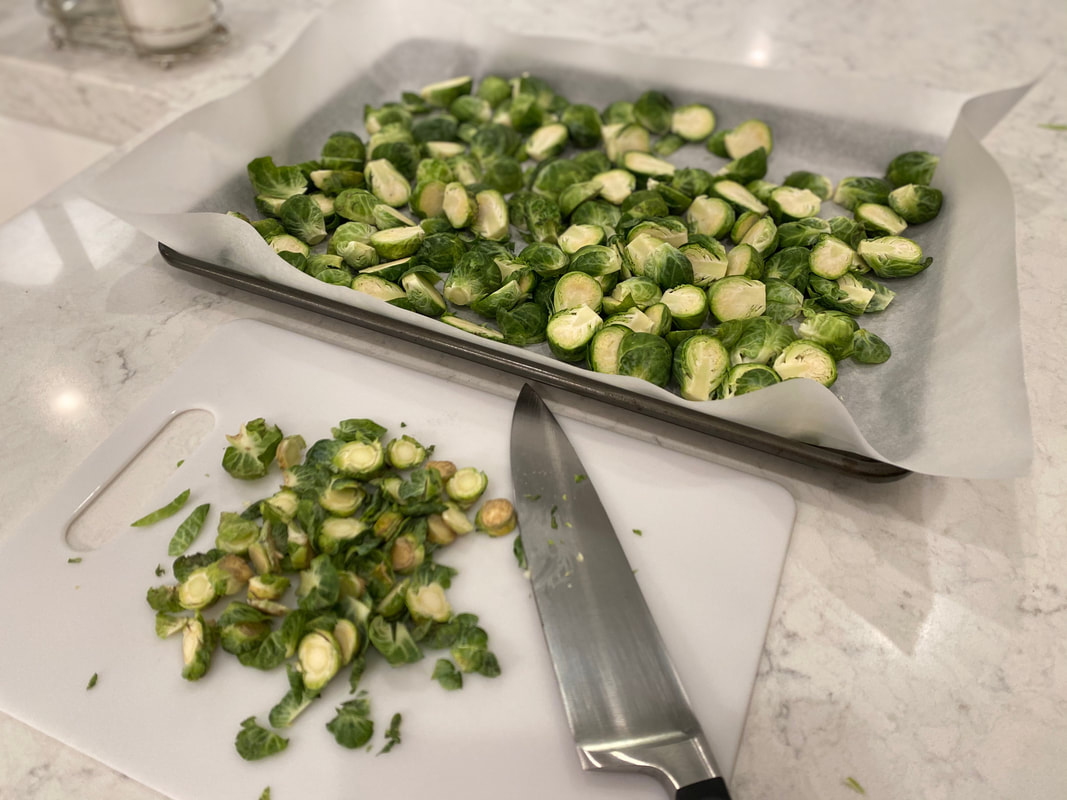
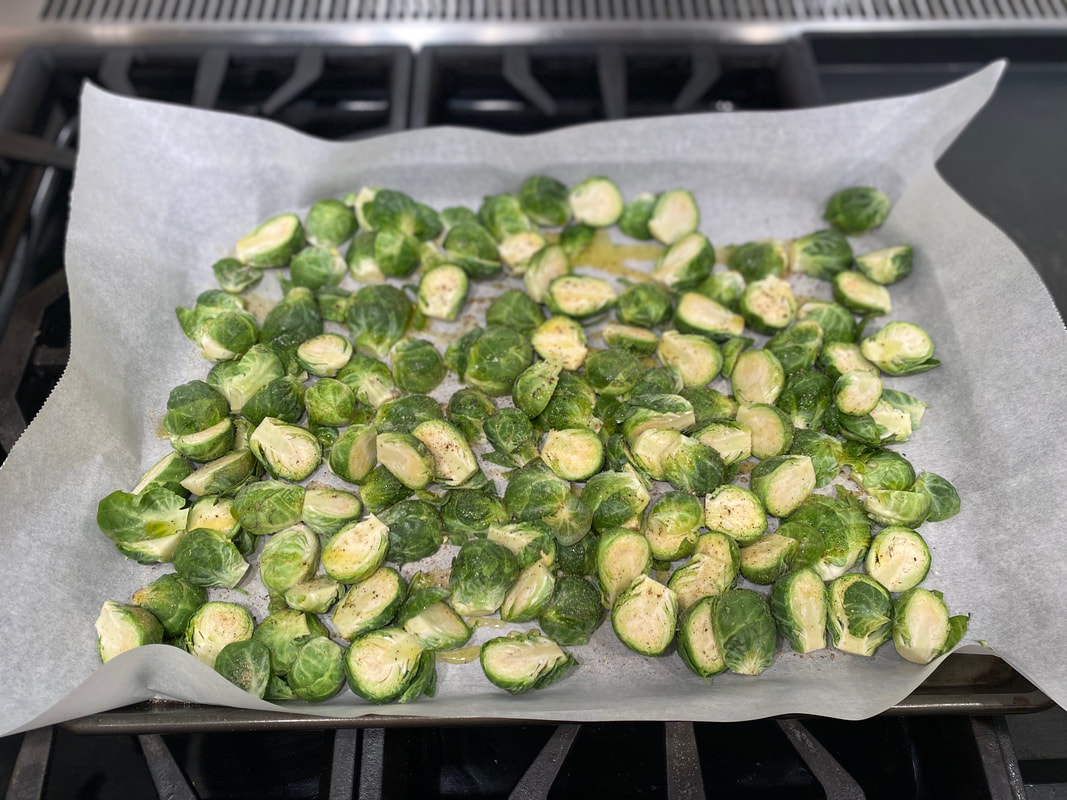
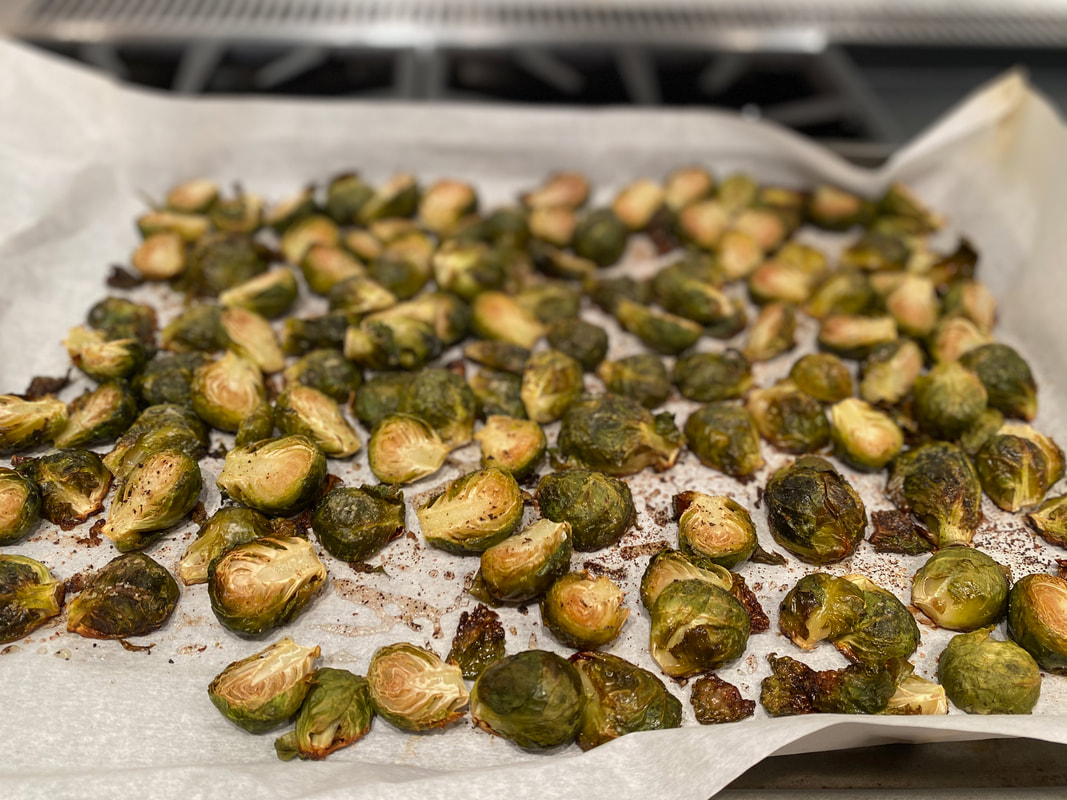
I take him to doctor appointments, go to parent teacher meetings, and make his meals. I teach him right from wrong, table manners, how to say yes ma’am, no sir and y’all. I take care of him when he’s sick, encourage him when he’s down, and I love him unconditionally. To all of my fellow step parents out there… I see you. I know how much you carry on your shoulders and the heaviness in your heart. Don’t stop. Keep charging forward. Keep loving that child unconditionally. You’re making a difference. Love. Never. Fails. Stepmom Support If you’re a stepmom and looking for support, I am a huge fan of Stepmom Magazine. It’s an incredible resource that talks about tough topics, helpful tools, support and encouragement. “Because even when it’s good… it’s complicated.” 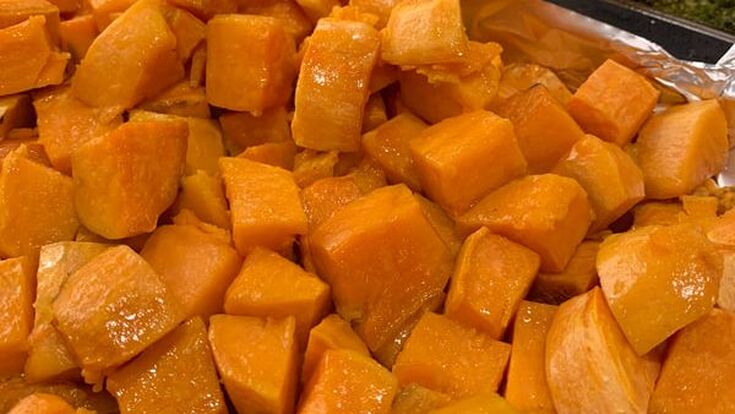 It doesn’t get any easier than this folks. Big Strong Handsome doesn’t typically eat white potatoes, but he’ll eat sweet potatoes and purple potatoes. So, roasted sweet potatoes is something I make almost every week. This is a super simple way to prepare them, and they’re delicious every time. 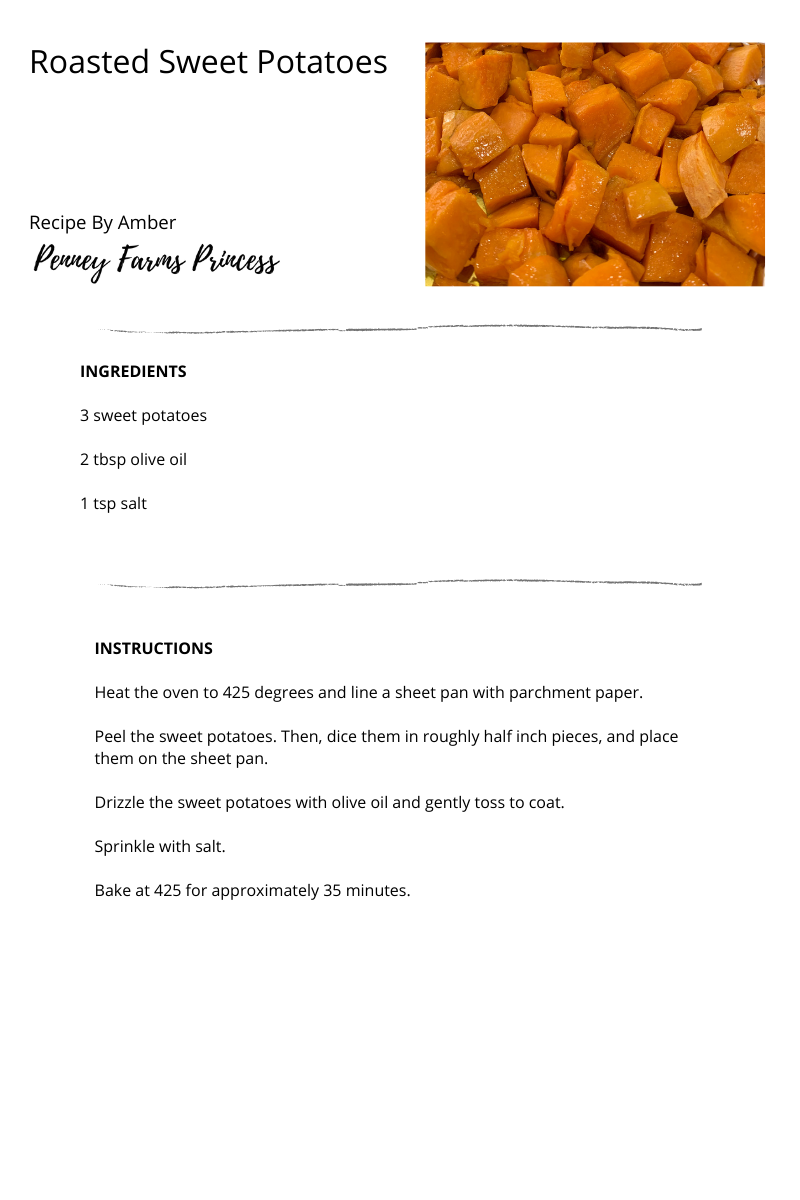 
 |
AuthorAmber Categories
All
Archives
August 2023
|


 RSS Feed